Generating Documentation with Doxygen
A step-by-step guide to integrating Doxygen into your CMake build process for automated C++ documentation.
In this chapter, we saw how add_custom_target() allows us to create standalone utility targets for developer-centric tasks like code formatting. This concept of creating named actions is a powerful way to automate your entire development workflow.
One of the most valuable automations you can add to a project is documentation generation. Good documentation is essential for maintainable software, but keeping it up-to-date manually is a chore. The best documentation is the kind that lives right next to the code it describes and can be generated with a single command.
This lesson explores how to integrate Doxygen into a CMake project. We'll learn how to install Doxygen, how to write documentation comments, and how to create a docs target that fully automates the process.
What is Doxygen?
Doxygen is a documentation generator. It's a tool that parses your source files and extracts specially formatted comments, along with information about your code's structure (classes, functions, namespaces, etc.), to produce a set of documentation.
The output is highly configurable and can be generated in multiple formats, most commonly HTML, but also LaTeX for high-quality PDFs and man pages for command-line tools.
The core philosophy of Doxygen is that documentation should live with the code. By embedding documentation directly in comments, you make it easier for developers to keep it synchronized with the code it describes. When a function changes, its documentation is right there to be updated.
Installing Doxygen
Before we can use Doxygen, we need to install it. The process is simple and available for all major platforms from the official site.
Doxygen is also available on most package managers:
- Homebrew:
brew install doxygen. - Debian/Ubuntu using
apt:sudo apt install doxygen. - Chocolatey:
choco install doxygen.install. - MSYS2 UCRT64 using
pacman:pacman -S mingw-w64-ucrt-x86_64-doxygen
After installation, we can open a new terminal and verify doxygen is available by checking its version:
doxygen --versionYou should see output indicating the version number, for example, 1.14.0:
1.14.0Finding Doxygen using CMake
As with our previous example using clang-format, we can ask CMake to find doxygen using the find_program() command. To keep things organized, we'll set up Doxygen from a new cmake/Docs.cmake file and then include() it in our root CMakeLists.txt file:
Files
We can test this by running the configure step from our build directory:
cmake .....
-- Found Doxygen at D:/msys64/usr/bin/doxygen.exe
...We can use this DOXYGEN_EXECUTABLE to interact with Doxygen on the command line in much the same way we used CLANG_FORMAT_EXE earlier in the chapter.
add_custom_target(doxygen_things
COMMENT "Doing doxygen things..."
COMMAND ${DOXYGEN_EXECUTABLE} --version
)However, by default, CMake also includes a FindDoxygen helper that let's us load Doxygen through a find_package() command. This approach provides us with some additional CMake-specific variables and functions that we'll use later:
cmake/Docs.cmake
cmake_minimum_required(VERSION 3.23)
find_package(Doxygen)
if(Doxygen_FOUND)
message(STATUS "Found Doxygen Version "
"${DOXYGEN_VERSION} at ${DOXYGEN_EXECUTABLE}")
endif()cmake .....
-- Found Doxygen Version 1.14.0 at D:/msys64/usr/bin/doxygen.exe
...Note that DOXYGEN_EXECUTABLE is technically deprecated when using find_package(Doxygen) and may stop working in the future. The find_package() variation instead provides modern CMake targets and functions that we can use to interact with Doxygen. We're just using DOXYGEN_EXECUTABLE in this example to show the parallels between each approach.
Installing Doxygen using Conan
If we don't want to install Doxygen through our system tools, we can instead use Conan if preferred. However, Doxygen is not a runtime dependency of our project in the same way that libraries like spdlog and tabulate might be.
As such, it should not go in the [requires] section of our conanfile.txt. Doxygen is a tool that we use as part of the building of our project - not something we ship - so it should instead be placed in a [tool_requires] section:
conanfile.txt
[tool_requires]
doxygen/1.14.0
[generators]
CMakeDeps
CMakeToolchainWe can then run a conan install in the normal way. From the project root:
conan install . --output-folder=build --build=missingConan will not automatically add the doxygen executable to our system path. Unless we do that manually, we won't have access to some useful utilities that are available through the doxygen command-line interface.
However, as long as we provide the generated conan_toolchain.cmake file to CMake at the configure step, our find_program() and find_package() commands will work as normal within our build:
Files
We can configure this from our project root to ensure everything is working:
cmake --preset conan...
-- Doxygen: /Users/greg/.conan2/p/b/doxyg4821aef89cf1f/p/bin/doxygen
-- Doxygen Version: 1.14.0
...Documenting Code with Doxygen Syntax
Doxygen recognizes several styles of comments, but the most common for C++ is the Javadoc style. A Doxygen comment block starts with /** and ends with */, or uses /// for single-line comments.
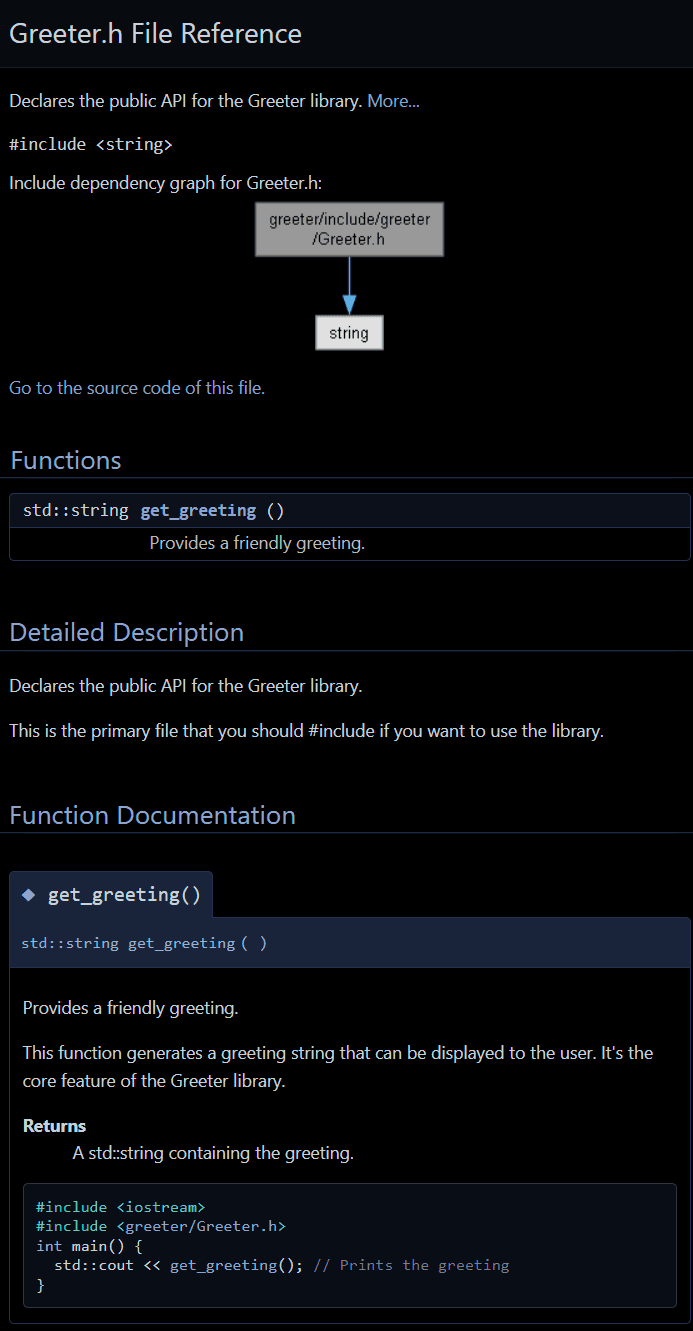
Let's document the public Greeter.h header in our GreeterLib. We do this by adding our specially formatted comments at the top of the file, and above the function declarations we want to document:
greeter/include/greeter/Greeter.h
/**
* @file Greeter.h
* @brief Declares the public API for the Greeter library.
*
* This is the primary file that you should #include if
* you want to use the library.
*/
#pragma once
#include <string>
/**
* @brief Provides a friendly greeting.
*
* This function generates a greeting string that can be
* displayed to the user. It's the core feature of the
* Greeter library.
*
* @return A std::string containing the greeting.
*
* @code
* #include <iostream>
* #include <greeter/Greeter.h>
* int main() {
* std::cout << get_greeting(); // Prints the greeting
* }
* @endcode
*/
std::string get_greeting();Let's break down the special Doxygen commands (which start with @ or \\):
@file: This is the simplest way we can signal to Doxygen that this file is part of the public API of our library, so should be included in the documentation it generates@brief: A short, one-line summary of the file or function's purpose. This is often used in lists and quick-reference sections. Optionally, the paragraphs that follow provides a more detailed description.@return: Describes what the function returns.@code/@endcode: A block that will be formatted as a code sample in the final documentation.
This is just a tiny fraction of Doxygen's capabilities. You can document parameters with @param, create groups of related functions, add notes with @note, and much more. The official docs list all the possibilities.
For now, this basic documentation of our get_greeting() function is enough to demonstrate the process of integrating Doxygen with CMake.
Integrating with CMake
The FindDoxygen helper powering our find_package(Doxygen) command provides the convenient doxygen_add_docs() function, which wraps all the logic for creating a documentation target. At its simplest, you give it a name for the target and a list of files or directories to scan.
Let's add it to our Docs.cmake module. We'll create a target named docs and tell it to scan our app and greeter source directories.
cmake/Docs.cmake
cmake_minimum_required(VERSION 3.23)
find_package(Doxygen)
if(Doxygen_FOUND)
message(STATUS "Found Doxygen Version "
"${DOXYGEN_VERSION} at ${DOXYGEN_EXECUTABLE}")
doxygen_add_docs(docs
${PROJECT_SOURCE_DIR}/greeter/include
COMMENT "Generating docs with Doxygen..."
)
endif()This single command does several things for us:
- It creates a custom target named
docs. - It configures Doxygen to scan files in the provided directories for documentation comments. We're just scanning
/greeterin this example, but we could add more. - If we don't provide a configuration file, it generates a default one on the fly. We cover configuration files later in the lesson.
Building and Viewing the Documentation
With our Docs.cmake module set up and included in our root CMakeLists.txt file, let's configure our project and build our docs. From our build directory:
cmake ..Now, we can build our new docs target.
cmake --build . --target docs[build] Generating API documentation with Doxygen...
... (Doxygen's output) ...This will create a html/ directory inside our build/ folder. If we open the index.html file in a web browser, we'll see our generated documentation, ready to be explored:
This lets anyone using our library browse through our documentation in a clean, organized way. Our documentation is also a website, so we could easily upload the contents of this /build/html directory on the internet for anyone to browse.
Configuring Doxygen using a Doxyfile
Doxygen's behavior is controlled by a configuration file, by default named Doxyfile. If doxygen_add_docs() can't find this file, it just uses a default configuration it manages internally.
A Doxyfile can set hundreds of settings that controls every aspect of the process, from what files Doxygen should scan to what colors should be used in the generated documentation.
You can generate a default Doxyfile by running doxygen -g in your terminal.
doxygen -gConfiguration file 'Doxyfile' created.This will create a large file that you can copy, paste, and edit as needed. The file is heavily commented, explaining what each option does.
In CMake projects, we don't usually create the Doxyfile directly. Instead, we ask CMake to generate it as part of the configuration step.
The first step is to create a template version of a Doxyfile. We typically call this template Doxyfile.in, whick CMake will ingest and modify to create the final Doxyfile. This allows us to control the configuration through CMake, meaning we can inject CMake variables from our build into the Doxyfile.
Let's create a docs directory in our project root and add our template file to it:
docs/Doxyfile.in
# High Level Settings
PROJECT_NAME = "@PROJECT_NAME@"
PROJECT_VERSION = "@PROJECT_VERSION@"
OUTPUT_DIRECTORY = "@CMAKE_CURRENT_BINARY_DIR@/docs"
# Which files should be documented?
INPUT = "@PROJECT_SOURCE_DIR@/greeter/include" \
"@PROJECT_SOURCE_DIR@/some-other-lib/include"
RECURSIVE = YES
# Styling
HTML_COLORSTYLE = TOGGLE
HTML_COLORSTYLE_SAT = 80
SHOW_INCLUDE_FILES = NOIn this example, we:
- Provide our project name and version, and where the docs should be generated. We've moved the output to the
/docsfolder within our/buildto keep things more organized. - Provide a list of the folders that Doxygen should document. The
some-other-libexample doesn't exist in our case, but is included to show how we can document multiple directories. TheRECURSIVEsetting asks Doxygen to also explore subdirectories of these inputs. - Provide some styling adjustments. The
HTML_COLORSTYLEbeing set toTOGGLEcauses the documentation to show a button to switch between light mode and dark mode.HTML_COLORSTYLE_SATchanges the saturation in a range from 0 (grayscale) to 255 (maximum vibrancy).SHOW_INCLUDE_FILESbeing set toNOhides the list of files that our headers depend on, such as<string>.
This is just an example configuration - Doxygen is hugely configurable. Remember, we can see a full list of options and what they do from the file generated by doxygen -g or, alternatively, from the official docs.
The key part to note for the CMake integration are the @VARIABLE@ placeholders. When we process this file with CMake, it will replace these placeholders with the values of the corresponding CMake variables.
Using configure_file()
Let's process our Doxyfile.in template to generate a final, configured Doxyfile. We do this with the configure_file() command. This is a generic, CMake-provided command for generating any type of configuration file from a template, not just doxyfiles.
We provide it with an input template (Doxyfile.in in this case) and an output file path. It reads the input, replaces all @VAR@ and ${VAR} placeholders with the corresponding CMake variable values, and writes the result to the output file.
configure_file(
"MyTemplateFile.in"
"MyOutputFile.txt"
)The @ONLY Argument
The fact that configure_file() replaces placeholders using both the @VAR@ and ${VAR} syntax can be problematic. Some external tools use ${VAR} as their own syntax for interpolating variables, and this includes Doxygen's Doxyfile format.
Without intervention, CMake's configure_file() command would see something like ${DOXYGEN_VAR} in our template, try to substitute it with a CMake variable called DOXYGEN_VAR, find nothing, and replace it with an empty string. This would break our Doxygen configuration.
Fortunately, configure_file() allows us to pass the @ONLY argument. This means it will only replace placeholders that use the @VAR@ syntax, leaving ${VAR} alone:
configure_file(
"Doxyfile.in"
"Doxyfile"
@ONLY
)Using configure_file() to Generate a Doxyfile
Let's use this to create our Doxyfile. We'll stick to the practice of placing generated files in our build directory - CMAKE_CURRENT_BINARY_DIR - so our project is easier to keep clean.
We'll also provide this file to doxygen_add_docs() using the CONFIG_FILE argument, and we can delete our input argument:
cmake/Docs.cmake
cmake_minimum_required(VERSION 3.23)
find_package(Doxygen)
if(Doxygen_FOUND)
message(STATUS "Found Doxygen Version "
"${DOXYGEN_VERSION} at ${DOXYGEN_EXECUTABLE}")
configure_file(
"${PROJECT_SOURCE_DIR}/docs/Doxyfile.in"
"${CMAKE_CURRENT_BINARY_DIR}/Doxyfile"
@ONLY
)
doxygen_add_docs(docs
# This is now provided in the Doxyfile<d>
${PROJECT_SOURCE_DIR}/greeter/include
CONFIG_FILE "${CMAKE_CURRENT_BINARY_DIR}/Doxyfile"
COMMENT "Generating docs with Doxygen..."
)
endif()With these changes, we can now rebuild our documentation as before, and see our configuration reflected in the output:
cmake --build . --target docs
Summary
Automating documentation is a common hallmark of creating large projects. By integrating Doxygen with CMake, we can turn a tedious manual task into a simple, repeatable command.
Doxygen Basics: Doxygen generates documentation by parsing special comments (/** ... */) in your source code.
CMake Integration:
- Use
find_package(Doxygen)to locate the Doxygen executable. - Use
configure_file()to generate a project-specificDoxyfilefrom your template. - Pass the file to the
CONFIG_FILEargument ofdoxygen_add_docs().
Building Docs: After integrating everything, we can generate up-to-date documentation for your project by running a single command: cmake --build . --target docs.
Configuration as Code: Doxygen can be configured using a Doxyfile. We can use CMake to generate this by creating a Doxyfile.in template, and inject variables into the output with @VAR@ placeholders.
Automated Testing and CTest
Learn the fundamentals of automated testing in C++ with CTest. Create your first test suite, register tests with add_test(), and run them with the ctest command.