Cross-Compilation with Conan
Learn to cross-compile C++ projects with Conan, using build and host profiles to manage dependencies for different platforms.
In the last lesson, we integrated Conan into our project. We saw how its binary-first approach can speed up clean builds by avoiding the need to compile every dependency from source. We used a single, default profile to describe our native build environment.
But, how does this work when wer're cross-compiling? What happens when the machine we're building on is different from the machine we're building for? Conan has a different approach here than what we've seen previously. Rather than manually writing toolchain files, we rely more heavily on Conan's profile system.
Recap: The Manual CMake Toolchain File
In our lesson on , we learned that the native CMake way to handle this is with a toolchain file. This file explicitly tells CMake about the target system and provides absolute paths to the cross-compilers.
A toolchain file for cross-compiling to Windows from a Unix-like host might look like this:
toolchains/manual-mingw.cmake
# 1. Set the target system
set(CMAKE_SYSTEM_NAME Windows)
set(CMAKE_SYSTEM_PROCESSOR x86_64)
# 2. Specify the cross-compilers
set(CMAKE_C_COMPILER x86_64-w64-mingw32-gcc)
set(CMAKE_C_FLAGS_INIT "-static -static-libgcc")
set(CMAKE_CXX_COMPILER x86_64-w64-mingw32-g++)
set(CMAKE_CXX_FLAGS_INIT
"-static -static-libgcc -static-libstdc++")
set(CMAKE_EXE_LINKER_FLAGS_INIT
"-static-libgcc -static-libstdc++")
# 3. Configure search for external dependencies
set(CMAKE_FIND_ROOT_PATH_MODE_PROGRAM NEVER)
set(CMAKE_FIND_ROOT_PATH_MODE_LIBRARY ONLY)
set(CMAKE_FIND_ROOT_PATH_MODE_INCLUDE ONLY)Conan's Abstraction: The Profile as a Toolchain
Conan offers a higher-level solution. Instead of writing a script that tells CMake where the tools are, you write a Conan profile that describes what the target platform is.
What needs to go in any given profile may require some research, as it depends on the the platform you're targetting and the compiler you're using. A fairly minimalist Conan profile for the same Windows target using mingw32-gcc might look something like this:
profiles/mingw-windows.profile
[settings]
os=Windows
arch=x86_64
build_type=Release
compiler=gcc
# Compiler-specific settings we want to use
compiler.version=15
compiler.cppstd=20
compiler.libcxx=libstdc++11
compiler.exception=seh
compiler.threads=posix
[conf]
tools.build:compiler_executables={"c": "x86_64-w64-mingw32-gcc", "cpp": "x86_64-w64-mingw32-g++"}
# Static linking to remove dependency on MinGW DLLs
tools.build:sharedlinkflags=["-static"]
tools.build:exelinkflags=["-static"]When we use this profile, Conan takes on the responsibility of:
- Finding a cross-compiler on our system that matches this description.
- Finding or building Conan packages that match this exact configuration.
- Generating a
conan_toolchain.cmakefile that contains all the low-level details that CMake needs.
The Build/Host Context
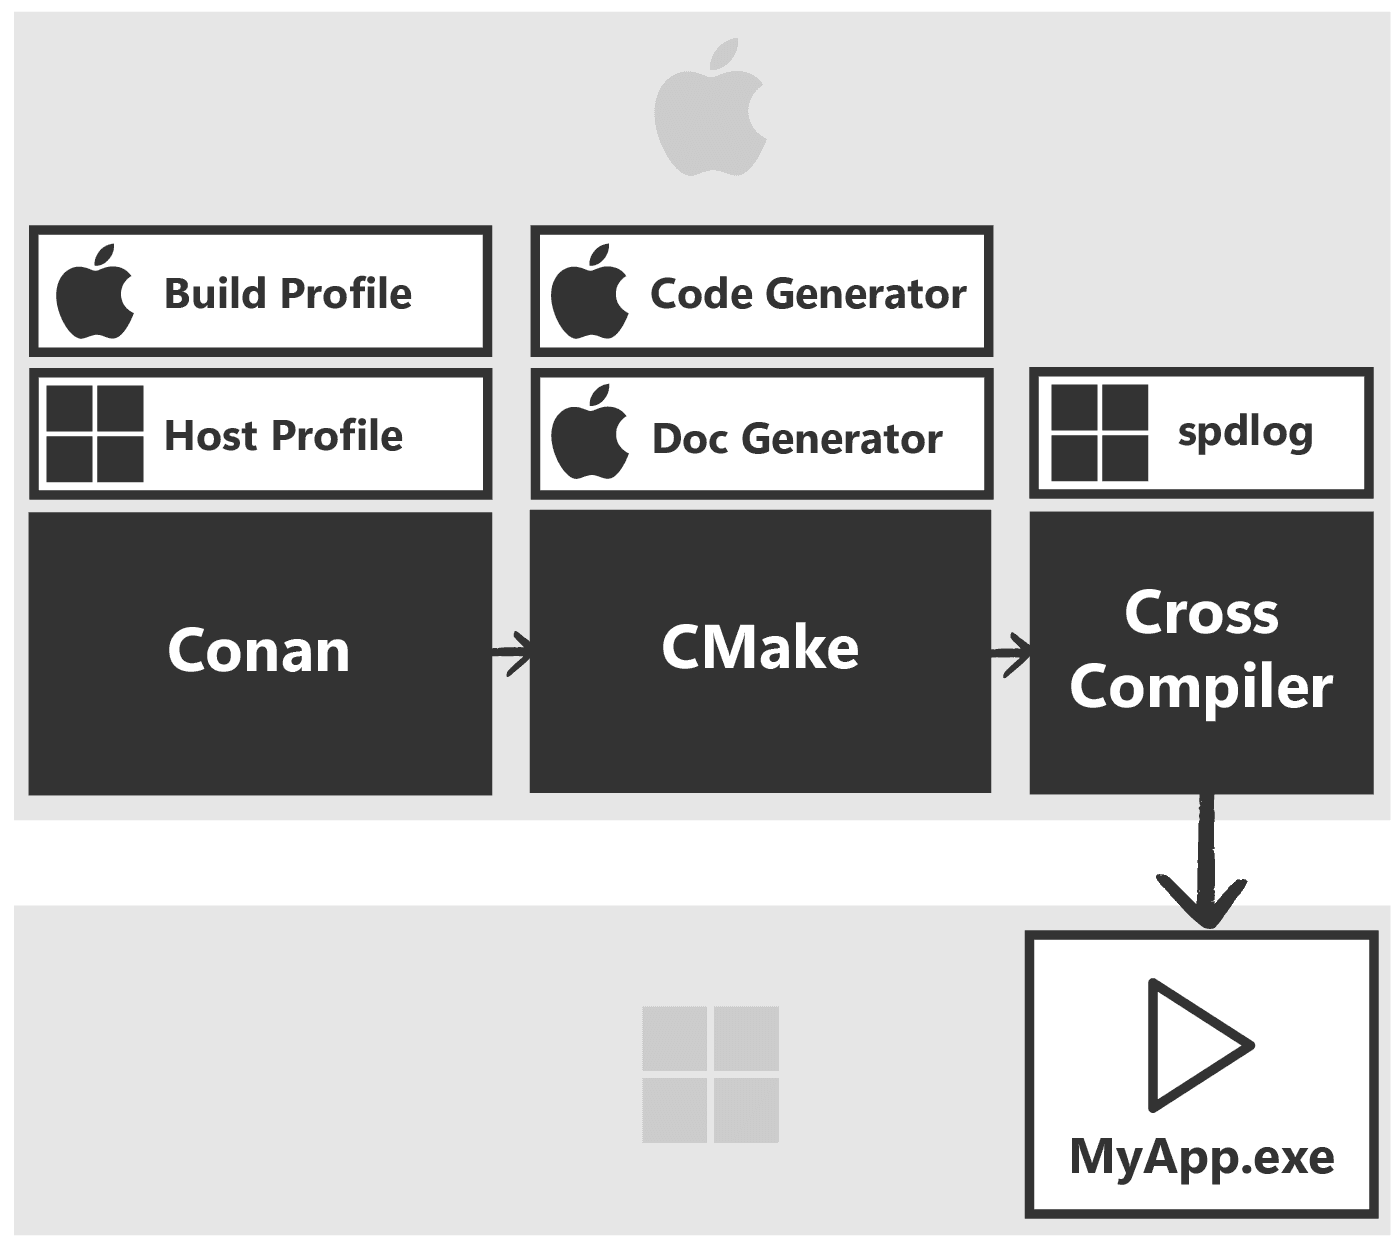
As usual with cross-compilation, we need to consider two different environments simultenously - the environment where we're building the project, and the environment where the code is eventually going to be run. In Conan terminology, this is the build/host context.
- The
buildcontext describes the machine you are building on (your machine). - The
hostcontext describes the machine you are building for (the target machine).
Note that the naming convention here is different to what other tools use, and what we introduced previously. Most other tools use the word "host" to refer to the machine that is performing the build. Unfortunately, Conan's terminology uses it in the exact opposite way. The "host" within Conan's context is the machine that our program will ultimately run on.
When you cross-compile, you need two profiles: one for the build context and one for the host context.
This is because some dependencies are tools that need to run during the build itself. The most obvious example is CMake itself, but we'll see some other examples soon, such as code generators and documentation generators. These tools must be compiled for the build machine. Regular library dependencies, like spdlog, must be compiled for the host machine.

By using two separate profiles, Conan can resolve the entire dependency graph correctly by, for example, fetching macOS ARM libraries for our Apple build machine, but Windows binaries for the host (target) machine.
Practical Example: Building for Windows with MinGW
Let's walk through the process of cross-compiling our GreeterApp from a macOS machine to a Windows executable again. But, this time, we'll use Conan.
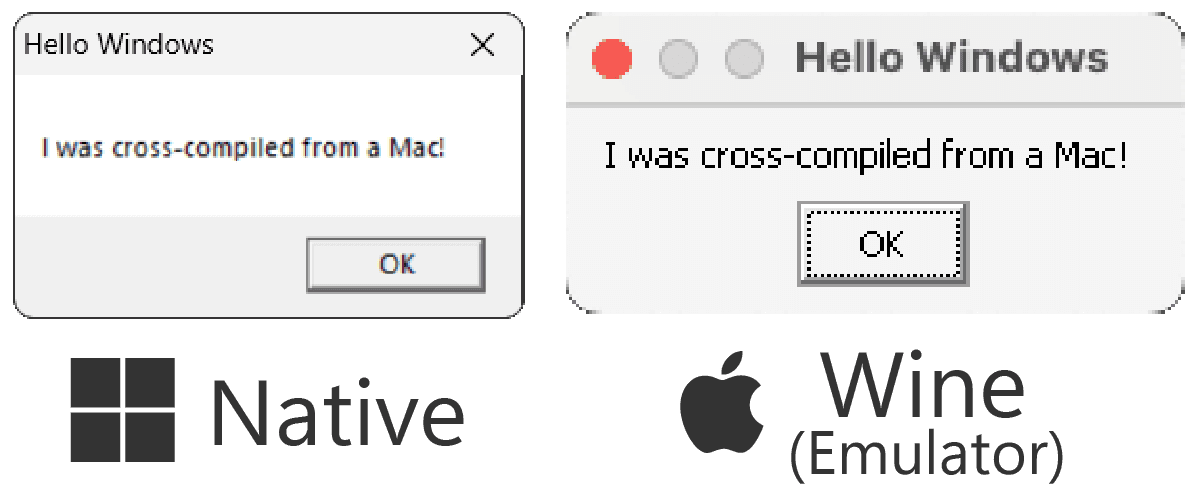
As a test application, we can use the same Windows code we used in previous examples. The following program pops up a Windows MessageBox, and uses spdlog to create a log file next to the executable when we close the program:
app/src/main.cpp
#include <windows.h>
#include <spdlog/spdlog.h>
int WINAPI WinMain(HINSTANCE, HINSTANCE, LPSTR, int) {
auto logger{spdlog::basic_logger_mt(
"file_logger", "log.txt"
)};
logger->info("Program started");
MessageBox(
nullptr,
"I was cross-compiled from a Mac!",
"Hello Windows",
MB_OK
);
logger->info("Program shut down");
// Flush logs to ensure they're written
spdlog::shutdown();
return 0;
}We'll also use the same conanfile.txt from the previous lesson to handle the spdlog dependency:
conanfile.txt
[requires]
spdlog/1.15.3
[generators]
CMakeDeps
CMakeToolchainStep 1: Create the Host Profile
For Conan profiles that are intended to be shared alongside our project, we should store them within a directory in our project structure. Let's call this directory profiles and, inside it, we'll create the mingw-windows.profile file we saw earlier.
profiles/mingw-windows.profile
[settings]
os=Windows
arch=x86_64
build_type=Release
compiler=gcc
# Compiler-specific settings we want to use
compiler.version=15
compiler.cppstd=20
compiler.libcxx=libstdc++11
compiler.exception=seh
compiler.threads=posix
[conf]
tools.build:compiler_executables={"c": "x86_64-w64-mingw32-gcc", "cpp": "x86_64-w64-mingw32-g++"}
# Static linking to remove dependency on MinGW DLLs
tools.build:sharedlinkflags=["-static"]
tools.build:exelinkflags=["-static"]This profile assumes you have a MinGW-w64 cross-compiler installed (e.g., via Homebrew on macOS or apt on Linux) and that its executables are in your system PATH.
Step 2: Run conan install with Two Profiles
Now, let's set up a clean build directory within our project root. Let's first navigate there using the cd command:
cd /path/to/project-rootWe can create a directory in our current location using the mkdir command, and then navigate into it using cd as usual. We'll call our clean build directory build-win in this example.
mkdir build-wincd build-winFrom this location, we then run conan install. This time, we provide both a build and a host profile:
conan install .. \
--profile:build=default \
--profile:host=../profiles/mingw-windows.profile \
--build=missing...
Install finished successfullyLet's break down this command:
conan install ..: Reads theconanfile.txtfrom the parent directory.-profile:build=default: For any build tools, use ourdefaultnative profile.-profile:host=../profiles/mingw-windows.profile: For our application's libraries, use the Windows target profile we just created.-build=missing: As before, this tells Conan to compile from source if it can't find a matching pre-compiled binary for our target.
Conan will now resolve our required libraries, downloading or building Windows versions of spdlog and its dependencies. It will then generate a conan_toolchain.cmake file in our current directory (build-win).
Step 3: Configure and Build with CMake
The generated conan_toolchain.cmake file now contains all of our cross-compilation requirements, so the rest of the process looks the same as it did before. We simply invoke the configure step with this CMAKE_TOOLCHAIN_FILE variable, and we provide the build type:
From inside the build-win directory, the command would look like this:
cmake .. \
-DCMAKE_TOOLCHAIN_FILE=conan_toolchain.cmake \
-DCMAKE_BUILD_TYPE=ReleaseNote that we must match the CMAKE_BUILD_TYPE to the build_type we specified in our Conan host profile.
Now, build the project:
cmake --build .If you inspect the build-win/app directory, you'll find a GreeterApp.exe file. We can verify it's a Windows executable using the file command, or by running it in Windows or an emulator:
file app/GreeterApp.exeapp/GreeterApp.exe: PE32+ executable (console) x86-64, for MS Windows
After running the application, we should also see a log file created with help from our Conan-managed spdlog dependency:
logs.txt
[2025-08-22 10:57:21.499] [file_logger] [info] Program started
[2025-08-22 10:57:26.165] [file_logger] [info] Program shut downSummary
Conan's profile-based approach provides an alternative solution for C++ cross-compilation, abstracting away the low-level details of toolchain management.
- Profiles as Abstractions: Instead of manual toolchain files, Conan uses profiles to describe the target platform. Conan finds the tools and binaries that match the description.
- Build vs. Host Context: Cross-compilation requires two profiles: one for the
buildmachine (where tools run) and one for thehostmachine (where the final application runs). - Seamless CMake Integration: The
conan installcommand, when given both profiles, generates a singleconan_toolchain.cmakefile that configures your entire cross-build, requiring no changes to yourCMakeLists.txt. - Portable Workflow: This approach keeps your project's build logic clean and portable, while the platform-specific details are neatly encapsulated in shareable profile files.
CMake Presets
Learn the fundamentals of CMake Presets. This lesson introduces CMakePresets.json to simplify complex build commands.