Scene Rendering
Create a scene management system that converts world space coordinates to screen space for 2D games.
This legacy content uses SDL2
An updated version using SDL3 is available
When developing games, we need a way to represent our virtual world and then transform it to display on a screen
In this lesson, we'll create a complete scene system that lets us position game objects using world coordinates, and then automatically converts those positions to screen coordinates when rendering.
We'll be using the Vec2 struct we created in the previous chapter, as well as Window and Image classes using techniques we covered earlier in the course. A complete version of these are available below:
Scenes
Let's create a class that we can use to represent scenes defined in world space. We'll first create a class for objects that can exist in our scene. As usual, we'll provide it with HandleEvent(), Tick() and Render() methods so it can interact with the rest of our game:
// GameObject.h
#pragma once
#include <SDL.h>
class GameObject {
public:
void HandleEvent(SDL_Event& E) {}
void Tick() {}
void Render(SDL_Surface* Surface) {}
};We'll give them an Image which they can render to our window surface, and a Vec2 to store their position:
// GameObject.h
#pragma once
#include <SDL.h>
#include "Vec2.h"
#include "Image.h"
class GameObject {
public:
GameObject(const std::string& ImagePath,
const Vec2& InitialPosition)
: Image{ImagePath},
Position{InitialPosition}{}
void HandleEvent(SDL_Event& E) {}
void Tick() {}
void Render(SDL_Surface* Surface) {
Image.Render(Surface, Position);
}
private:
Vec2 Position;
Image Image;
};Conceptually, we can create a scene representation in much the same way we've created any other manager-style class. The basic foundations involve storing the collection of the objects it manages, typically in an array such as a std::vector.
#pragma once
#include <vector>
#include "GameObject.h"
class Scene {
private:
std::vector<GameObject> Objects;
};We then notify those objects of events and instruct them to tick and render at the appropriate times:
#pragma once
#include <SDL.h>
#include <vector>
#include "GameObject.h"
class Scene {
public:
void HandleEvent(SDL_Event& E) {
for (GameObject& Object : Objects) {
Object.HandleEvent(E);
}
}
void Tick() {
for (GameObject& Object : Objects) {
Object.Tick();
}
}
void Render(SDL_Surface* Surface) {
for (GameObject& Object : Objects) {
Object.Render(Surface);
}
}
private:
std::vector<GameObject> Objects;
};In our main function, we'll construct our Window and Scene, and connect everything together in an application loop:
#include <SDL.h>
#include "Window.h"
#include "Scene.h"
int main(int argc, char** argv) {
SDL_Init(SDL_INIT_VIDEO);
Window GameWindow;
Scene GameScene;
SDL_Event Event;
while (true) {
while (SDL_PollEvent(&Event)) {
GameScene.HandleEvent(Event);
if (Event.type == SDL_QUIT) {
SDL_Quit();
return 0;
}
}
// Tick
GameScene.Tick();
// Render
GameWindow.Render();
GameScene.Render(GameWindow.GetSurface());
// Swap
GameWindow.Update();
}
return 0;
}Rendering Scenes
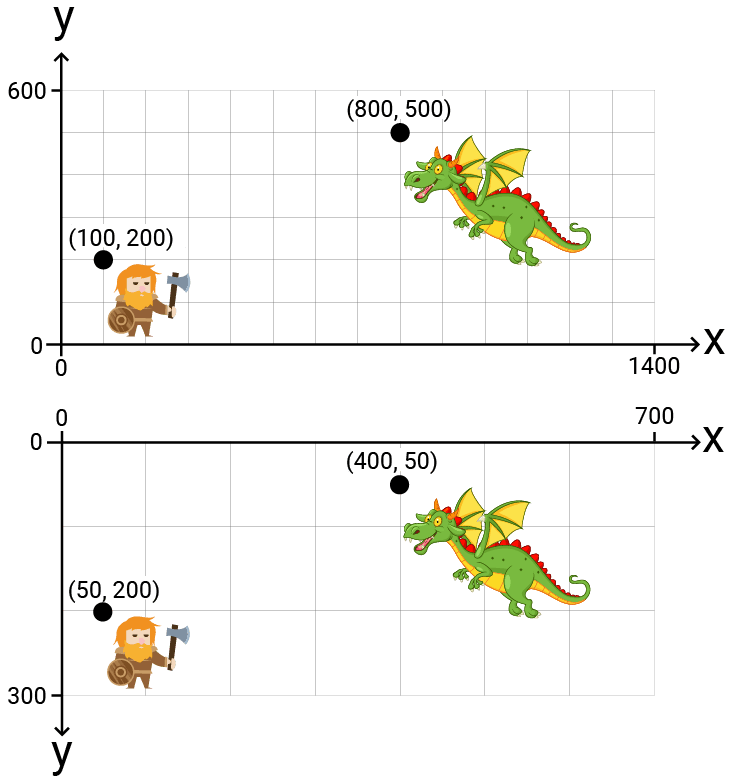
In the previous lesson, we worked with the example scene illustrated below. The top shows the positions in world space, with the bottom showing the corresponding positions in screen space:
Let's add the two objects to our scene. As a quick test, we'll initially set their positions directly in screen space to confirm everything we've done so far works:
// Scene.h
// ...
class Scene {
public:
Scene() {
Objects.emplace_back("dwarf.png", Vec2{50, 200});
Objects.emplace_back("dragon.png", Vec2{400, 50});
}
// ...
};
Working in World Space
This looks good, however, we want to work in world space, not screen space. Let's update the positions of the objects in our scene to their world space coordinates:
// Scene.h
// ...
class Scene {
public:
Scene() {
Objects.emplace_back("dwarf.png", Vec2{100, 200});
Objects.emplace_back("dragon.png", Vec2{800, 500});
}
// ...
};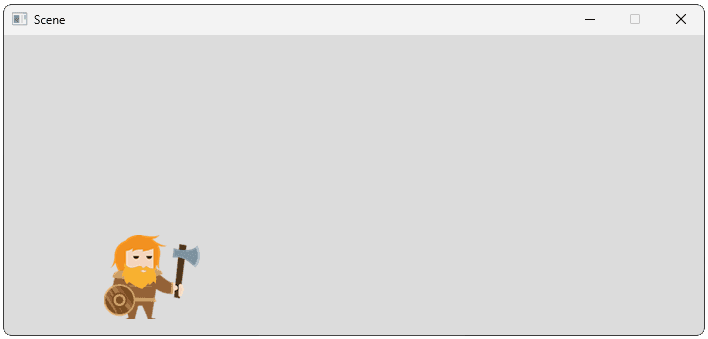
This looks less good, so we need to implement the world space to screen space transformation we designed in the previous lesson.
In our simple 2D games, the process for doing this will be quite easy. Later in the course, we'll demonstrate a more elaborate pipeline that outlines what this process looks like in a complex, 3D game.
As with anything in programming, there are countless ways we can set this up. We can scale our implementation up as our needs get more complex, but it's best to keep things as simple as possible for as long as possible.
A simple implementation might involve adding the transformation logic to our Scene object. For now, we'll assume our screen space and world space are the same as the example we worked through in the previous lesson. As such, we'll use the same transformation function we created in that lesson:
// Scene.h
// ...
class Scene {
public:
Vec2 ToScreenSpace(const Vec2& Pos) const {
return {
Pos.x * 0.5f,
(Pos.y * -0.5f) + 300
};
}
// ...
};For our objects to access this function, we need to provide them with a reference to the Scene they're part of. We can do that through the constructor and save it as a member variable, or pass it to each Render() invocation. We'll go with the constructor approach and have our Scene pass a reference to itself using the this pointer:
// Scene.h
// ...
class Scene {
public:
Scene() {
Objects.emplace_back("dwarf.png", Vec2{100, 200}, *this);
Objects.emplace_back("dragon.png", Vec2{800, 500}, *this);
}
// ...
};Let's update our GameObject constructor to accept this Scene reference. However, because our Scene.h header is already including GameObject.h, we should be cautious with having GameObject.h also include Scene.h. This would result in a circular dependency.
Instead, within GameObject.h, we can forward-declare the Scene class:
// GameObject.h
// ...
class Scene;
class GameObject {
// ...
private:
// ...
const Scene& Scene;
};Finally, let's update our Render() function to ensure our world space Position variable is converted to screen space for rendering. Given we've only forward-declared the Scene type rather than including the header, Scene will be an incomplete type in this file. That means we can't access the ToScreenSpace() function.
To solve this, we can move our Render() definition to a standalone implementation file. That .cpp file can #include the full declaration of both Scene and GameObject, meaning we can send our Position vector through the Scene.ToSceenSpace() transformation function:
// GameObject.cpp
#include "GameObject.h"
#include "Scene.h"
void GameObject::Render(SDL_Surface* Surface) {
Image.Render(Surface, Scene.ToScreenSpace(Position));
}We can now remove the definition of GameObject::Render() from the header file, and leave just the declaration:
// GameObject.h
// ...
class GameObject {
public:
// ...
// Before - Full Definition:
void Render(SDL_Surface* Surface) {
Image.Render(Surface, Position);
}
// After - Just the Declaration:
void Render(SDL_Surface* Surface);
// ...
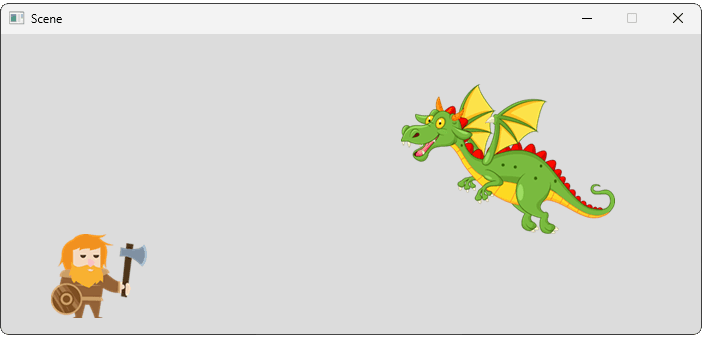
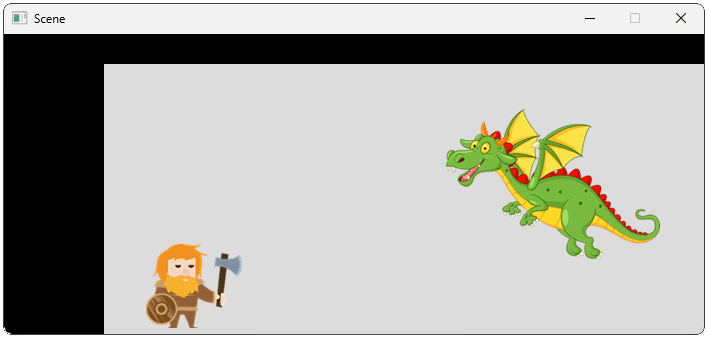
};Running our game, we should see the viewport transformation rendering objects in the correct position:
We now have an entirely different world space to work with in our scene, without the limitations of always needing to work in screen space.
Viewports and Clip Rectangles
So far, our program's rendering pipeline has assumed its output is covering the entire area of our window, but that's not necessarily the case. In a more complicated application, our rendering pipeline may only have access to a small portion of the available area. Other parts of the screen, such as UI elements, may be controlled by other parts of our program.

From the perspective of a renderer, the area of the screen it is rendering to is typically called it's viewport. For a renderer to transform its content correctly, it needs to be aware of this viewport's size, and where it is positioned on the screen.
In our examples, our rendering has involved performing blitting operations onto an SDL_Surface, typically the SDL_Surface associated with an SDL_Window. The area of an SDL surface that is available for blitting is called the clipping rectangle.
SDL_GetClipRect()
To get the clip rectangle of a surface, we create an SDL_Rect to receive that data. We then call SDL_GetClipRect(), passing a pointer to the surface we want to query, and a pointer to the SDL_Rect that the function will update:
SDL_Rect ClipRect;
SDL_GetClipRect(
SomeSurfacePointer,
&ClipRect
);By default, the clipping rectangle is the entire surface. Let's find out what the clipping rectangle is of our window's surface:
#pragma once
#include <iostream>
#include <SDL.h>
class Window {
public:
Window() {
SDLWindow = SDL_CreateWindow(
"Scene",
SDL_WINDOWPOS_UNDEFINED,
SDL_WINDOWPOS_UNDEFINED,
700, 300, 0
);
SDL_Rect ClipRect;
SDL_GetClipRect(
SDL_GetWindowSurface(SDLWindow),
&ClipRect
);
std::cout << "x = " << ClipRect.x
<< ", y = " << ClipRect.y
<< ", w = " << ClipRect.w
<< ", h = " << ClipRect.h;
}
// ...
};x = 0, y = 0, w = 700, h = 300This is perhaps not surprising, as we've likely noticed that our objects can render their content to any part of the window's surface. But, this is not true in general. The clipping rectangle can be changed to only cover a part of the surface.
SDL_SetClipRect()
To change a surface's clipping rectangle, we call SDL_SetClipRect(), passing a pointer to the SDL_Surface, and a pointer to an SDL_Rect representing what we want the new rectangle to be.
Below, we update the clipping rectangle so only the bottom-right of our window is available to our renderer:
#pragma once
#include <iostream>
#include <SDL.h>
class Window {
public:
Window() {
SDLWindow = SDL_CreateWindow(
"Scene",
SDL_WINDOWPOS_UNDEFINED,
SDL_WINDOWPOS_UNDEFINED,
700, 300, 0
);
SDL_Rect ClipRect{100, 30, 600, 270};
SDL_SetClipRect(
SDL_GetWindowSurface(Window),
&ClipRect
);
}
// ...
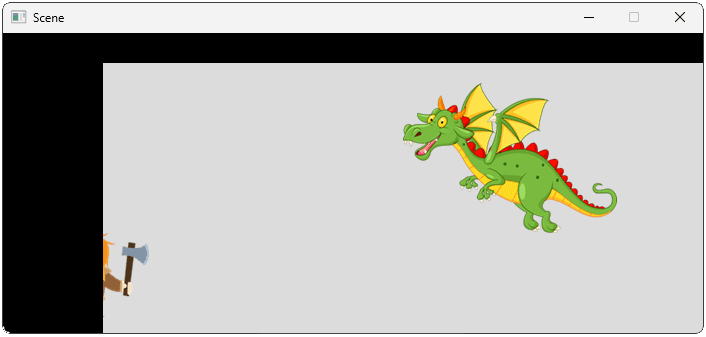
};This means that future blitting operations cannot overwrite the left 100 columns of pixels, and the top 30 rows:
If we want to set the clip rectangle back to the full area of the surface, we can pass a nullptr to SDL_SetClipRect():
SDL_GetClipRect(
SDL_GetWindowSurface(Window),
nullptr
);Note that the SDL_Surface associated with an SDL_Window is destroyed and recreated when the window is resized. As such, if our program is applying a clip rectangle to that surface, we need to listen for window resize events and recalculate and reapply our clip rectangle when they happen.
Dynamic Transformations
It is rarely the case that our transformations are fully known at the time we write our code. They are usually include variables that are not known at compile time. In the next lesson, we'll implement the most obvious example of this - we'll add a player-controllable camera, which determines which part of our world gets displayed on the screen on any given frame.
Even now, our simple transformation is a little more static than we'd like. It assumes the size of our viewport is exactly 700x300. If we wanted to let the user resize our window, or if we wanted our window to go full screen, we need to make our transformation function a little smarter by supporting dynamic viewport sizes.
Each invocation of our Render() function is being provided with the pointer to the SDL_Surface. We can retrieve the clip rectangle associated with that surface, and use it to update a member variable in our Scene:
// Scene.h
// ...
class Scene {
// ...
private:
// ...
SDL_Rect Viewport;
};Note that, because this Viewport value is eventually going to control how objects in our scene are to be transformed to view space, it's important that we update it before we render those objects:
// Scene.h
// ...
class Scene {
public:
// ...
void Render(SDL_Surface* Surface) {
SDL_GetClipRect(Surface, &Viewport);
for (GameObject& Object : Objects) {
Object.Render(Surface);
}
}
// ...
};We'll now update our ToScreenSpace() transformation to no longer assume we need to transform positions to a 700x300 space. Instead, we'll calculate the values dynamically based on our viewport size:
// Scene.h
// ...
class Scene {
public:
// Before:
Vec2 ToScreenSpace(const Vec2& Pos) {
return {
Pos.x * 0.5f,
(Pos.y * -0.5f) + 300
};
}
// After:
Vec2 ToScreenSpace(const Vec2& Pos) {
auto[vx, vy, vw, vh]{Viewport};
float HorizontalScaling{vw / WorldSpaceWidth};
float VerticalScaling{vh / WorldSpaceHeight};
return {
vx + Pos.x * HorizontalScaling,
vy + (WorldSpaceHeight - Pos.y) * VerticalScaling
};
}
private:
float WorldSpaceWidth{1400};
float WorldSpaceHeight{600};
// ...
};Now, our transformation only assumes that our world space spans from (0, 0) to (1400, 600) and that, compared screen space, the $y$ axis is inverted. These are valid assumptions, as these characteristics are known at compile-time, and they do not change at run-time.
To test our new transformation function, we can make our window resizable using the SDL_WINDOW_RESIZABLE flag, or the SDL_SetWindowResizable() function:
// Create a resizable window
SDL_Window* Window{SDL_CreateWindow(
"My Game",
SDL_WINDOWPOS_UNDEFINED,
SDL_WINDOWPOS_UNDEFINED,
700, 300,
SDL_WINDOW_RESIZABLE
)};
// Update an existing window to be resizable
SDL_SetWindowResizable(Window, SDL_TRUE);If we did everything correctly, our objects should now render in the correct position whilst respecting both the window size and the clip rectangle of the surface they're rendering to:
Complete Code
Complete versions of our Scene and GameObject classes are below:
Summary
In this lesson, we've implemented a scene management system that bridges the gap between world space (where our game logic lives) and screen space (where rendering happens).
Our system automatically transforms coordinates between these spaces and adapts to changing viewport dimensions. Key takeaways:
- Separating world space from screen space creates more flexible, maintainable game code
- Scene classes provide organization and management for collections of game objects
- Transformation functions convert world coordinates to screen space for rendering
- Dynamic viewport handling ensures our scene renders correctly at any window size
- Forward declarations help avoid circular dependencies in our class design
- Clip rectangles control which parts of the window surface are available for rendering
- Debug visualization tools make it easier to understand complex coordinate transformations
Cameras and View Space
Create camera systems that follow characters, respond to player input, and properly frame your game scenes.