SDL Surfaces and Colors
Explore SDL surfaces, the canvases for drawing, understand pixel formats, colors, and set your window's background.
This legacy content uses SDL2
An updated version using SDL3 is available
In this lesson, we'll take our first steps into drawing graphics with SDL. We'll learn about SDL Surfaces, the canvases we draw onto, understand how colors and pixel formats work, and use this knowledge to change the background color of our window.
Starting Point
In this lesson, we'll continue working on our main.cpp and Window.h files from the previous lesson. We've provided them below.
Surfaces
When we write graphical programs, we're essentially telling the computer how to color in a grid of dots on the screen. These dots are pixels, and a complete grid forms an image.
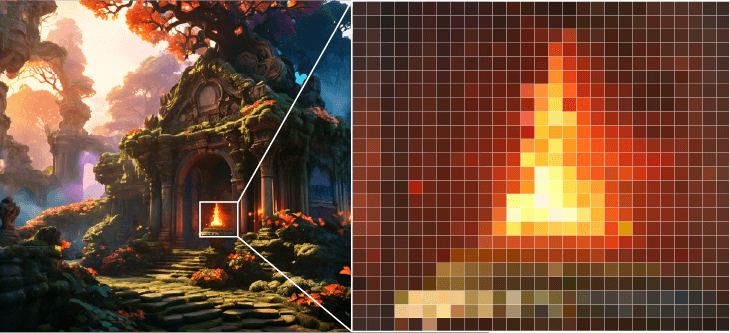
By showing many images in quick succession, we create animations and videos.
SDL uses the SDL_Surface type to manage these 2D grids of pixel colors. Think of an SDL_Surface as a digital canvas containing all the color information for an image, plus details like its width, height, and the specific way colors are encoded.
Window Surfaces
An SDL_Window isn't just an empty frame; it comes equipped with its own SDL_Surface that acts as its drawing board. This is the surface we'll manipulate to change what's displayed inside the window.
The function SDL_GetWindowSurface() gives us access to this surface. It takes the SDL_Window* as an argument and returns an SDL_Surface*.
Let's add a GetSurface() method to our Window class to simplify getting this pointer when we need it:
// Window.h
#pragma once
#include <SDL.h>
class Window {
public:
Window(){
SDLWindow = SDL_CreateWindow(
"Hello Window",
SDL_WINDOWPOS_UNDEFINED,
SDL_WINDOWPOS_UNDEFINED,
700, 300, 0
);
}
SDL_Surface* GetSurface() const {
return SDL_GetWindowSurface(SDLWindow);
}
Window(const Window&) = delete;
Window& operator=(const Window&) = delete;
~Window() {
SDL_DestroyWindow(SDLWindow);
}
private:
SDL_Window* SDLWindow{nullptr};
};Colors
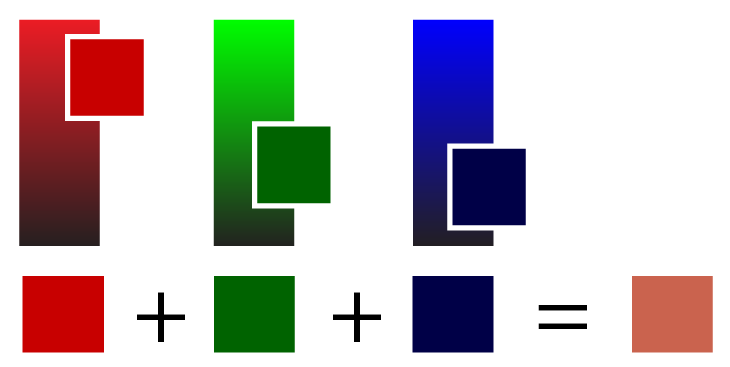
To define a specific color in a digital format, we usually break it down into its core components. For display devices, the standard approach is to use the RGB model, which stands for Red, Green, and Blue. Each color we see on screen is a combination of these three primary light colors.
Each component (R, G, and B) can have a range of possible values, representing its intensity. By specifying a value for red, a value for green, and a value for blue, we precisely define a single color out of millions of possibilities.
Pixel Formats
Since computers store everything as numbers (ultimately sequences of binary bits), we need a standardized way to translate these numbers into the RGB color intensities we just discussed. This is where pixel formats come in.
A pixel format defines exactly how the color data for a single pixel is stored in memory - that is, how a color is converted to a sequence of bits, and how a sequence of bits is converted back to a color.
Example Pixel Formats
To understand how to convert a binary sequence to a color, and a color back to a binary sequence, a pixel format typically requires three main pieces of information:
- Which channels are in the format
- How many bits are assigned to each channel
- What order the channels are in
Pixel formats are typically given names, and a common example is RGB888. All of the information we listed above is included in this short name. RGB888 has red (R), green (G), and blue (B) channels, in that order, and each channel is assigned to 8 bits.
8 bits can store one of 256 possible values, so RGB888 can have one of 256 different intensities for each of it's red, green, and blue channels. Combined, this means an RGB888 pixel can be one of approximately 16.8 million colors ()
Even though a pixel in this format only needs 24 bits (8 + 8 + 8), for technical reasons related to memory alignment, we include 8 bits of unused space. As such, an RGB888 color (and generally any color requiring 24 bits) is stored in a 32 bit (4 byte) container:

We cover memory alignment and padding in a dedicated lesson later in the course.
Using SDL_MapRGB()
To create a color in a specific format, SDL provides the SDL_MapRGB() function to help us. It accepts 4 arguments:
- The format we want to use
- The intensity of the red channel (from 0 to 255)
- The intensity of the green channel (from 0 to 255)
- The intensity of the blue channel (from 0 to 255)
In almost all scenarios, the format we want to use will be based on the format of the thing we're drawing to, such as an SDL_Surface. The format of an SDL_Surface is available through the format member variable.
So, for example, if we wanted to generate a red color to use on the window surface, we'd do this:
// Window.h
// ...
class Window {
public:
Window(){
SDLWindow = SDL_CreateWindow(/*...*/);
// Get the window surface's pixel format
SDL_PixelFormat* PixelFormat{
GetSurface()->format};
// Create a bright red color value
// suitable for this surface
Uint32 RedColor{SDL_MapRGB(
PixelFormat,
255, // Max intensity for Red
0, // Zero intensity for Green
0 // Zero intensity for Blue
)};
}
// ...
};Using SDL_FillRect()
Let's use all of this to set the background color of our window. To fill a rectangular area of a surface with a solid color, we use the SDL_FillRect() function. It accepts three arguments:
- A pointer to the surface we want to fill
- A pointer to the rectangle representing which area of the surface we want to fill. We'll cover rectangles in the next chapter but, for now, we'll pass a
nullptrhere. This indicates to SDL we want to fill the entire surface with our color - The color we want to use
Let's add this to our Window constructor to make its background dark gray:
// Window.h
// ...
class Window {
public:
Window(){
SDLWindow = SDL_CreateWindow(/*...*/);
SDL_FillRect(
GetSurface(),
nullptr,
SDL_MapRGB(
GetSurface()->format, 50, 50, 50
)
);
}
// ...
};To see our changes, we need to call SDL_UpdateWindowSurface(), passing a pointer to our SDL_Window*. We'll cover this function in more detail at the end of this chapter. For now, let's just add it to our constructor, after the call to SDL_FillRect():
// Window.h
// ...
class Window {
public:
Window(){
SDLWindow = SDL_CreateWindow(/*...*/);
SDL_FillRect(/*...*/);
SDL_UpdateWindowSurface(SDLWindow);
}
// ...
};After these changes, we should now see our window adopt the requested background color:

Complete Code
After the changes of this lesson, our completed files look like the following. We'll continue to build on these files in the next lesson.
Summary
In this lesson, we learned how SDL represents drawable areas using SDL_Surface. We saw how to access the specific surface associated with our window using SDL_GetWindowSurface().
We also explored how colors are defined using RGB components and how pixel formats dictate their storage in memory. Finally, we used SDL_MapRGB() to create a color value and SDL_FillRect() to change our window's background, making sure to update the display with SDL_UpdateWindowSurface().
Key Takeaways:
- Computer graphics involve drawing sequences of images made of pixels.
SDL_Surfacerepresents a 2D grid of pixels in SDL.- Windows have an associated surface, obtainable via
SDL_GetWindowSurface(). - Colors are often represented by Red, Green, and Blue (RGB) channels.
- Pixel formats define how color data is stored (channels, order, bits per channel).
SDL_MapRGB()converts RGB values into a single integer value suitable for a specific pixel format.SDL_FillRect()can fill a surface area with a solid color.SDL_UpdateWindowSurface()makes changes to the window surface visible.
Detecting and Managing Errors
Discover techniques for detecting and responding to SDL runtime errors