Click and Drag Actors
Implement clicking and dragging actors from the menu, showing a tooltip that follows the mouse cursor.
We've built the basic structure and the actor menu. Now, let's implement the ability to interact with the actors in that menu. The goal is to allow users to click and drag an actor type to eventually place it in the level.
This lesson covers the first part of drag-and-drop: initiating the drag and providing visual feedback. We'll modify our Actor class to recognize when it's been clicked.
Upon detecting a click, the Actor will dispatch a custom SDL_Event. We'll use SDL_RegisterEvents() to define this event type.
Then, we'll introduce a new ActorTooltip class. This class will manage a second, specialized SDL_Window. This window will appear when the custom drag event is received, display the image of the actor being dragged, and follow the mouse cursor faithfully using SDL_GetMouseState() and SDL_SetWindowPosition().
We'll carefully select window flags to ensure it behaves like a proper tooltip.
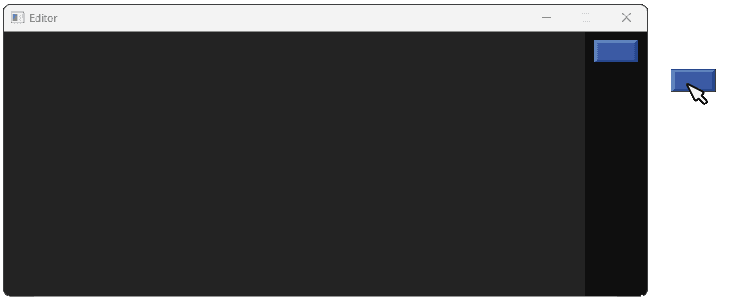
By the end of this section, we'll be able to click and drag on the actors in our actor menu. We'll have a visual indicator follow our mouse as we drag our actor, even outside of our primary window:
Actor Dragging
To signal that the user has started dragging an actor from the menu, we need a way for the Actor instance to communicate this action. We'll achieve this by defining and registering a custom SDL event type specifically for this purpose.
src/Config.h
// ...
namespace UserEvents{
#ifdef WITH_EDITOR
inline Uint32 ACTOR_DRAG{
SDL_RegisterEvents(1)};
#endif
}
// ...First, we'll add a HasMouseFocus() method to Actor to specifically check if the cursor is currently over that particular actor's area. This function will need to query the ParentScene to ensure the main window is active before checking the coordinates against the actor's Rect.
Because this new function relies on the full definition of Scene (which isn't available in Actor.h - we've only forward-declared it), we need to add a new source file for this. To keep our header file concise, we'll move our HandleEvent() definition over to that new source file too.
We'll declare HasMouseFocus() and HandleEvent() in Actor.h and implement them in a corresponding Editor/Actor.cpp file, where we can safely include Editor/Scene.h.
src/Editor/Actor.h
// ...
namespace Editor {
class Scene;
class Actor {
public:
// ...
bool HasMouseFocus() const;
virtual void HandleEvent(const SDL_Event& E);
// ...
};
}Inside Editor/Actor.cpp, the Actor::HasMouseFocus() function first defers to the Scene: if the parent scene doesn't have mouse focus, we know the Actor can't possibly have mouse focus, so we return false. This ensures we only consider hover checks when the editor window is active.
Assuming the scene has focus, SDL_GetMouseState() fetches the mouse coordinates within that scene's window. These coordinates are then compared against the actor's boundaries, defined by Rect.
If the coordinates lie within the horizontal range (Rect.x to Rect.x + Rect.w) and the vertical range (Rect.y to Rect.y + Rect.h), the actor is considered hovered, and true is returned. Otherwise, false indicates the mouse is elsewhere.
src/Editor/Actor.cpp
#include "Editor/Actor.h"
#include "Editor/Scene.h"
using namespace Editor;
bool Actor::HasMouseFocus() const {
if (!ParentScene.HasMouseFocus()) {
return false;
}
float x, y;
SDL_GetMouseState(&x, &y);
if (
x < Rect.x ||
x > Rect.x + Rect.w ||
y < Rect.y ||
y > Rect.y + Rect.h
) {
return false;
}
return true;
}The Actor::HandleEvent() implementation filters for the specific interaction we care about: a left mouse button press. If an event represents a left-click, it's type will be SDL_EVENT_MOUSE_BUTTON_DOWN, and the SDL_MouseButtonEvent's button value will be SDL_BUTTON_LEFT.
If both are true, we then also verify HasMouseFocus() to confirm the click landed within this actor's bounds.
Upon confirmation, we prepare our custom event. An SDL_Event struct called DragEvent is initialized with the type UserEvents::ACTOR_DRAG.
The key piece of information - which actor was clicked - is attached by assigning this (a pointer to the current Actor object) to DragEvent.user.data1. This event, carrying the actor pointer, is then injected into the event queue via SDL_PushEvent(&DragEvent).
src/Editor/Actor.cpp
// ...
#include "Config.h"
// ...
void Actor::HandleEvent(const SDL_Event& E) {
if (
E.type == SDL_EVENT_MOUSE_BUTTON_DOWN &&
E.button.button == SDL_BUTTON_LEFT &&
HasMouseFocus()
) {
SDL_Event DragEvent{UserEvents::ACTOR_DRAG};
DragEvent.user.data1 = this;
SDL_PushEvent(&DragEvent);
}
}Actor Tooltip
To make the dragging action clear, we need a visual indicator that follows the mouse. When the ACTOR_DRAG event occurs, we should display the image of the selected actor near the cursor.
The best way to ensure this indicator remains visible even if the mouse moves outside the main editor window is to use a separate, dedicated SDL_Window. This approach allows the tooltip to float freely above the main window and others.
As we , SDL lets us create windows with special characteristics suitable for tooltips.
We will create an Editor::ActorTooltip class to manage this process. It will be responsible for:
- creating the tooltip
SDL_Windowwith appropriate flags - listening for the
ACTOR_DRAGevent - showing/hiding the window when drag interactions begin and end
- during drag actions, continously moving the tooltip window to be near the the mouse cursor
- drawing the dragged actor's image onto its surface
Our functions to accomplish all of these tasks look like this, and we'll walk through implementing them next:
src/Editor/ActorTooltip.h
#pragma once
#include <SDL3/SDL.h>
#include "Actor.h"
namespace Editor{
class Scene;
class ActorTooltip {
public:
ActorTooltip(Scene& ParentScene);
~ActorTooltip();
ActorTooltip(const ActorTooltip&) = delete;
ActorTooltip& operator=(const ActorTooltip&)
= delete;
void Render();
void Tick(float DeltaTime);
void PositionWindow();
void HandleEvent(const SDL_Event& E);
void SetIsVisible(bool NewVisibility);
SDL_Surface* GetSurface() const {
return SDL_GetWindowSurface(SDLWindow);
}
private:
bool isVisible{false};
SDL_Window* SDLWindow{nullptr};
Actor* DragActor{nullptr};
Scene& ParentScene;
};
}Constructing Tooltips
The constructor for ActorTooltip, defined in its .cpp file, focuses on creating the specialized SDL_Window.
As we saw previously, SDL3 requires tooltip and popup windows to have a parent window which, in this case, will be the window we're currently using for our primary program. We can retrieve this parent window from our ParentScene.
We use SDL_CreatePopupWindow() to create the window, passing flags combined with | to specify its behavior:
SDL_WINDOW_HIDDEN: Ensures the tooltip is initially hidden.SDL_WINDOW_TOOLTIP: Identifies this window as a tooltip to the OS.SDL_WINDOW_BORDERLESS: Creates a window without any standard decorations like title bars or borders.SDL_WINDOW_ALWAYS_ON_TOP: Keeps the tooltip window rendered above the main application window and potentially other applications.SDL_WINDOW_NOT_FOCUSABLE: Ensures the tooltip never steals input focus, allowing the main window to continue receiving keyboard and mouse events even while the tooltip is active.
The remaining arguments we need to create the window are its position (x and y) and size (w and h). We'll just pass 0, 0, 100, and 100 as this stage. These values aren't important - we'll dynamically update the position and size of the window later, when it becomes visible.
src/Editor/ActorTooltip.cpp
#include "ActorTooltip.h"
#include "Scene.h"
using namespace Editor;
ActorTooltip::ActorTooltip(Scene& ParentScene)
: ParentScene{ParentScene}
{
SDLWindow = SDL_CreatePopupWindow(
ParentScene.GetWindow().GetRaw(),
0, 0, 100, 100,
SDL_WINDOW_HIDDEN
| SDL_WINDOW_TOOLTIP
| SDL_WINDOW_BORDERLESS
| SDL_WINDOW_ALWAYS_ON_TOP
| SDL_WINDOW_NOT_FOCUSABLE
);
CheckSDLError("Creating Tooltip Window");
}Destroying and Copying Tooltips
Just like our main Editor::Window, the ActorTooltip class manages an SDL_Window resource. Therefore, it needs a destructor (~ActorTooltip) to ensure proper cleanup when an ActorTooltip object goes out of scope or is destroyed.
In our program, we expect our Scene and therefore our Tooltip to be alive for the entire duration of our program, so this shouldn't happen, but it's better to be proactive.
The destructor checks if SDL's video subsystem is still initialized using SDL_WasInit(SDL_INIT_VIDEO). If SDL has already shut down, the windows would have been cleaned up globally, so we don't need to do anything.
Otherwise, if the SDLWindow pointer is valid (not nullptr), we explicitly destroy the tooltip window using SDL_DestroyWindow().
src/Editor/ActorTooltip.cpp
// ...
ActorTooltip::~ActorTooltip() {
if (!SDL_WasInit(SDL_INIT_VIDEO)) return;
if (SDLWindow) {
SDL_DestroyWindow(SDLWindow);
}
}Positioning Tooltips
The PositionWindow() function is responsible for moving the tooltip window to follow the mouse cursor. We want the tooltip to appear right next to the cursor, creating the illusion that the user is dragging the actor image directly.
It uses SDL_GetMouseState() to get the current mouse coordinates (x, y) relative to the primary window. It then calls SDL_SetWindowPosition(), passing the SDLWindow pointer and these x and y coordinates cast to int, instantly repositioning the tooltip window to the cursor's location.
src/Editor/ActorTooltip.cpp
// ...
void ActorTooltip::PositionWindow() {
float x, y;
SDL_GetMouseState(&x, &y);
SDL_SetWindowPosition(SDLWindow, int(x), int(y));
}This works because our tooltip window is a child of our primary window, thus its position is relative to that parent.
If our tooltip was a regular window, its position would instead be set within the global screen coordinates. If we wanted to get our mouse position within that coordinate system, we'd use SDL_GetGlobalMouseState() instead of the SDL_GetMouseState() function we're using here.
Showing and Hiding Tooltips
We need a controlled way to show and hide the tooltip window. Creating and destroying windows frequently is inefficient, so toggling visibility is preferred.
The SetIsVisible() method manages this state. It takes a boolean Visible argument. It updates the internal isVisible flag and then calls either SDL_ShowWindow() if Visible is true, or SDL_HideWindow() if Visible is false:
This synchronizes the internal state with the actual visibility of the SDL_Window.
src/Editor/ActorTooltip.cpp
// ...
void ActorTooltip::SetIsVisible(bool Visible) {
isVisible = Visible;
if (isVisible) {
SDL_ShowWindow(SDLWindow);
} else {
SDL_HideWindow(SDLWindow);
}
}Handling Tooltip Events
The ActorTooltip::HandleEvent() method listens for the specific event that signals the start of a drag: our custom UserEvents::ACTOR_DRAG.
When it receives an event of this type, it knows it needs to become active. It first calls SetIsVisible(true) to make the tooltip window appear.
It then retrieves the pointer to the Actor being dragged, which we stored in E.user.data1 when pushing the event. It casts this void* back to an Actor* and stores it in the DragActor member variable for later use. Later, we'll render this actor's image in our tooltip window.
src/Editor/ActorTooltip.cpp
// ...
void ActorTooltip::HandleEvent(
const SDL_Event& E
) {
using namespace UserEvents;
if (E.type == ACTOR_DRAG) {
SetIsVisible(true);
DragActor = static_cast<Actor*>(
E.user.data1
);
}
}Tooltip Ticking
In the Tick() function, we handle the continuous aspects of the tooltip's behavior. The initial if (!isVisible) return; ensures we only process logic when the tooltip should be active.
The first task of our Tick() function is to determine if the drag action is still happening or if the user has ended it. To detect this, we can get the current mouse button states using SDL_GetMouseState(). We test if the bit corresponding to the left mouse button - SDL_BUTTON_MASK(SDL_BUTTON_LEFT) - is set in the returned mask.
If it's not set, the user has let go, so we hide the tooltip using SetIsVisible(false). If the button is still held down, the drag continues, and we call PositionWindow() to keep the tooltip aligned with the cursor.
src/Editor/ActorTooltip.cpp
// ...
void ActorTooltip::Tick(float DeltaTime) {
if (!isVisible) return;
auto Buttons{
SDL_GetMouseState(nullptr, nullptr)
};
if (!(Buttons & SDL_BUTTON_MASK(SDL_BUTTON_LEFT))) {
SetIsVisible(false);
} else {
PositionWindow();
}
}Rendering Tooltips
The ActorTooltip::Render() function is responsible for drawing the content inside the tooltip window.
We'll implement the actual rendering in the next steps. For now, we'll provide an empty function body just so the code compiles. This allows us to integrate the ActorTooltip into the Scene's render loop without causing errors, even though it won't visually draw anything yet.
src/Editor/ActorTooltip.cpp
// ...
void ActorTooltip::Render() {
// We'll implement this next...
}Adding the Tooltip to the Scene
To integrate our new tooltip system, we need to instantiate ActorTooltip within the Editor::Scene. We'll add it as a member variable and ensure its HandleEvent(), Tick(), and Render() methods are called from the corresponding Scene methods.
Note that our ActorTooltip constuctor is accessing the ParentWindow of our scene, so we should ensure the ParentWindow variable is initialized before our ActorTooltip is constructed:
src/Editor/Scene.h
// ...
#include "ActorTooltip.h"
namespace Editor{
class Scene {
// ...
void HandleEvent(const SDL_Event& E) {
ActorShelf.HandleEvent(E);
TooltipWindow.HandleEvent(E);
}
void Tick(float DeltaTime) {
ActorShelf.Tick(DeltaTime);
TooltipWindow.Tick(DeltaTime);
}
void Render(SDL_Surface* Surface) {
ActorShelf.Render(Surface);
TooltipWindow.Render();
}
private:
Window& ParentWindow;
ActorTooltip TooltipWindow{*this};
// ...
};
}Rendering the Actor within the Tooltip
Our tooltip window exists, appears, follows the mouse, and disappears correctly. Now we need to draw the actual actor image inside it. To do this, the ActorTooltip needs access to information from the Actor instance it's currently tracking (DragActor).
Specifically, the tooltip needs:
- The
Imageobject associated with the actor to render it. - The dimensions (
w,h) of the actor to size the tooltip window correctly. - A way to calculate the offset between where the user clicked on the actor and the actor's top-left corner, for a smoother drag feel.
We'll add getter methods and a new member variable (DragOffset) to the Actor class to provide this information.
src/Editor/Actor.h
#pragma once
#include <SDL3/SDL.h>
#include "Image.h"
namespace Editor {
class Scene;
class Actor {
public:
// ...
const SDL_Rect& GetRect() const {
return Rect;
}
const SDL_Point& GetDragOffset() const {
return DragOffset;
}
const Image& GetArt() const {
return Art;
}
protected:
// ...
SDL_Point DragOffset{0, 0};
};
}Using Drag Offset
Our DragOffset value let's us remember exactly where on the actor the user clicked to start dragging. Remembering this position is not technically necessary, but we can use it to improve the user experience.
If we don't store this offset, we can still position the tooltip next to the mouse, but its position will be slightly different to where the user started dragging. Perhaps we'd position the tooltip at the centre of the cursor, or the top left for example. Either way, it's unlikely to match exactly where the user clicked:
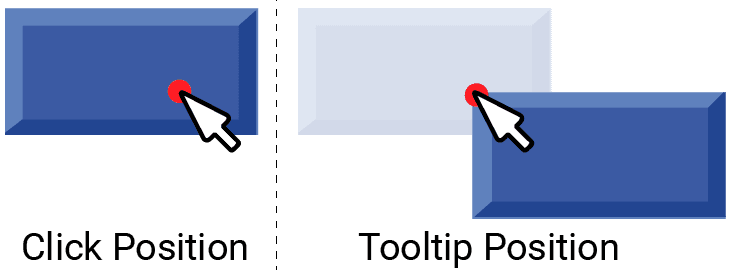
But if we remember the drag offset, we can use that value to subtly adjust the position of our tooltip window, creating the effect of the actor "sticking" to the mouse more accurately.
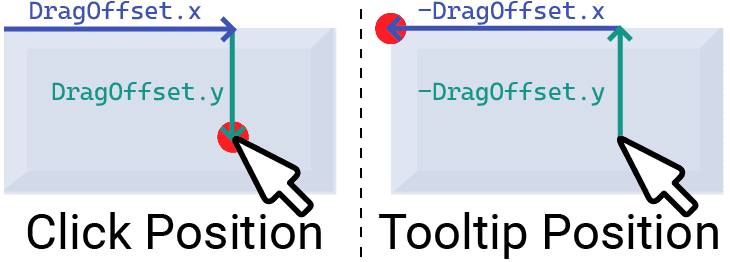
When the user starts dragging our actor, we'll calculate and store their mouse position relative to the top left of our actor's rectangle:
src/Editor/Actor.cpp
// ...
void Actor::HandleEvent(const SDL_Event& E) {
if (
E.type == SDL_EVENT_MOUSE_BUTTON_DOWN &&
E.button.button == SDL_BUTTON_LEFT &&
HasMouseFocus()
) {
DragOffset.x = int(E.button.x) - Rect.x;
DragOffset.y = int(E.button.y) - Rect.y;
SDL_Event DragEvent{UserEvents::ACTOR_DRAG};
DragEvent.user.data1 = this;
SDL_PushEvent(&DragEvent);
}
}We'll now modify ActorTooltip::PositionWindow() to incorporate the DragOffset. Before setting the window position, we retrieve the offset from the DragActor using its new GetDragOffset() method.
We then subtract the retrieved DragOffsetX and DragOffsetY from the mouse coordinates (x, y) before passing them to SDL_SetWindowPosition(). This adjustment ensures the tooltip window is positioned such that the original click point on the actor aligns with the current mouse cursor, creating the desired "sticky" dragging effect.
src/Editor/ActorTooltip.cpp
// ...
void ActorTooltip::PositionWindow() {
float x, y;
SDL_GetMouseState(&x, &y);
auto [DragOffsetX, DragOffsetY]{
DragActor->GetDragOffset()
};
SDL_SetWindowPosition(
SDLWindow,
int(x) - DragOffsetX,
int(y) - DragOffsetY
);
}Using GetRect()
The tooltip window needs to be the same size as the actor being dragged. When the ACTOR_DRAG event is handled in ActorTooltip::HandleEvent(), right after identifying the DragActor, we can now use its GetRect() method.
We call SDL_SetWindowSize(), passing it the SDLWindow pointer. We extract the width (w) and height (h) from the SDL_Rect returned by DragActor->GetRect() and use these values as the new dimensions for the tooltip window.
This ensures the tooltip perfectly matches the size of the actor image it will display.
src/Editor/ActorTooltip.cpp
// ...
void ActorTooltip::HandleEvent(
const SDL_Event& E) {
using namespace UserEvents;
if (E.type == ACTOR_DRAG) {
DragActor = static_cast<Actor*>(
E.user.data1
);
SDL_SetWindowSize(
SDLWindow,
DragActor->GetRect().w,
DragActor->GetRect().h
);
SetIsVisible(true);
}
}Using GetArt()
Finally, our Actor's new GetArt() method lets our tooltip retrieve the Image associated with the actor being dragged. Let's render that image within our tooltip.
Our image should take up the full size of our tooltip's window surface, so we'll render it at position (0, 0) with the width and height provided by the DragActor's GetRect() function.
In our case, that is also the same width and height as the tooltip window itself, as we set its size to these values when our drag event started.
Remember, to see our changes to a window surface, we need to call SDL_UpdateWindowSurface(). In this case, our tooltip is only going to render this image, so we're done. We're not going to be adding anything else to it within this iteration of the application loop, so we can just call SDL_UpdateWindowSurface() as the last step of our Render() function.
src/Editor/ActorTooltip.cpp
// ...
void ActorTooltip::Render() {
if (!isVisible) return;
DragActor->GetArt().Render(
GetSurface(),
SDL_Rect{
0, 0,
DragActor->GetRect().w,
DragActor->GetRect().h
});
SDL_UpdateWindowSurface(SDLWindow);
}Running our program, we should now see that we can click and drag actors from our menu, and even drag them outside of our window:
Complete Code
Complete versions of the files we updated are provided below:
Files
Summary
This lesson focused on making the ActorMenu interactive by adding drag capabilities. We enabled users to click on an actor, triggering a visual feedback mechanism.
The core components added were a custom ACTOR_DRAG event and the ActorTooltip class. The Actor now detects clicks and pushes this event, carrying a pointer to itself.
The ActorTooltip listens for this event, creates a borderless, always-on-top window, sizes it appropriately, and displays the dragged actor's image. This tooltip window dynamically follows the mouse cursor until the mouse button is released.
We reviewed how to:
- Define custom events for application-specific signaling.
- Use
SDL_WindowFlagsto create specialized windows (tooltips). - Manage window visibility and position dynamically.
- Render content to a secondary window surface and update it.
- Implement a drag offset for a more natural user experience.
In the next lesson, we'll handle the "drop" part of the interaction. We'll learn how to detect where the user releases the mouse, verify if it's a valid drop location, and then instantiate a new actor at that position in our level.
Placing Actors in the Level
Build the level container, add logic for placing actors via drag-and-drop, including visual hints.