Build Servers and Continuous Integration
Learn how to automate your build and test process with Continuous Integration (CI) and a build server. This lesson provides a guide to creating a GitHub Actions workflow for a CMake project.
In the previous lesson, we put our project under source control with Git and established the pull request as the formal process for integrating new code to an important branch, such as main.
Having other members of the team review the proposed changes and make suggestions is helpful, but this process can be further improved by adding automated checks.
These checks can be as elaborate as we want, but the two most fundamental checks are whether the code compiles, and whether the automated tests pass.
Compiling our code and running tests requires a computer, and the computer used for this task is commonly called a build server. That server needs a few things:
- The tools our project uses, such as Git, CMake and a C++ compiler
- Access to our remote repository, such that it can be notified when a pull request has been made and that there is new code that it needs to download, build and test
- The ability to report its findings back to the remote repository. Did the code compile successfully? Did the tests pass?
When we have all of this set up, our build server can provide quick, automated feedback on every proposed change. If a pull request introduces a compilation error or causes a test to fail, the build server will flag it, alerting us that we shouldn't merge those changes in their current form into our main branch.
A Quick Tour of CI Providers
The build server itself can be "self-hosted" - a physical machine in your office. But today, it's far more common to use a cloud-based service. These platforms provide on-demand virtual machines (called "runners" or "agents") to run your build jobs.
There are many providers, but a few of the most popular are:
- GitHub Actions: Tightly integrated directly into the GitHub platform. It's controlled by configuration files stored within the project files, and checked into source control. It offers a free tier, which is sufficient for solo developers and small teams.
- Jenkins: One of the oldest and most used CI tools. It's open-source and typically self-hosted, giving you complete control over your build environment.
- GitLab CI/CD: Similar in concept to GitHub Actions, but deeply integrated into the GitLab ecosystem. If your code is hosted on GitLab, this is the natural choice.
For this lesson, we will use GitHub Actions, but the principles remain the same across all providers.
Creating Your First GitHub Actions Workflow
A GitHub Actions workflow is defined in a YAML file placed in a special directory within your repository: .github/workflows/. You can have multiple workflow files, each triggered by different events.
Let's create our first workflow. In the root of our Greeter project, we'll create the .github directory, and inside it, a workflows directory. Finally, we'll create a new file named ci.yml (the name can be anything, but ci.yml or main.yml are common conventions).
.github/workflows/ci.yml
name: C++ CI
on:
pull_request:
branches: [ "main" ]
jobs:
build-and-test:
runs-on: ubuntu-latest
steps:
- name: Check out code
uses: actions/checkout@v4This is the basic skeleton of a workflow. Let's break it down:
name: C++ CI: A human-readable name for the workflow. This is what you'll see on the "Actions" tab in your GitHub repository.on: pull_request: ...: This defines the trigger. This workflow will run automatically whenever a pull request is opened or updated that targets themainbranch.jobs:: A workflow is made up of one or more jobs that can run in parallel or sequentially. We've defined a single job namedbuild-and-test.runs-on: ubuntu-latest: This specifies the type of virtual machine the job will run on. GitHub provides runners for Ubuntu, Windows, and macOS. We'll start with Linux as it's cheaper. GitHub Actions have a free monthly quota that is sufficient for small projects, but Windows uses more of that quota than Linux, and macOS uses significantly more than both.steps:: Each job is a sequence of steps. Each step can either run a terminal command or use a pre-built "action".uses: actions/checkout@v4: This is our first step. It uses a standard, pre-made action provided by GitHub calledactions/checkout. Its job is to download the source code from your pull request branch onto the runner so the subsequent steps can work with it.
Note that the YAML format is sensitive to white space, so it is important that the files are laid out correctly. You can learn more about YAML here.
To test our workflow, we can create a new branch, commit this file, and then push our changes:
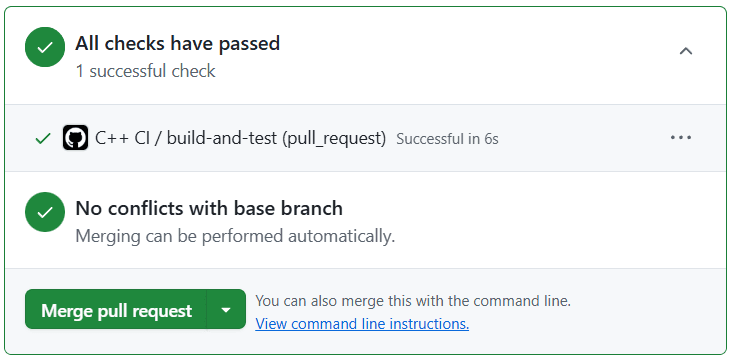
git checkout -b enable-cigit add .git commit -m "Enable CI"git push -u origin enable-ciOnce we open a pull request for our branch and wait for a few moments, we should see our check pop up in the PR user interface, reporting it has completed successfully. We can also get more information about the run from the "..." menu:
This workflow isn't doing anything useful yet - it is simply downloading our code and not doing anything with it. Let's make it it check that our code is compilable next
Preparing the Build Environment
The ubuntu-latest runner that GitHub Actions provides is a convenient starting point. Common tools that most C++ projects need are preinstalled, such as a compiler, Git, and CMake.
However, almost all projects need some additional tools, too. For example, our project depends on vcpkg to manage its libraries, and the default runner doesn't have that.
The base environment is just a starting point; it's our job to add new steps to the workflow to install any additional tools or dependencies our build requires.
Let's look at the two most common ways to install a tool like vcpkg in our workflow.
Approach 1: Manual Installation
This approach involves running the exact same commands in your workflow's run step that you would run on your own local machine to install the tool. This gives you complete control but can be more verbose.
For vcpkg, this means cloning the repository and running its bootstrap script, just like we did on our own machine earlier.
In this example, we're downloading vcpkg to the ~/vcpkg directory of our Ubuntu host, and then running the bootstrap script that we just downloaded:
.github/workflows/ci.yml
name: C++ CI
on:
pull_request:
branches: [ "main" ]
jobs:
build-and-test:
runs-on: ubuntu-latest
- name: Check out code
uses: actions/checkout@v4
- name: Install vcpkg
run: |
git clone https://github.com/microsoft/vcpkg.git ~/vcpkg
~/vcpkg/bootstrap-vcpkg.sh
shell: bash # Explicitly use bash for the scriptApproach 2: Using a GitHub Action
The manual approach works, but it has downsides. You have to write and maintain the installation script yourself. A better way is often to use a pre-made action from the GitHub Marketplace.
For pretty much any common requirement, such as installing vcpkg, someone has already made and shared a free script that will do the work for us.
For vcpkg, the lukka/run-vcpkg action (documented here) is commonly used. It handles all the details of installing vcpkg and its dependencies for you.
Note that this action requires we provide a baseline for vcpkg. This is a good practice anyway, so let's ensure our vcpkg.json includes one:
vcpkg.json
{
"name": "greeter",
"dependencies": [
"gtest",
"spdlog",
"benchmark"
],
"builtin-baseline":
"44a1e4eca5211434b5fefcc25a69bba246c3f861"
}We covered vcpkg baselines and how to set them up .
With our baseline set, we can now add the action to our workflow:
.github/workflows/ci.yml
name: C++ CI
on:
pull_request:
branches: [ "main" ]
jobs:
build-and-test:
runs-on: ubuntu-latest
- name: Check out code
uses: actions/checkout@v4
- name: Set up vcpkg
uses: lukka/run-vcpkg@v11Where an established, prebuilt action is available, using it is generally recommended over the manual approach. The action's author maintains the script, ensuring it works correctly.
These scripts often also include options we can change and features we can enable or disable. The options for lukka/run-vcpkg are listed on its GitHub page.
Setting Environment Variables in CI
In our previous chapters, we made our CMakePresets.json portable by reading the path to vcpkg from an environment variable: $env{VCPKG_ROOT}.
This makes things a lot easier - we now just need to define this variable as part of our workflow so that when CMake runs and processes our preset, it can find the toolchain file.
Setting environment variables is a pretty fundamental requirement supported by every CI provider. In GitHub Actions, we do this via the env key.
This can be set for the entire job, or just for an individual step:
jobs:
some-job:
runs-on: ubuntu-latest
# Set an env variable for all steps in this job
env:
SOME_VARIABLE: Some value
steps:
- name: Some Step
run: some-command
# Set an env variable for just this step
env:
ANOTHER_VARIABLE: Another valueFor the VCPKG_ROOT variable, this will need to be set at the job level, as it will be required by multiple steps.
- The "Install vcpkg" step will read it to ensure it installs vcpkg at the location we requested.
- The "configure CMake" step (which we'll add later) will read to to understand where vcpkg's toolchain file is.
Setting VCPKG_ROOT in the Workflow
The lukka/run-vcpkg action sets the VCPKG_ROOT environment variable automatically, which is another reason why using dedicated actions is often the preferred approach.
However, let's assume we we needed to install vcpkg manually, so we can walk through a generic process that works for any task.
We'll set our VCPKG_ROOT path to be relative to the workspace directory. GitHub provides a variable for this in the form of github.workspace:
.github/workflows/ci.yml
jobs:
build-and-test:
runs-on: ubuntu-latest
# Set environment variables for all steps in this job
env:
VCPKG_ROOT: ${{ github.workspace }}/vcpkg
steps:
- name: Check out code
uses: actions/checkout@v4
- name: Install vcpkg
run: |
git clone https://github.com/microsoft/vcpkg.git ${{ env.VCPKG_ROOT }}
${{ env.VCPKG_ROOT }}/bootstrap-vcpkg.sh
shell: bashLet's break down the new additions:
env:: We set this environment variable at the job level,VCPKG_ROOT: ${{ github.workspace }}/vcpkg: We define theVCPKG_ROOTvariable. The value${{ github.workspace }}is a GitHub Actions context variable that points to the root of our checked-out repository on the runner. We're telling the workflow that vcpkg will live in avcpkgsubdirectory within our workspace.${{ env.VCPKG_ROOT }}: Inside therunstep, we can now use this syntax to access the environment variable we just defined. This ensures ourgit cloneand bootstrap commands use the exact same path, setting up vcpkg at the location we specified in our variable.
With this env block in place, any subsequent step in this will run in an environment where VCPKG_ROOT is correctly set. This also means our CMake preset will have access to it, and can construct the correct path to the toolchain file.
CMakePresets.json
{
"version": 3,
"configurePresets": [
{
"name": "default",
"binaryDir": "${sourceDir}/build",
"toolchainFile":
"$env{VCPKG_ROOT}/scripts/buildsystems/vcpkg.cmake"
},
// ...
],
// ...
}Now that we have our build environment set up, we're ready to add the steps that build and test our code.
Configuring and Building the CMake Project
Now let's add the steps to actually build our project. The ubuntu-latest runner comes with a C++ compiler and CMake pre-installed, so we don't need to worry about setting those up.
We will add two new steps to our job. These steps will use the run key to execute shell commands, just as if we were typing them into a terminal. And thanks to the CMakePresets.json file we created in the previous chapters, the commands are simple and clean.
In some situations, we may want to add presets that are specifically dedicated to our CI requirements. We'd add those to CMakePresets.json just like any other preset.
In our case, the default presets work fine:
.github/workflows/ci.yml
name: C++ CI
on:
pull_request:
branches: [ "main" ]
jobs:
build-and-test:
runs-on: ubuntu-latest
steps:
- name: Check out code
uses: actions/checkout@v4
- name: Set up vcpkg
uses: lukka/run-vcpkg@v11
- name: Configure CMake
run: cmake --preset default
- name: Build project
run: cmake --build --preset defaultWhen this workflow runs, it will first check out the code, then install vcpkg, run the standard CMake configure step, and finally run the build step.
If any of these commands fails (i.e., returns a non-zero exit code), the step will fail, and the entire job will stop and be marked as a failure.
Let's create such a failure so we can confirm everything is working. In greeter/src/Greeter.cpp, we no longer want to ignore Bob, so lets clumsily try to remove this feature, leaving a compilation error:
greeter/src/Greeter.cpp
#include <greeter/Greeter.h>
Greeter::Greeter(std::string name)
: name_(std::move(name)) {}
namespace {
bool should_ignore(const std::string& Name) {
return Name == "Bob";
}
}
std::string Greeter::greet() const {
// This will now be a compilation error
if (should_ignore(name_)) return "";
return "Hello, " + name_ + "!";
}Let's commit and push our changes to the ci.yml and Greeter.cpp files:
git add .git commit -m "Stop ignoring Bob"git pushOnce our changes are pushed, GitHub should notice a PR targeting the main branch has been updated, and that matches the condition in one of our workflows:
.github/workflows/ci.yml
# ...
on:
pull_request:
branches: [ "main" ]
# ...Therefore, it should jump into action and run our workflow again:
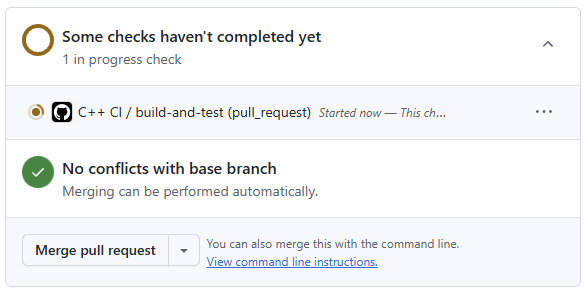
When our build server attempts to compile our project, our workflow will fail and the error will be reported, so we know our branch is not safe to merge in its current state:
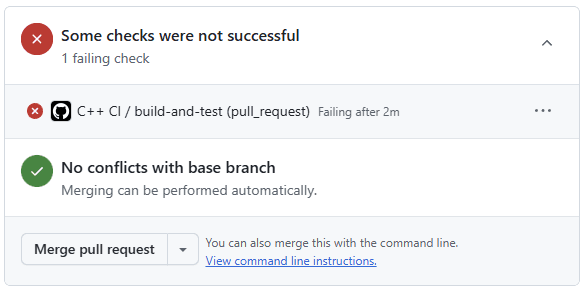
With the default GitHub settings, we can still merge a PR even with failing checks, but we can configure that from our repository settings if we wish. We configure it by updating the rules for our main branch under Rules > Rulesets > Require status checks to pass.
Fixing CI Errors
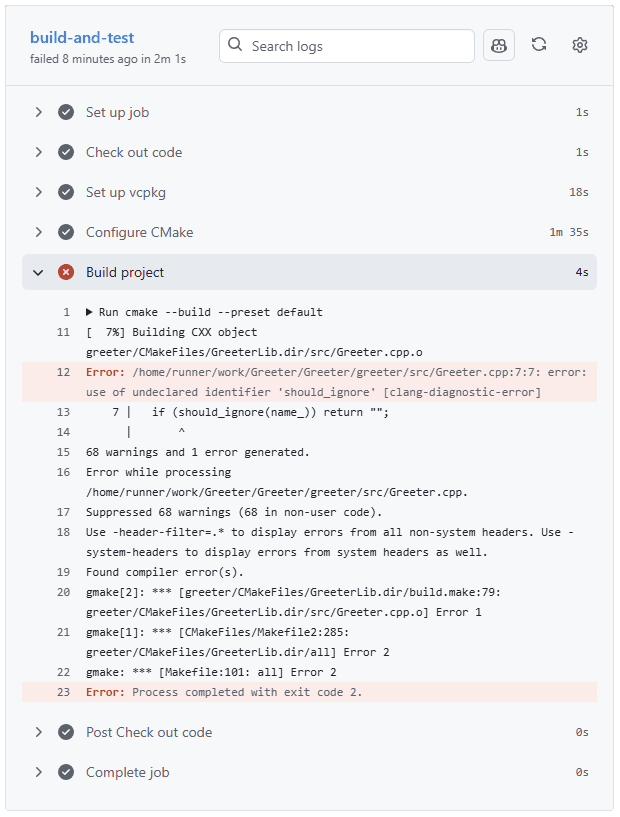
To understand why an action failed, we can retrieve the logs by clicking the "..." button next to failure on the PR, or from the "Actions" tab at on the top menu. Ideally, our workflow will have failed for exactly the reason we expect - the compiler error we introduced:
If we fix our error, create a new commit on our branch, and then push our changes, the job should rerun and report the success:
greeter/src/Greeter.cpp
#include <greeter/Greeter.h>
Greeter::Greeter(std::string name)
: name_(std::move(name)) {}
std::string Greeter::greet() const {
if (should_ignore(name_)) return "";
return "Hello, " + name_ + "!";
}git add .git commit -m "Fix compilation error"git push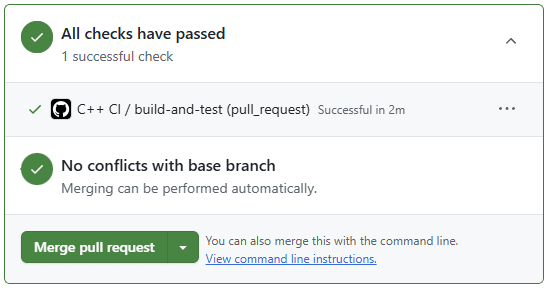
Running Tests with CTest
Ensuring our code compiles is a good first step for our CI process, but we usually want to perform other checks too. Most notably, we typically want to ensure our tests pass.
We can add this step in the way you might expect, extending our job with an additional step that invokes ctest:
.github/workflows/ci.yml
name: C++ CI
on:
pull_request:
branches: [ "main" ]
jobs:
build-and-test:
runs-on: ubuntu-latest
steps:
- name: Check out code
uses: actions/checkout@v4
- name: Configure CMake
run: cmake --preset default
- name: Build project
run: cmake --build --preset default
- name: Run tests
run: ctest --preset defaultNow, when we commit and push this change to our workflow, we should see our CI server running our unit tests, and failing as the test suite doesn't pass:
git add .git commit -m "Run test suite on CI"git push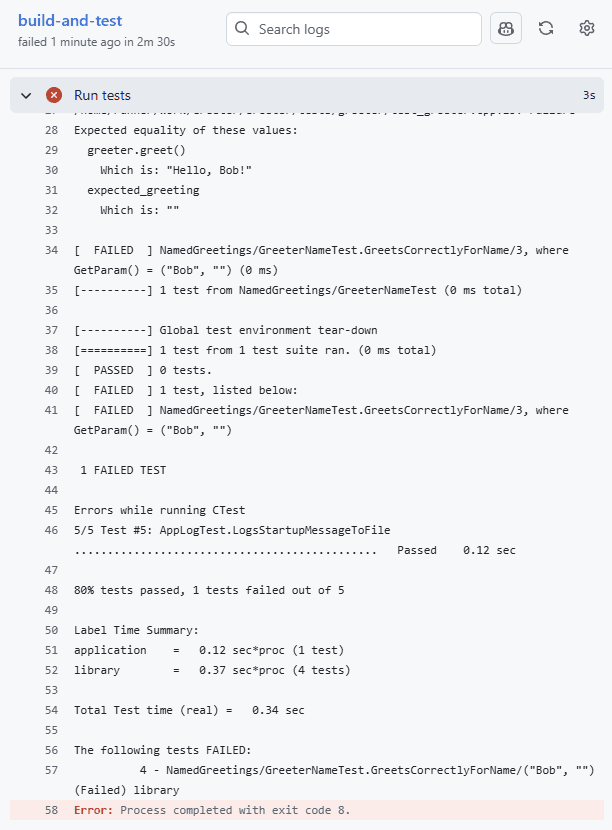
Let's fix our tests, and then commit and push one last time to see our full CI pipeline validating our PR as being complete and ready to merge:
tests/greeter/test_greeter.cpp
#include <gtest/gtest.h>
#include <greeter/Greeter.h>
#include <tuple>
class GreeterNameTest :
public testing::TestWithParam<
std::tuple<std::string, std::string>
> {};
TEST_P(GreeterNameTest, GreetsCorrectlyForName) {
auto [name, expected_greeting] = GetParam();
Greeter greeter = name.empty() ? Greeter() : Greeter(name);
EXPECT_EQ(greeter.greet(), expected_greeting);
}
INSTANTIATE_TEST_SUITE_P(
NamedGreetings,
GreeterNameTest,
testing::Values(
std::make_tuple("", "Hello, User!"),
std::make_tuple("John", "Hello, John!"),
std::make_tuple("Jane", "Hello, Jane!")
std::make_tuple("Bob", "")
)
);git add .git commit -m "Fix broken test"git pushSummary
In this lesson, we've set up a complete Continuous Integration pipeline, elevating our project from a local build to a fully automated workflow.
- Continuous Integration (CI): This practice of automatically building and testing every change provides a quality gate, ensuring the stability of your main branch.
- Build Servers: A build server (like a GitHub Actions runner) provides a clean, reproducible environment.
- GitHub Actions: We learned to create a workflow in a YAML file that is triggered by pull requests.
- The CI Workflow: Our workflow now automatically performs the key steps to ensure our PR meets the quality bar: it checks out the code, configures it with CMake, builds it, and runs the test suite with CTest.
Packaging with CPack
Learn to package your C++ projects using CMake's CPack. This lesson covers creating developer ZIP archives and professional Windows MSI installers with components.