Loading and Displaying Images
Learn how to load, display, and optimize image rendering in your applications with SDL3.
In this lesson, we'll see how we can load images into SDL, and then display them in our window.
We will begin with a simplified version of the code from our last lesson. To focus on image handling, we have removed the UI, Rectangle, and Button classes.
Our main.cpp now only creates a Window and an instance of a new class called Image. The Image object is being asked to Render() onto the window surface every frame:
Files
Loading an Image
By default, SDL only supports the basic bitmap (.bmp) format. Later in the chapter, we'll introduce the SDL_image extension which understands many more image types, but we'll stick with bitmaps for now to establish the basics.
If you want to follow along, an example bitmap image is available here.
Loading Bitmaps Using SDL_LoadBMP()
To load a bitmap image, we call the SDL_LoadBMP() function, passing the location of the file we want to load:
SDL_LoadBMP("SomeFile.bmp");This path is relative to the base path of our program. The base path is typically the directory containing our executable, such as MyProgram.exe.
In the previous example, we're asking SDL to load a file called SomeFile.bmp, stored in the same location as our executable. If our image were in some subdirectory, such as Assets/, we would load it like this:
SDL_LoadBMP("Assets/SomeFile.bmp");Where are our Executables Stored?
If we're using an IDE to launch our programs, it may not be entirely obvious where it is storing our compiled files.
There's no standard here - it depends on what editor you're using, and how it is configured. Generally, they will be stored in the same location as your source code files. Within that directory, they may be in a folder with a name such as bin, build, or debug.
Alternatively, you can ask SDL to log out the directory your application is running from:
#include <iostream>
//...
std::cout << SDL_GetBasePath();Using SDL_GetBasePath()
On some platforms, using a relative path like our earlier examples will not work. In those scenarios, we can construct an absolute path instead. The safest way to do this is by creating a std::string from the value returned by SDL_GetBasePath():
std::string BASE_PATH{SDL_GetBasePath()};By default, SDL_GetBasePath() will return the path to the executable that the player launched.
We can then construct our asset paths using the std::string utilities. The most useful is the simple + operator, which we can use to append the relative path to our asset. The following example loads SomeFile.bmp from the Assets directory within our base path:
std::string BASE_PATH{SDL_GetBasePath()};
std::string IMAGE_PATH{BASE_PATH + "Assets/SomeFile.bmp"};
SDL_LoadBMP(IMAGE_PATH.c_str());The rest of our examples will use the simpler relative path techniques to keep things focused but, if you're following along on a platform that doesn't support this, you can use this SDL_GetBasePath() technique instead.
Managing the Image Surface
The SDL_LoadBMP() function creates an SDL_Surface using the dimensions and colors of the file we loaded, and it returns an SDL_Surface* - that is, a pointer to the surface.
Let's update our Image class to make use of this. We'll add three things:
- An
SDL_Surface*so we can remember what surface is associated with ourImageobject. - A constructor that creates this surface. We'll accept the location of the image we want to load as a
std::string. - A destructor that asks SDL to free the surface associated with an
Imageobject when that object is destroyed.
To simplify memory management, we'll also prevent our Image objects from being copied. We'll learn how to implement copy constructors and copy assignment operators for classes that manage SDL_Surface objects later in the course.
Our changes look like this:
src/Image.h
#pragma once
#include <string>
#include <SDL3/SDL.h>
class Image {
public:
Image(const std::string& File)
: ImageSurface{SDL_LoadBMP(File.c_str())} {}
void Render(SDL_Surface* DestinationSurface) {
// ...
}
~Image() {
if (ImageSurface) {
SDL_DestroySurface(ImageSurface);
}
}
Image(const Image&) = delete;
Image& operator=(const Image&) = delete;
private:
SDL_Surface* ImageSurface{nullptr};
};Our main.cpp already passes the path of our example image to this new constructor:
src/main.cpp
// ...
int main(int, char**) {
// ...
Window GameWindow;
Image Example("example.bmp");
// ...
}Handling Errors
The SDL_LoadBMP() function can fail, in which case it will return a nullptr and populate the SDL_GetError() return value with an explanation. We won't attempt to handle this scenario gracefully in this section, as it adds a lot of noise to our code examples and distracts from the key content.
If the image fails to load, our application will likely crash. However, to help us debug, we can at least log out a message explaining why. Let's update our Image class accordingly:
src/Image.h
#pragma once
#include <iostream>
#include <SDL3/SDL.h>
#include <string>
class Image {
public:
Image(const std::string& File)
: ImageSurface{SDL_LoadBMP(File.c_str())} {
if (!ImageSurface) {
std::cout << "Failed to load image "
<< File << ":\n " << SDL_GetError() << '\n';
}
}
// ...
};With our Image class updates complete, let's temporarily change the argument provided from main.cpp to see our error handling in action:
src/main.cpp
// ...
int main(int, char**) {
// ...
Image Example("fake.bmp");
// ...
}Failed to load image fake.bmp:
Couldn't open fake.bmpRemember, if you unexpectedly get this error with a file you know does exist, you may need to switch to using an absolute path instead, perhaps with help from SDL_GetBasePath():
const std::string BASE_PATH{SDL_GetBasePath()};
SDL_LoadBMP(BASE_PATH + "SomeFile.bmp");Surface Blitting
SDL_Surface objects manage an area of memory where they store the color information of each of their pixels. We won't interact with that data directly in this lesson, but we can see where it is by accessing the pixels member of an SDL_Surface:
src/main.cpp
#include <SDL3/SDL.h>
#include <SDL3/SDL_main.h>
#include <iostream>
#include "Window.h"
int main(int, char**) {
SDL_Init(SDL_INIT_VIDEO);
Window GameWindow;
std::cout << "GameWindow Surface is storing "
"its pixel data at: "
<< GameWindow.GetSurface()->pixels;
// ...
}GameWindow Surface is storing its pixel data at: 000002307E090000To render the image within our program, we need to copy this pixel data to the area of memory where it will end up on our screen. In this context, that means copying data from the ImageSurface to the window surface.
In our main.cpp, we are already passing the window surface to our Image object's Render() method:
src/main.cpp
// ...
int main(int, char**) {
// ...
while (!shouldQuit) {
// ...
GameWindow.Render();
Example.Render(GameWindow.GetSurface());
GameWindow.Update();
}
// ...
}So, within that Render() function, we have access to both of the surfaces we need - the ImageSurface member variable, and the DestinationSurface parameter which, in this program, will always be the window surface:
src/Image.h
// ...
class Image {
public:
// ...
void Render(SDL_Surface* DestinationSurface) {
std::cout << "\nDestinationSurface Pixels: "
<< DestinationSurface->pixels;
std::cout << "\nImage Surface Pixels: "
<< ImageSurface->pixels << '\n';
}
// ...
private:
SDL_Surface* ImageSurface{nullptr};
};DestinationSurface Pixels: 00007FF45DB30020
Image Surface Pixels: 00000292E26E0000If the data we're copying from one memory location to another represents pixels, that copying operation is often referred to as blitting. SDL provides the SDL_BlitSurface() function to make it easier to copy pixel data from one surface to another.
The function accepts 4 arguments:
- Source: The surface we're copying from
- Source Rectangle: Which area of the source we're copying from
- Destination: The surface we're copying to
- Destination Rectangle: Which area of the destination we're copying to
Both of the rectangles are optional, and we'll explore them in more detail in the next lesson. For now, we'll pass nullptr to those parameters:
src/Image.h
// ...
class Image {
public:
// ...
void Render(SDL_Surface* DestinationSurface) {
if (!ImageSurface) return;
SDL_BlitSurface(
ImageSurface, nullptr,
DestinationSurface, nullptr
);
}
// ...
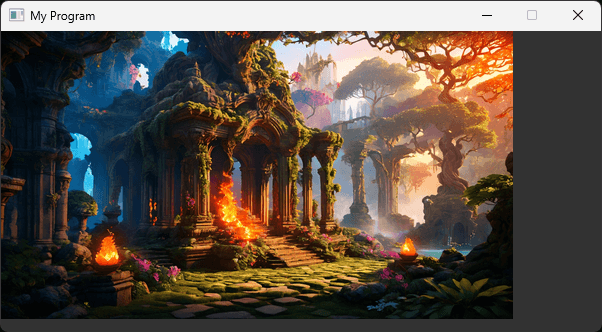
};Running our program, we should now see our program rendering the image:
Reviewing the Architecture
It's important to understand exactly what is going on here, as this architecture is foundational for a lot of more advanced concepts. Let's review what is happening.
In our main.cpp, we're creating a Window and an Image:
src/main.cpp
int main(int, char**) {
SDL_Init(SDL_INIT_VIDEO);
Window GameWindow;
Image Example("example.bmp");
bool IsRunning = true;
SDL_Event Event;
while (IsRunning) {
while (SDL_PollEvent(&Event)) {
if (Event.type == SDL_EVENT_QUIT) {
IsRunning = false;
}
}
GameWindow.Render();
Example.Render(GameWindow.GetSurface());
GameWindow.Update();
}
SDL_Quit();
return 0;
}The constructors for both of these classes result in an SDL_Surface being created. The GameWindow surface is created automatically as a side effect of the SDL_CreateWindow() function, whilst the Example surface is created by the call to SDL_LoadBMP().
Later, in our application loop, we're performing three actions after all of our events are processed:
src/main.cpp
// ...
int main(int, char**) {
SDL_Init(SDL_INIT_VIDEO);
Window GameWindow;
Image Example("example.bmp");
// Application Loop
bool IsRunning = true;
SDL_Event Event;
while (IsRunning) {
while (SDL_PollEvent(&Event)) {
if (Event.type == SDL_EVENT_QUIT) {
IsRunning = false;
}
}
GameWindow.Render();
Example.Render(GameWindow.GetSurface());
GameWindow.Update();
}
// Cleanup
SDL_Quit();
return 0;
}GameWindow.Render()fills our window surface with a solid gray color. This is done throughSDL_FillSurfaceRect().Example.Render()fills a portion of our window surface with data from our image surface. This overwrites most of the gray pixels with colors from our image. In this case, our image surface is slightly smaller than the window surface, so not all of the gray pixels are overwritten.- We call
GameWindow.Update(). This callsSDL_UpdateWindowSurface(), telling SDL we've completed rendering our frame, and it can be shown on the screen. This triggers the buffer swap we described in our earlier lesson on .
There are two additional things to note about these three actions.
Firstly, the order is important. If we call GameWindow.Render() after blitting our image onto the window surface, we'd never see the image. This is because the gray color from SDL_FillSurfaceRect() would overwrite everything we blitted.
This is perhaps obvious in this case but, as our programs become more complex, we should be mindful of the order our blits happen. We can imagine later blits as "painting over" previous ones.
Secondly, as we're calling these functions within the application loop, they're being performed on every frame. It's particularly important to understand GameWindow.Render() in this context.
On every iteration of our application loop, the window surface still has the content of the previous frame. By kicking off the render process with GameWindow.Render(), we're effectively clearing out that content by replacing it all with a solid color. This gives us a fresh canvas, ensuring artifacts from the previous frame don't stick around.
Why do we Redraw Everything on Every Frame?
The process of throwing away every frame and creating a new one from scratch may seem wasteful. This is especially likely to be a concern in situations where each new frame is very similar to the previous. Perhaps only part of the frame has changed or, in the case of our simple program, nothing at all has changed.
However, this discard-and-redraw approach is widely adopted, meaning our operating systems, drivers, and hardware are highly optimized to handle applications that work this way. As such, it is generally not worth trying to optimize this aspect.
Optimizing Blit Performance
As we introduced earlier, surfaces can represent their pixel data in different ways in memory.
If the two surfaces we're blitting between use different pixel formats, the blitting process will be much slower, as we can no longer just copy the pixel data from the source to the destination. We need to transform each pixel from the format used by the source surface (the image, in this example) to the format used by the destination surface (the window, in this example).
As a reminder, the format an SDL_Surface uses is available from the format member variable. If our surfaces don't have the same format, SDL_BlitSurface() will need to perform the conversion:
src/Image.h
// ...
class Image {
public:
// ...
void Render(SDL_Surface* DestinationSurface) {
if (!ImageSurface) return;
if (DestinationSurface->format ==
ImageSurface->format
) {
std::cout << "Matched Format Blit\n";
} else {
std::cout << "Reformat Required\n";
}
SDL_BlitSurface(
ImageSurface, nullptr,
DestinationSurface, nullptr
);
}
// ...
};Reformat Required
Reformat Required
Reformat Required
...SDL functions like SDL_BlitSurface() will happily perform this transformation for us, so we don't need to implement it ourselves. However, we still incur the performance cost every time it happens.
If one of our surfaces is frequently used to blit onto surfaces that use a different format, we should consider doing that transformation only once, rather than on every blit. We can do that using the SDL_ConvertSurface() function. It accepts a pointer to the surface we want to convert, and the SDL_PixelFormat enum we want to convert it to.
SDL_ConvertSurface(Surface, Format)This function returns a pointer to a new surface with the pixel data in the correct format, or a nullptr if the conversion failed.
Let's add this format as an optional parameter to our Image constructor. If provided, our ImageSurface will use that format:
src/Image.h
// ...
class Image {
public:
Image(
const std::string& File,
SDL_PixelFormat PreferredFormat = SDL_PIXELFORMAT_UNKNOWN
) : ImageSurface{SDL_LoadBMP(File.c_str())} {
if (!ImageSurface) {
std::cout << "Failed to load image: "
<< File << ":\n" << SDL_GetError() << '\n';
}
if (PreferredFormat != SDL_PIXELFORMAT_UNKNOWN) {
SDL_Surface* Converted{
SDL_ConvertSurface(ImageSurface, PreferredFormat)
};
if (Converted) {
SDL_DestroySurface(ImageSurface);
ImageSurface = Converted;
} else {
std::cout << "Error converting surface: "
<< SDL_GetError() << '\n';
}
}
}
// ...
};Performance Profiling
Before we update our main.cpp to provide this PreferredFormat argument, let's establish a baseline so we can ensure our changes are improving the performance.
Let's profile how long our image is currently taking to render. We can do this using SDL_GetPerformanceCounter(), which returns a high-accuracy timer. By calling this function before and after the thing we're profiling, we can get a platform-specific representation of how long it is taking:
src/main.cpp
// ...
#include <iostream>
int main(int, char**) {
SDL_Init(SDL_INIT_VIDEO);
Window GameWindow;
Image Example("example.bmp");
bool IsRunning = true;
SDL_Event Event;
while (IsRunning) {
while (SDL_PollEvent(&Event)) {
if (Event.type == SDL_EVENT_QUIT) {
IsRunning = false;
}
}
GameWindow.Render();
Uint64 Start{SDL_GetPerformanceCounter()};
Example.Render(GameWindow.GetSurface());
Uint64 Delta{SDL_GetPerformanceCounter() - Start};
std::cout << "Time to Render Image: "
<< Delta << '\n';
GameWindow.Update();
}
// Cleanup
SDL_Quit();
return 0;
}Running our program, we can now get some indication of how long the image is taking to render on each frame. On my system, it is taking approximately 4,900 units of time:
Time to Render Image: 4874
Time to Render Image: 4977
Time to Render Image: 4922
...Note that the "units" here are not well defined. SDL_GetPerformanceCounter() is intended to compare the performance of different implementations, so this 4,900 result is only useful if we have something to compare it against.
Let's update our main.cpp to provide the PreferredFormat argument, so we can confirm our updated Image constructor is making a positive difference:
src/main.cpp
// ...
int main(int, char**) {
SDL_Init(SDL_INIT_VIDEO);
Window GameWindow;
Image Example{
"example.bmp",
GameWindow.GetSurface()->format
};
bool IsRunning = true;
SDL_Event Event;
while (IsRunning) {
while (SDL_PollEvent(&Event)) {
if (Event.type == SDL_EVENT_QUIT) {
IsRunning = false;
}
}
GameWindow.Render();
Example.Render(GameWindow.GetSurface());
GameWindow.Update();
}
SDL_Quit();
return 0;
}Now, our pixel format conversion happens only once - in the Image constructor. The Render() function that is called every frame has less work to do, and that is reflected in our profiling. On my machine, the image blitting is approximately 10 times faster:
Time to Render Image: 498
Time to Render Image: 479
Time to Render Image: 585
...Should I Always Convert the Format?
Given these results, it may seem reasonable to always convert our surfaces to the same format. However, this is not always a good idea.
Some capabilities require surfaces to be in a specific format. For example, if we want to blend surfaces or images using transparency, we need to use a pixel format that supports it.
If we load a semi-transparent PNG image onto a surface and then convert it to match the window surface, we'll likely lose the transparency data. This means we can no longer blend our surfaces in the way we may have intended.
We cover transparency and other forms of blending in more detail later in the course.
Complete Code
Complete versions of the files we created in this lesson are available below:
Files
Summary
Throughout this lesson, we covered the key techniques for working with images in C++ and SDL3. We learned how to:
- Load bitmap images into SDL surfaces
- Render images on the screen using blitting
- Optimize performance through pixel format conversion
- Profile and measure rendering performance
In the next lesson, we'll see how we can replace the nullptr arguments we're currently passing to SDL_BlitSurface(). This will allow us to select which part of the image to copy, and which position to copy it to.
Cropping and Positioning Images
Learn to precisely control image display using source and destination rectangles.