Installing vcpkg on Windows
An introduction to C++ package managers, and a step-by-step guide to installing vcpkg on Windows and Visual Studio.
When working with C++, we're not restricted to just working with the standard library. There is a huge and diverse ecosystem of other libraries we can use, covering a large range of uses.
Rather than reinventing the wheel in every project, we can import libraries created by other developers that can meet our needs.
In upcoming lessons, we're going to begin relying more and more on these external libraries.
However, manually downloading and managing packages is a cumbersome process. A range of options have been created that help us manage our dependencies more effectively.
The most popular options are currently vcpkg and Conan.
For this course, we'll use vcpkg, and in this lesson, we'll walk through the installation process and some common issues that can occur in Windows. but feel free to use any option
Installing vcpkg
We need to compile vcpkg from the source code, but a simple script is provided that will do this for us with a single command.
A common installation and setup for vcpkg involves four steps:
- Downloading the Source Code
- Building the Source Code
- Integrating vcpkg with MSBuild
- Setting our default target
We walk through these four steps below.
Download vcpkg from GitHub
A zip containing the source code we need is available from the releases page on GitHub.
We should download the source code from the Assets section of the latest release:

Once acquired, we should unzip this folder to a location on our hard drive. We will be accessing it frequently, so ensure it is in a location we'll easily be able to find later.
Running bootstrap-vcpkg.bat
To compile vcpkg and generate the executable file, we can run the bootstrap-vcpkg.bat in the folder where we unzipped everything.
Once complete, the script should have created an executable file - vcpkg.exe - in the same directory.
Integrating vcpkg with MSBuild / Visual Studio
To easily use the packages we download, we need to integrate vcpkg with our C++ build tools. By default, this is MSBuild on Windows.
vcpkg also has a script for this, as part of the executable we generated in the previous step
vcpkg.exe is a command line tool. To use it, we need to execute it from a terminal, which allows us to pass additional arguments.
On Windows, we can open a Power Shell terminal window in our vcpkg directory using Shift + Right Click > Open PowerShell Window here
From PowerShell, we can run the following command to integrate vcpkg with MSBuild:
.\vcpkg integrate installThis should generate a success message, indicating C++ projects can now #include installed libraries.
If this script generates an error stating vcpkg is not recognized, we need to ensure we ran the bootstrap-vcpkg.bat file from step 2, and that we're opening our PowerShell window in the same location as the vcpkg.exe file that was generated.
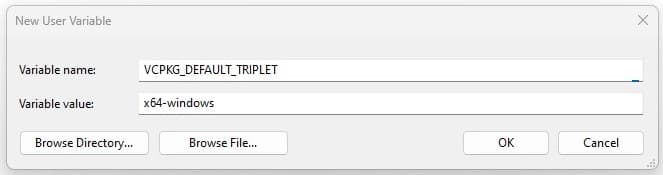
Setting the Default Triplet
There are many possible environments we can build C++ applications for. For example, these can include PCs running Windows, phones running iOS, smartwatches, etc. A triplet is a simple string that specifies what the target environment is. For example, x64-windows specifies our target is 64-bit Windows devices.
When we download a package through vcpkg, we need to specify which target we want. We can do that every time we install a package, but it's usually easier to specify a default.
We do that by creating a VCPKG_DEFAULT_TRIPLET as an environment variable.
We can do that through Control Panel > System Properties > Advanced > Environment Variables, and click "New" within the User Variables section.
Alternatively, we can run this PowerShell command:
[System.Environment]::SetEnvironmentVariable(
'VCPKG_DEFAULT_TRIPLET','x64-windows', 'User'
)Installing Packages with vcpkg
We can install packages through vcpkg by using the vcpkg install command, followed by the names of the packages we want to install.
For example, let's install spdlog, a popular third-party library for logging. As before, open a PowerShell terminal in our vcpkg installation directory, and run this command:
.\vcpkg install spdlogIf successful, we should now be able to immediately #include this library in our Visual Studio projects:
#include <spdlog/spdlog.h>
int main() {
spdlog::info("hello world");
spdlog::error("oh no!");
}[2023-06-21 14:12:33.945] [info] hello world
[2023-06-21 14:12:33.946] [error] oh no!Troubleshooting
If the #include directive isn't working following the above steps, the problem is likely to be one of two possibilities:
The integrate Script Didn't Run
Ensure step 2 from the installation instructions above is completed successfully.
Target/Triplet Mismatch
We need to ensure the platform we're building for in Visual Studio matches the target of the package we downloaded. We can see our Visual Studio target (eg x64) from the dropdown near the Run button, or Build Menu > Configuration Manager
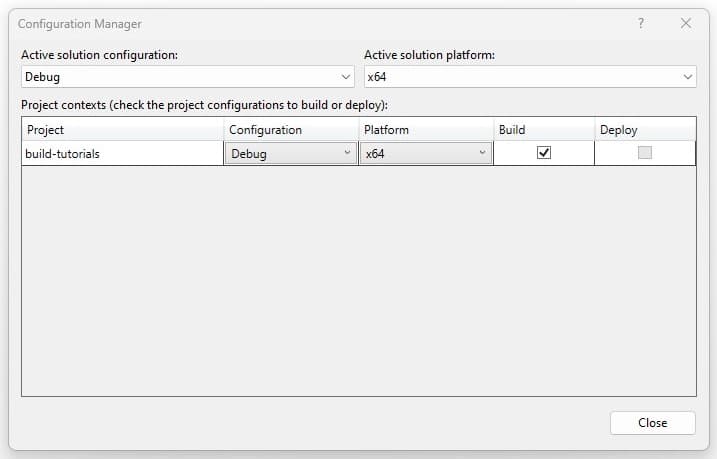
In the above example, we're building for x64, or the x64-windows triplet.
We can see what vcpkg packages we have downloaded by running .\vcpkg.exe list from the vcpkg directory. For example, if our Visual Studio build configuration is targeting x64, we should ensure that the list includes the x64-windows version of our package:
.\vcpkg.exe listIf it's missing, we can specify the desired triplet as an additional argument to the vcpkg install command:
.\vcpkg install spdlog --triplet x64-windowsAlternatively, we can set the default triplet by following step 4 of the installation instructions above. The default triplet will be used when we do not explicitly specify one as part of the install command.
Summary
In this lesson, we've navigated through the steps of installing vcpkg on Windows, allowing us to manage external C++ libraries. The key takeaways include:
- Package managers and their role in simplifying library management.
- An introduction to vcpkg, a C++ package manager created and maintained by Microsoft.
- Installing and integrating vcpkg with MSBuild and Visual Studio.
- Understood how to set a default target environment using triplets to tailor library installations for specific platforms.
- Explored the process of installing packages with vcpkg and troubleshooting common issues.
Using JSON in Modern C++
A practical guide to working with the JSON data format in C++ using the popular nlohmann::json library.