Configuring a CMake Project
Separate our core logic into libraries, configure CMake for multiple targets, and apply hardware-aware optimizations.
When you write C++ code, you are writing text. That text needs to be translated into machine instructions - binary - that the CPU can execute. This translation is performed by a compiler toolchain, such as GCC (on Linux), Clang (on macOS/Linux), or MSVC (on Windows).
These compilers are incredibly complex tools. A compiler like GCC has hundreds of command-line flags that control code generation. You can tell it to prioritize file size over speed, to unroll loops, to assume strict aliasing rules, or to generate instructions for a specific processor architecture.
Manually invoking the compiler with these flags for every single file in your project is impossible. This is where a build system comes in.
We will be using CMake. It is important to understand that CMake is not a build system itself; it is a build system generator. You describe your project in a file called CMakeLists.txt. CMake reads that file and generates the actual build instructions for your specific environment.
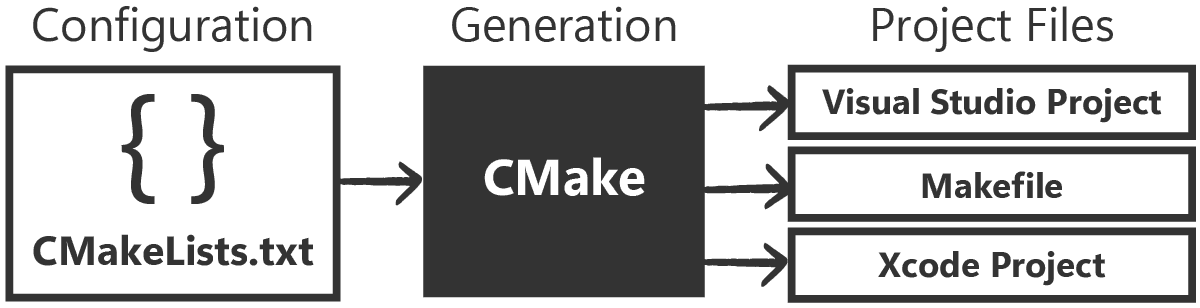
If you are on Linux, it might generate a Makefile. If you are on Windows and have Visual Studio installed, it might generate a Visual Studio Solution (.sln). This allows us to write our configuration once and have it work on any machine.
We cover CMake in detail in a . For this course, we will move much faster and focus specifically on the configurations that impact performance analysis.
The Project Architecture
In this course, we'll mostly be focused on setting up a benchmarking lab, but we'll use a somewhat realistic project structure - one that generates an executable that we'd ultimately ship to users.
An important thing to note is that our benchmarking lab will also be an executable.
Both executables need to share the same code - the algorithms and data structures we test in our benchmarks are the same ones we use in what we ship to our users.
To accomplish this, we need to place that shared code in a library, meaning our project needs to have at least three components:
- Core Logic: A library containing the code that is used by both our primary executable and our benchmarking.
- Application: The actual program that users run (e.g., a game) that consumes the core logic.
- Benchmarks: A separate testing suite that also consumes the core logic to measure its speed.
Of course, more complex projects can span across many more libraries but, for our simple project, we will organize our filesystem into these three distinct subdirectories:
MyProject/
├── CMakeLists.txt (The Root)
├── CMakePresets.json (Build configurations)
├── dsa_core/ (The Library)
│ ├── CMakeLists.txt
│ ├── include/
│ │ └── dsa/
│ │ └── vector.h
│ └── src/
│ └── vector.cpp
├── dsa_app/ (The Main Application)
│ ├── CMakeLists.txt
│ └── main.cpp
└── benchmarks/ (We will add this next lesson)
├── CMakeLists.txt
└── main.cppThe Root Configuration
Let's start by creating the root CMakeLists.txt. Its primary job is to define the project-wide standards and orchestrate the subdirectories.
CMakeLists.txt
cmake_minimum_required(VERSION 3.20)
# Define the project name and language
project(DsaCourse VERSION 1.0 LANGUAGES CXX)
# Enforce a global standard
set(CMAKE_CXX_STANDARD 23)
set(CMAKE_CXX_STANDARD_REQUIRED ON)
set(CMAKE_CXX_EXTENSIONS OFF)
# Add our subdirectories
add_subdirectory(dsa_core)
add_subdirectory(dsa_app)
# We will add this in the next lesson
# add_subdirectory(benchmarks)Defining the Core Library
Now we move into the dsa_core folder, which is where we'll place all our shared code. We will define this as a library target.
In CMake, add_library() tells the build system to compile code into a binary archive but not into an executable program. This archive waits to be linked to other programs later.
We will also add a simple placeholder class here, MyVector, just so we can confirm everything is working.
Files
Note that the intermediate dsa directory between include/ and vector.h is intentional. In larger projects, this "namespaced include" technique makes it easier to tell what our #include directives are doing:
// Before - where is this file coming from?
#include <vector.h>
// After - we're clearly using the dsa library
#include <dsa/vector.h>Defining the Application
Next, we define our main application. This will be an executable that links to our library. We use add_executable() to create the target, and target_link_libraries() to link it against our library:
dsa_app/CMakeLists.txt
# Create the executable binary
add_executable(dsa_app main.cpp)
# Link to our core library.
# This pulls in the code AND the include paths
target_link_libraries(dsa_app PRIVATE dsa_core)Our library's configuration file specified where its header files are using target_include_directories(), and our application's configuration file used target_link_libraries() to declare that it needs the library.
CMake will now manage that dependency for us. We can #include our library's header files from our app:
dsa_app/main.cpp
#include <dsa/vector.h>
#include <iostream>
int main() {
dsa::MyVector vec;
vec.push_back(42);
std::cout << "Application Running. Vector size: "
<< vec.data.size() << "\n";
return 0;
}When we build our project, CMake will coordinate with the build system to make sure the linking happens correctly, too. We'll build and confirm this soon, but let's handle some additional configuration first.
The Debug Deception
At this point, we have a working build. But if you compile it using default settings, you are likely creating a Debug build.
In debug mode, the compiler's goal is not performance; it is observability. It wants to make it easy for you to step through the code line-by-line in a debugger. To achieve this, it does several things that hurt performance:
- No Inlining: It compiles every function call as a literal
callinstruction. For small functions (likestd::vector::size()or accessing an element), the overhead of the function call can be larger than the work done inside the function. - Memory Stack Usage: It keeps variables in stack memory rather than CPU registers, so you can inspect their values at any time. This forces constant, slow L1 cache interaction instead of instant register access.
- Safety Checks: The standard library often enables extra checks in debug mode. Accessing a vector element might trigger a bounds check. Incrementing an iterator might check if the iterator is valid.
These features are helpful for detecting and fixing bugs, but to maximize performance, we turn them off when we're creating a build that we'll release. So, if we're trying to measure the performance of what we'll eventually release, we must replicate that release configuration when running our benchmarks.
To simplify this, we will use a CMakePresets.json file in our root directory. This allows us to define standard configurations that we can apply with a single command later:
CMakePresets.json
{
"version": 3,
"configurePresets": [{
"name": "release",
"binaryDir": "${sourceDir}/build/release",
"cacheVariables": {
"CMAKE_BUILD_TYPE": "Release"
}
}],
"buildPresets": [{
"name": "release",
"configurePreset": "release"
}]
}Unlocking the Hardware
Setting the build to Release usually enables the -O3 (on GCC/Clang) or /O2 (on MSVC) optimization level. This tells the compiler to apply aggressive transformations to your code, like unrolling loops and reordering instructions.
However, by default, compilers are conservative about architecture.
When you download a program like Chrome or Discord, it works on your computer, but it also works on a computer from 2015. To achieve this portability, the compiler only uses the "lowest common denominator" CPU instructions. It avoids using modern features like AVX2 or AVX-512 because older CPUs would crash if they tried to execute them.
But we aren't distributing our benchmarks to millions of users. We are running them on our machine and, assuming our test machine is similar to our users, we want to optimize for that hardware.
Using march=native
We can tell the compiler to generate code specifically for the CPU it is currently running on. On GCC and Clang, this flag is -march=native. MSVC doesn't have a direct equivalent, but /arch:AVX2 is a fairly common standard for modern PCs.
We will apply these flags specifically to our dsa_core library. Because dsa_core is linked into both our primary application and, later, our benchmarking application; optimizing it here will apply it to both.
Let's update dsa_core/CMakeLists.txt:
dsa_core/CMakeLists.txt
# ...
# Enable Architecture-Specific Optimizations for Release Builds
# -march=native allows the compiler to use instructions specific
# to your CPU (like AVX)
if(CMAKE_CXX_COMPILER_ID MATCHES "Clang" OR CMAKE_CXX_COMPILER_ID MATCHES "GNU")
target_compile_options(dsa_core PRIVATE
$<$<CONFIG:Release>:-O3 -march=native>
)
elseif(MSVC)
target_compile_options(dsa_core PRIVATE
$<$<CONFIG:Release>:/O2 /arch:AVX2>
)
endif()Notice the use of generator expressions: $<$<CONFIG:Release>:...>. This ensures these flags are only applied when we are building in release mode. We don't want to optimize our debug builds, or we'll lose the ability to step through them easily.
Link Time Optimization (LTO)
Traditionally, C++ compiles one file at a time. This unit is called a translation unit.
If you have a function MyVector::push_back() in vector.cpp and you call it from main.cpp, the compiler cannot optimize that call when compiling main.cpp. It doesn't know what push_back() does; it only sees the function declaration (the promise that it exists).
This means the compiler cannot inline the function. It has to generate a standard function call, jumping to a different memory address. This breaks locality and prevents optimizations.
Link Time Optimization (LTO) changes this. It delays the code generation step until the linker runs. The linker sees the entire program at once. It can see the code inside vector.cpp and inject it directly into main.cpp, deleting the function call entirely.
CMake makes enabling this easy. We check if the compiler supports it, and if so, we turn it on for dsa_core.
dsa_core/CMakeLists.txt
# ...
# Enable Link Time Optimization (LTO) if supported.
include(CheckIPOSupported)
check_ipo_supported(RESULT result OUTPUT output)
if(result)
set_target_properties(dsa_core PROPERTIES
INTERPROCEDURAL_OPTIMIZATION TRUE
)
else()
message(WARNING "IPO is not supported: ${output}")
endif()Complete Code
Here is the complete state of the project files at the end of this lesson. This structure establishes the library-application separation and configures the build system for high-performance release builds.
Files
Configuring the Generator
Before we use CMake to generate the build system, we might want to configure what type of build system it generates. By default, it scans our system searching for what we have installed, and it will generally choose a sensible default.
However, if we have a complex environment, perhaps with many different toolchains installed, it might choose something we don't want.
We can get the list of the available generators using the following command:
cmake --helpTo explicitly specify which one we use, we add a generator key to our CMakePresets.json. This value should be the generator we want to use, formatted in the exact same way it was in the cmake --help output. For example:
{
"version": 3,
"configurePresets": [{
"name": "release",
"binaryDir": "${sourceDir}/build",
"generator": "Visual Studio 17 2022",
"cacheVariables": {
"CMAKE_BUILD_TYPE": "Release"
}
}],
"buildPresets": [{
"name": "release",
"configurePreset": "release",
"configuration": "Release"
}]
}Building the Project
Let's build our project and confirm everything is working. From our project directory (the same location as the root CMakeLists.txt) we can ask CMake to generate a build system using our release preset:
cmake --preset releaseWe can then use that build system to compile our project. CMake provides an interface via the --build flag that lets us communicate with that underlying build system in a standardized way.
To use it, from our project root:
cmake --build --preset defaultUsing this approach is recommended over interacting with the build system directly. This is primarily because cmake --build will first check if we changed anything in our CMakeLists.txt files, and will automatically regenerate the build system to include those changes.
If our build was successful, and we pay attention to the output, we should see where our executable was created. The location depends on our build system, but will often be something like build\dsa_app\Release\dsa_app, with an additional .exe extension on Windows.
We can run it from the same terminal window:
.\build\dsa_app\Release\dsa_app.exeApplication Running. Vector size: 1Summary
We have now laid the foundations for a build environment that will let us do performance analysis. Here are the key points:
- Structure: We separated our project into
dsa_core(library) anddsa_app(executable). This modular design allows us to easily attach a benchmarking suite in the next lesson. - Build Type: We prioritized
Releasemode to strip away debug overhead and enable the optimizer. - Hardware Access: We used
march=nativeto allow the compiler to use every feature of our specific CPU. - Global Optimization: We enabled LTO to allow the compiler to inline functions across the boundary between our library and our applications.
In the next lesson, we will implement the third component of our architecture: the benchmarks directory. We will integrate Google Benchmark to measure our code.
Integrating Google Benchmark
Integrate the industry-standard Google Benchmark library into a CMake project to capture nanosecond-precision timings.