Building Projects with CMake
Learn how to install and use CMake, the industry-standard build system for C++, to configure and build cross-platform projects.
We've set up a compiler to turn our C++ code into an executable. We've used Git to manage our source code and its dependencies (SDL3). Now, we need a tool to connect these two pieces - something that can take our source files, find the libraries we need, and tell the compiler exactly how to build everything. This is the job of a build system generator.
For C++ projects, the undisputed industry standard is CMake.
CMake is not a compiler or a build system itself. Instead, it reads a set of instructions you write in a file called CMakeLists.txt and uses them to generate the project files for a native build system, such as:
- Visual Studio solution files (
.sln) for Windows. - Makefiles for Linux and macOS.
- Ninja build files for a faster, cross-platform build.
This means you can write one CMakeLists.txt file, and anyone on any platform, using any compiler, can build your project with a consistent process.
In this lesson, we'll install CMake and learn how to use it.
Installing CMake on Windows
There are a few ways we can install CMake on Windows.
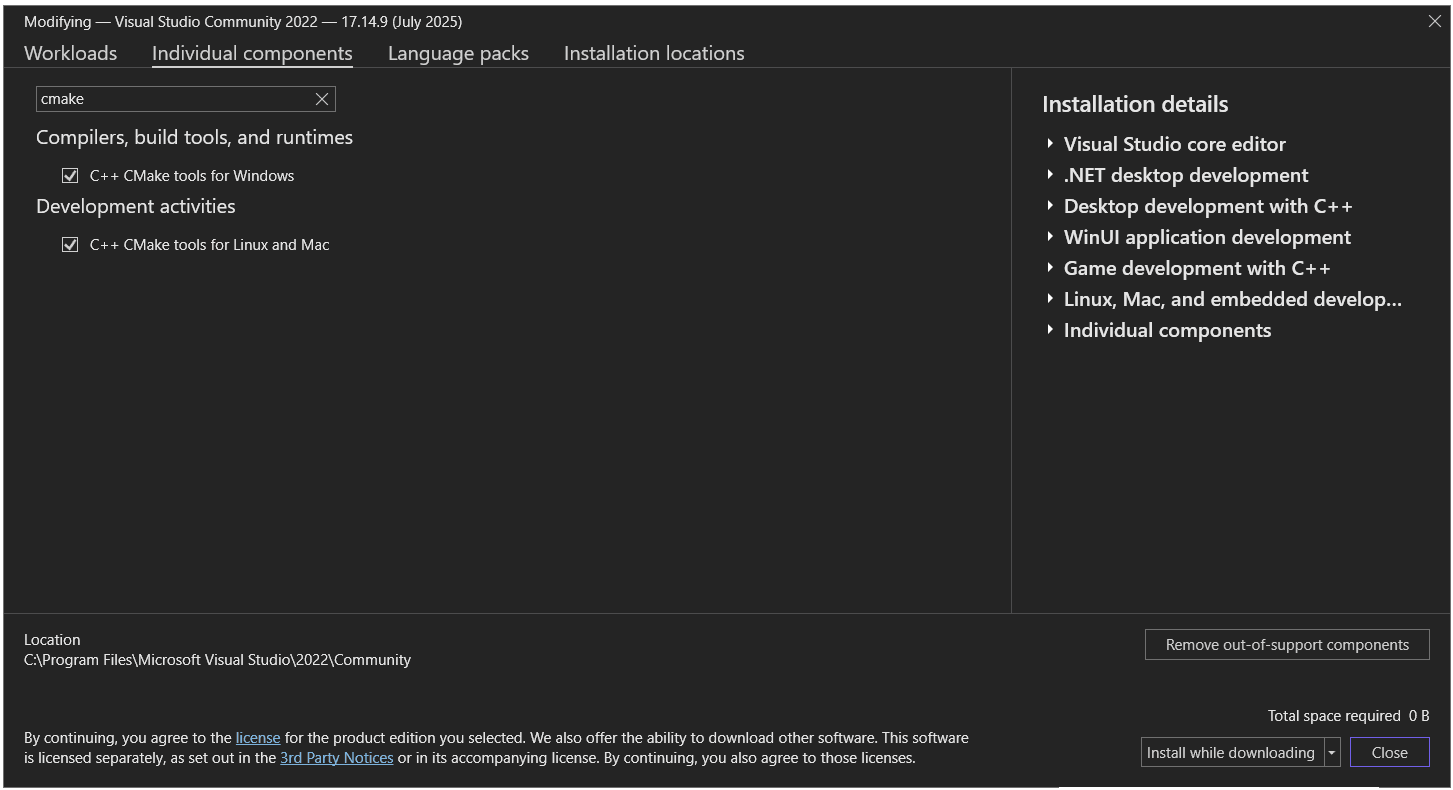
Visual Studio Installer: If you've installed Visual Studio as your C++ development environment, you likely already have CMake. You can check if CMake is installed (and install it if it isn't) by running the Visual Studio Installer, clicking "Modify", and then searching for CMake in the components list:
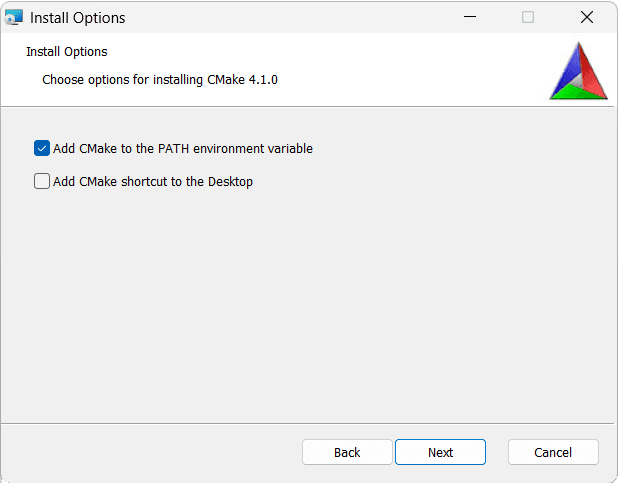
Official Installer: You can download the official Windows installer (.msi) from the CMake download page. During installation, make sure to select the option "Add CMake to the system PATH for all users" or "for current user". This makes the cmake command available in any Command Prompt or PowerShell terminal.
Package Managers: If you use a package manager like Chocolatey or Winget, they're likely to have CMake available. This will allow you to install it with a command such as winget install cmake or choco install cmake.
MSYS2: If you're using the MSYS2 UCRT64 terminal, you can install CMake using the command:
pacman -S mingw-w64-ucrt-x86_64-cmakeInstalling CMake on macOS
Homebrew: If you use the Homebrew package manager, installing CMake is a one-liner:
brew install cmakeOfficial Installer: You can download a .dmg disk image from the CMake download page. This provides a graphical installer similar to other macOS applications.
Installing CMake on Linux (Debian/Ubuntu)
APT (Recommended): The simplest way to install CMake on Debian-based systems is with apt.
The version in the standard repositories might be slightly older than the latest release, but it is generally stable and sufficient for most projects.
sudo apt update
sudo apt install cmakeSnap: For a more up-to-date version, you can use Snap: sudo snap install cmake --classic.
Verify Your Installation
Once the installation is complete, open a new terminal (or Command Prompt on Windows) and run the following command:
cmake --versionIf the installation was successful, you'll see output that includes the installed version number, something like this:
cmake version 4.0.3
CMake suite maintained and supported by Kitware (kitware.com/cmake).If you get an error like "command not found", it likely means CMake's installation directory was not added to your system's PATH environment variable.
At the time of writing, the latest stable version is 4.1.1. Yours may be older, particularly if you're using the version of CMake bundled with Visual Studio or some other IDE. Any version from 3.23 onwards will work with this course.
Command Line vs. GUI vs. IDE Integration
CMake isn't a single program; it's a suite of tools. You can interact with it in several ways, and the best one often depends on the task at hand.
The Command Line (cmake)
This is the most fundamental and powerful way to use CMake. It's what CI/CD pipelines use for automated builds, and it's what IDEs often run under the hood.
IDE Integration
This is how most developers use CMake day-to-day. Modern C++ IDEs have embraced CMake as a first-class project model.
- Visual Studio: Has native support for opening a folder containing a
CMakeLists.txtfile. It will automatically configure the project, let you select build targets, and provide full IntelliSense and debugging. - VS Code: The CMake Tools extension provides a popular workflow. It gives you a status bar to switch configurations, a side panel to view targets, and buttons to configure, build, and debug your project.
- CLion: This IDE uses CMake as it's primary method of managing builds. Its entire project model is a CMake project, offering deep integration, code completion for CMake commands, and easy management of profiles and configurations.
Creating a CMakeLists.txt
The heart of any CMake project is the CMakeLists.txt file. This is a plain text file that contains a series of commands that describe how to build your project.
Let's create this file in the root directory of our project, alongside our vendor directory and README.md.
CMakeLists.txt
# Set the minimum version of CMake required
cmake_minimum_required(VERSION 3.23)
# Define the project
project(
MyGame
VERSION 1.0
DESCRIPTION "My first SDL3 Game"
LANGUAGES CXX
)
# Set the C++ standard to C++20
set(CMAKE_CXX_STANDARD 20)
set(CMAKE_CXX_STANDARD_REQUIRED ON)Let's break this down:
cmake_minimum_required(VERSION 3.23): This is always the first line. It tells CMake what version it needs to be to understand the commands in this file. Version 3.23 is a safe, modern choice that's widely available.project(...): This command defines our project. We give it a name (MyGame), a version, a short description, and specify that its primary language is C++ (CXX).set(CMAKE_CXX_STANDARD 20): This tells CMake that we want to build our project using the C++20 standard.set(CMAKE_CXX_STANDARD_REQUIRED ON): This ensures that the chosen C++ standard is strictly enforced. If the compiler doesn't support C++20, CMake will stop with an error.
With just these few lines, we've defined the basic properties of our project.
CMake Presets
CMake Presets are the modern, recommended way to define common configuration options for your project. Instead of passing long, complex arguments on the command line, you can define named "presets" in a JSON file. This makes your build process repeatable and easy to share with other developers.
Let's create a file named CMakePresets.json in our project's root directory.
CMakePresets.json
{
"version": 3,
"configurePresets": [{
"name": "default",
"binaryDir": "build"
}],
"buildPresets": [{
"name": "default",
"configurePreset": "default"
}]
}This file defines two types of presets - presets for when we're configuring the project, and presets for when we're building the project. We cover these two steps in the next section, so this will make more sense soon, but broadly:
- We run the configuration step once to perform all the initial setup of our build system. On Windows, for example, the configure step might create a Visual Studio solution for our project.
- We run the build step every time we want to compile our software. This takes the configuration files, such as the Visual Studio solution, and uses them to create an executable we can run.
We can configure preset settings for each of these steps:
configurePresets
These define options for the "configure" step, where CMake generates the build files.
- We've created one named
"default". "binaryDir": "build"tells CMake to put all the generated project files, compiled code, and final executables into a separate directory namedbuild. This practice is called an out-of-source build, and it keeps our source code directory clean.
buildPresets
These define options for the "build" step.
- We've also created a "default" build preset.
"configurePreset": "default"links this build preset to our "default" configure preset, telling it which configuration to use. The most notable effect is that it informs CMake where the build system is. In this case, we're saying it's in thebinaryDirspecified in ourdefaultconfiguration preset.
Configuring and Building
Now that we have a CMakeLists.txt and a CMakePresets.json, we can perform the two main steps of a CMake build: configuring and building.
The first step is to "configure" the project. During this phase, CMake reads your CMakeLists.txt, detects your compiler and development environment, and generates the actual project files for your native build system (like a Visual Studio solution or a Makefile).
To run the configure step using our preset, we execute this command from the project's root directory:
cmake --preset defaultYou'll see output as CMake checks your system and sets up the build environment. When it's finished, you'll find a new build directory in your project. This directory contains all the generated files.
With the project configured, we can now build it. This step takes the generated project files and runs the actual compiler to turn your source code into an executable.
We could do that using the generated files directly. For example, if CMake generated a Visual Studio project in our /build directory, we could open that solution in Visual Studio and use it like any other .sln file.
However, we can alternatively trigger the build step through CMake, which works across all the different build systems it recognizes. We can trigger the build using our default build preset like this:
cmake --build --preset defaultSince we don't have any source code to compile yet, this command will run very quickly and report that there's nothing to do.
This workflow is the core of using CMake:
- Configure once: You only need to run the
cmake --preset defaultcommand when you first create the project, or when you make significant changes to your configuration such that you want to recreate a clean build environment. If things ever get strange with your build, a common troubleshooting step is to delete the build directory and run the configure step again. - Build many times: As you make changes to your C++ code, you will repeatedly run the
cmake --build --presetdefault command to recompile and see your changes.
Generators
A CMake Generator is what determines the type of native build files that CMake will create in your build directory. CMake is smart and will automatically choose a default generator based on your system.
- On a Windows system with Visual Studio installed, it will likely default to a "Visual Studio" generator, creating a
.slnfile. - On macOS or Linux, it will likely default to "Unix Makefiles", creating a
Makefile. - If you have the Ninja build system installed, CMake may prefer it, as it's known for being very fast.
Listing Generators
You can see a full list of the generators available on your machine by running cmake --help. The output is long, but will include a section listing the available generators:
cmake --help...
The following generators are available on this platform (* marks default):
Visual Studio 17 2022
Visual Studio 16 2019
...Specifying the Generator
While you can let CMake pick the default, you (or your team) may have a preference that doesn't match the default. We can specify which generator to use directly in our CMakePresets.json file.
For example, we could update our preset to explicitly request the Visual Studio 2022 generator. Note the generator value should exactly match one of the options listed in the cmake --help output:
CMakePresets.json
{
"version": 3,
"configurePresets": [{
"name": "default",
"binaryDir": "build",
"generator": "Visual Studio 17 2022"
}],
"buildPresets": [{
"name": "default",
"configurePreset": "default"
}]
}Creating a .gitignore
We should commit our changes to source control regularly, however, we should not commit files that are automatically generated, such as the contents of our /build directory.
To make this easier, git supports a .gitignore file, containing patterns that we want it to ignore.
We can ask git to ignore all contents of our /build directory like this:
.gitignore
build/*Now, if we check our status, we should see that the new files we created are being tracked, but the automatically generated content in our /build directory isn't:
git statusWe can stage, commit, and push our changes in the usual way:
git add .git commit -m "Add CMake"git pushSummary
In this lesson, we set up a project using CMake, the industry-standard build system generator for C++.
We began by installing CMake and verified that it was accessible from our command line. We then discussed the different ways to interact with CMake, either from the command line or via an IDE that natively supports it.
The core of the lesson was creating our first CMakeLists.txt file, where we defined our project's name and specified the C++ standard. We then created a CMakePresets.json file to standardize the two-step build process:
- Configuring the project with
cmake --preset defaultto generate native build files in a clean build directory. - Building the project with
cmake --build --preset defaultto compile our code into an executable.
Finally, we learned about CMake Generators and how to explicitly define one in our presets file to specify exactly which build system we want CMake to use.
Creating an SDL3 Project
Learn how to create a complete, cross-platform SDL3 project using CMake.