Creating Installers with CPack and GitHub Actions
Learn to automate the creation of a professional Windows installer by integrating CPack, the WiX Toolset, and a multi-platform GitHub Actions workflow.
In the last lesson, we configured our GitHub Actions workflow to build our project and package it into a ZIP archive. This archive is an "artifact" of the workflow, a downloadable file that proves that our build and packaging process works across multiple platforms.
A .zip file with source code and CMake configuration files is useful for sharing libraries with other developers, but it's not a user-friendly way to distribute an application. Non-technical users expect a guided installation experience. This lesson will extend our CI pipeline to produce just that. We'll create a Windows installer (.msi file) in this example, but we'll use our GitHub Actions workflow, so it's not necessary to have a Windows machine or to use cross-compilation.
We will use the CPack WIX generator, integrate the necessary tools into our CI environment, and use CMake Presets to manage the entire automated workflow.
Setting Up the Windows Environment
For reference, our basic GreeterApp is included below:
Files
To package this, we'll use the WiX Toolset, an open-source project for building Windows installation packages from XML source code. CPack automatically generates these WiX XML files for us and then calls the WiX compiler to build the final .msi package.
The CPack WIX generator is only a front-end for this toolset. It allows WiX to be configured and interacted with from CMake, but CMake doesn't include the tool itself. Conveniently, GitHub Action's Windows runner does come with WiX preinstalled but, if you want to run it locally or on other environments, you will need to install it.
WiX is available on most poplar Windows package managers, such as Chocolatey.
These package managers are also available on the Windows runner, which makes it easy to install tools we need that aren't included by default. For example, we could install Doxygen like this:
.github/workflows/ci.yml
name: C++ CI
on:
pull_request:
branches: ["main"]
jobs:
build-and-test:
runs-on: windows-latest
steps:
- name: Check out code
uses: actions/checkout@v4
- name: Install Doxygen
run: choco install doxygen.install
# ...Packaging with a Windows-Specific Preset
Let's start with the simplest case: our GreeterApp is built by statically linking against GreeterLib. In this scenario, the GreeterApp.exe is a self-contained executable. All the code from GreeterLib has been copied into it, so there are no external .dll files to worry about.
Step 1: Define Components and Install Rules
First, we need to tell CMake what to install. We'll continue to use CPack components to group our files. For this simple case, we only need one component for our application's executable.
In app/CMakeLists.txt, we'll add an install() command for our GreeterApp target, assigning it to a component named Application.
app/CMakeLists.txt
cmake_minimum_required(VERSION 3.23)
add_library(GreeterAppLogic src/run.cpp)
find_package(spdlog CONFIG REQUIRED)
target_link_libraries(GreeterAppLogic PRIVATE
GreeterLib
spdlog::spdlog
)
target_sources(GreeterAppLogic PUBLIC
FILE_SET HEADERS
BASE_DIRS "include"
FILES "include/app/run.h"
)
add_executable(GreeterApp src/main.cpp)
target_link_libraries(GreeterApp PRIVATE GreeterAppLogic)
include(GNUInstallDirs)
install(
TARGETS GreeterApp
RUNTIME DESTINATION ${CMAKE_INSTALL_BINDIR}
COMPONENT Application
)The DESTINATION bin tells the installer to place the executable in a bin subdirectory inside the final installation folder (e.g., C:\Program Files\Greeter\bin).
Next, in our root CMakeLists.txt, we need to inform CPack about this new component. We do this with the cpack_add_component() command, which allows us to provide a friendly name and description that will be shown to the user in the installer's UI.
CMakeLists.txt
cmake_minimum_required(VERSION 3.23)
project(Greeter VERSION 1.0)
include(cmake/Coverage.cmake)
include(cmake/Sanitize.cmake)
include(cmake/Tidy.cmake)
add_subdirectory(app)
add_subdirectory(greeter)
enable_testing()
add_subdirectory(tests)
add_subdirectory(benchmarks)
set(CPACK_ARCHIVE_COMPONENT_INSTALL ON)
include(CPack)
cpack_add_component(Development
DISPLAY_NAME "The Greeter Library"
DESCRIPTION "Compiled Library, Header Files, and CMake Configuration Files"
)
cpack_add_component(Application
DISPLAY_NAME "The Greeter Application"
DESCRIPTION "An application that says hello to the user"
)Step 2: Create a Windows-Specific Preset
For now, we'll ensure our application is a single, self-contained .exe by using static linking. This means we need to set several CMake and vcpkg variables. The best way to manage this is with a dedicated configure preset.
In CMakePresets.json, we'll create a windows-static-release preset that inherits from our base release preset and sets the necessary variables for a fully static Windows build.
CMakePresets.json
{
"version": 6,
"configurePresets": [
// ...
{
"name": "windows-static-release",
"inherits": "release",
"cacheVariables": {
"BUILD_SHARED_LIBS": "OFF",
"CMAKE_MSVC_RUNTIME_LIBRARY": "MultiThreaded",
"CMAKE_EXE_LINKER_FLAGS": "/INCREMENTAL:NO",
"VCPKG_TARGET_TRIPLET": "x64-windows-static"
}
}],
// ...
}Let's break down these cache variables:
- Disabling
BUILD_SHARED_LIBStells our own libraries (likeGreeterLib) to build as static. This is the default behaviour anyway, but we're just being explicit about our requirements here. We covered this variable . - Setting
CMAKE_MSVC_RUNTIME_LIBRARYtoMultiThreadedcorresponds to the/MTcompiler flag, which links against the static version of the Microsoft Visual C++ Runtime. - The
/INCREMENTAL:NOcompiler flag disables incremental linking. Incremental linking reuses linking information from previous builds to make linking of future builds faster. This comes at the expense of some predictability and optimizations that can be performed if we link from scratch. This tradeoff is useful for development where we want our build times to be as fast as possible, but it is typically turned off for release builds to create more performant and predictable outputs. - Setting
VCPKG_TARGET_TRIPLETtox64-windows-statictells vcpkg to find and install the static versions of our dependencies (like spdlog).
Step 3: Create the Installer Preset
Next, we'll create a new package preset in CMakePresets.json. This preset will use the WIX generator and specify that it should only include the Application component:
CMakePresets.json
{
"version": 6,
// ...
"packagePresets": [
// ...
{
"name": "windows-release-installer",
"displayName": "Windows Installer (MSI)",
"inherits": "default",
"generators": ["WIX"],
"variables": {
"CPACK_COMPONENTS_ALL": "Application"
}
}]
}Step 4: Updating the CI Workflow
With these changes, our CI workflow can now generate a basic installer. We need to add conditional logic so that the Windows-specific steps only run on the Windows runner:
.github/workflows/ci.yml
name: C++ CI
on:
pull_request:
branches: ["main"]
jobs:
build-and-test:
strategy:
matrix:
os: [ubuntu-latest, windows-latest, macos-latest]
runs-on: ${{ matrix.os }}
steps:
- name: Check out code
uses: actions/checkout@v4
- name: Set up vcpkg
uses: lukka/run-vcpkg@v11
- name: Configure CMake (Windows)
if: matrix.os == 'windows-latest'
run: cmake --preset windows-static-release
- name: Configure CMake (Linux/macOS)
if: matrix.os != 'windows-latest'
run: cmake --preset release
- name: Build project
run: cmake --build --preset release
- name: Run tests
run: ctest --preset release
- name: Package Development
run: cpack --preset dev-zip
- name: Upload Development Package Artifact
uses: actions/upload-artifact@v4
with:
name: Greeter-Development-${{ matrix.os }}
path: build/Greeter-*-Development.zip
- name: Package Application
if: matrix.os == 'windows-latest'
run: cpack --preset windows-release-installer
- name: Upload Application Package Artifact
if: matrix.os == 'windows-latest'
uses: actions/upload-artifact@v4
with:
name: Greeter-Installer-${{ matrix.os }}
path: build/Greeter-*.msiGitHub steps can be conditional. In this example, we're using if: matrix.os == 'windows-latest' to ensure the Windows-specific configure, package, and upload steps are only executed on the Windows runner.
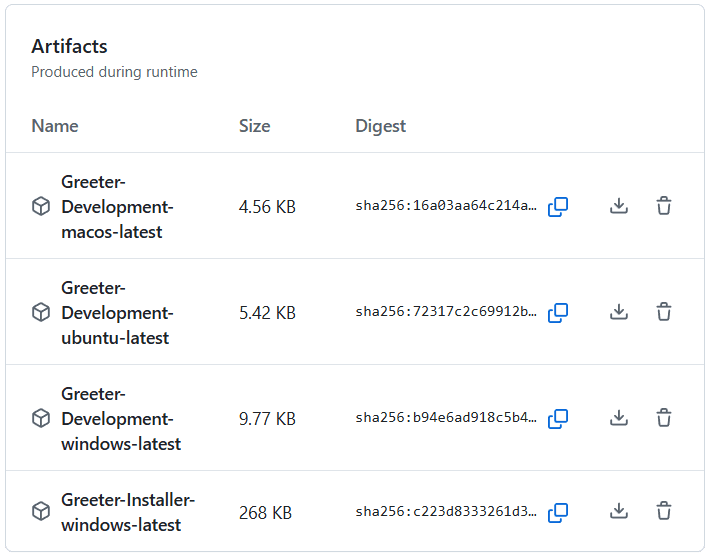
After committing and pushing our changes to a PR targetting the main branch, we should see our workflow start. The Windows job will include our two extra steps and, when it is complete, we'll see the installer available in our artifact list:
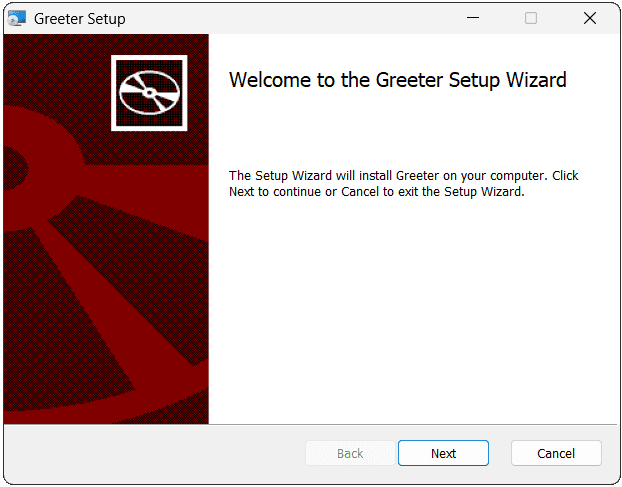
If you have a Windows machine, downloading and running the package will open a familiar UI, which will install our executable after walking through all the steps:
We'll learn how to customize this installer later in the lesson
Packaging Runtime Dependencies
Let's cover a more complex scenario where our executable has runtime dependencies - .dll files on Windows. This means the installer must include not only GreeterApp.exe but also all the .dll files it depends on.
Depending on our preferred configuration, this might include external dependencies like spdlog.dll and fmt.dll, or internal dependencies such as our own GreeterLib being compiled as a .dll.
To test this, we'll switch back to using our release configuration preset on all platforms:
.github/workflows/ci.yml
name: C++ CI
on:
pull_request:
branches: ["main"]
jobs:
build-and-test:
strategy:
matrix:
os: [ubuntu-latest, windows-latest, macos-latest]
runs-on: ${{ matrix.os }}
steps:
- name: Check out code
uses: actions/checkout@v4
- name: Set up vcpkg
uses: lukka/run-vcpkg@v11
- name: Configure CMake
run: cmake --preset release
- name: Build project
run: cmake --build --preset release
- name: Run tests
run: ctest --preset release
- name: Package Development
run: cpack --preset dev-zip
- name: Upload Development Package Artifact
uses: actions/upload-artifact@v4
with:
name: Greeter-Development-${{ matrix.os }}
path: build/Greeter-*-Development.zip
- name: Package Application
if: matrix.os == 'windows-latest'
run: cpack --preset windows-release-installer
- name: Upload Application Package Artifact
if: matrix.os == 'windows-latest'
uses: actions/upload-artifact@v4
with:
name: Greeter-Installer-${{ matrix.os }}
path: build/Greeter-*.msiBy default, vcpkg builds our dependencies as shared libraries (.dll files) so our executable will now have runtime dependencies. For this project, those are the spdlog and fmt libraries.
Installing Runtime Dependencies
The most direct way of installing our runtime dependencies is simple install(FILES ...) commands. We simply provide the path to our dependencies. For dependencies managed by vcpkg, there are some variables that can help us track them down:
install(FILES
"${VCPKG_INSTALLED_DIR}/${VCPKG_TARGET_TRIPLET}/bin/libfmt.dll"
"${VCPKG_INSTALLED_DIR}/${VCPKG_TARGET_TRIPLET}/bin/libspdlog.dll"
DESTINATION ${CMAKE_INSTALL_BINDIR}
COMPONENT Application
)This would work, but only on Windows, and only for release configurations. We could do more work to make this portable, however, CMake 3.21 introduced the RUNTIME_DEPENDENCIES keyword to the install() command to make this problem slightly easier to solve.
Using RUNTIME_DEPENDENCIES
The following example would install all runtime dependencies of SomeTarget into the binary directory, and assign them to the Application component:
install(
TARGETS SomeTarget
RUNTIME_DEPENDENCIES
DESTINATION ${CMAKE_INSTALL_BINDIR}
COMPONENT Application
)However, in most real-world scenarios, this command tries to install too many things. Our programs will typically rely on dependencies provided by the platform itself, such as DLL files that are included with Windows. We don't want those to be included in our package, so we need to filter this list.
Filtering RUNTIME_DEPENDENCIES
To filter the list of dependencies we want to install, the install() command provides a few options. The most useful tend to be PRE_EXCLUDE_REGEXES and PRE_INCLUDE_REGEXES. These allow us to provide regular expressions for files that we want to be excluded or included in our installation command.
In the following example, we exclude everything by default using the .* expression, and then include only dependencies that have fmt or spdlog in their name using .*fmt.* and .*spdlog.*:
app/CMakeLists.txt
cmake_minimum_required(VERSION 3.23)
add_library(GreeterAppLogic src/run.cpp)
find_package(spdlog CONFIG REQUIRED)
target_link_libraries(GreeterAppLogic PRIVATE
GreeterLib
spdlog::spdlog
)
target_sources(GreeterAppLogic PUBLIC
FILE_SET HEADERS
BASE_DIRS "include"
FILES "include/app/run.h"
)
add_executable(GreeterApp src/main.cpp)
target_link_libraries(GreeterApp PRIVATE GreeterAppLogic)
include(GNUInstallDirs)
install(
TARGETS GreeterApp
DESTINATION ${CMAKE_INSTALL_BINDIR}
COMPONENT Application
)
install(
TARGETS GreeterApp
RUNTIME_DEPENDENCIES
PRE_INCLUDE_REGEXES ".*fmt.*" ".*spdlog.*"
PRE_EXCLUDE_REGEXES ".*"
DESTINATION ${CMAKE_INSTALL_BINDIR}
COMPONENT Application
)We would expand this list as we add more dependencies or, alternatively, change our approach where we include everything by default, and then specify only what we want to exclude.
Installing Internal Libraries
For internal runtime dependencies, such as our GreeterLib, we install those using regular install(TARGETS ...) commands:
install(
TARGETS MyLibrary
RUNTIME DESTINATION ${CMAKE_INSTALL_BINDIR}
COMPONENT Application
)Our GreeterLib's RUNTIME files are already being installed to the binary directory and assigned to the Development component. To include them with our installer, we just need to add them to the Application component and then build with BUILD_SHARED_LIBS enabled:
greeter/CMakeLists.txt
# ...
install(
TARGETS GreeterLib
EXPORT GreeterLibTargets
ARCHIVE DESTINATION ${CMAKE_INSTALL_LIBDIR}
COMPONENT Development
LIBRARY DESTINATION ${CMAKE_INSTALL_LIBDIR}
COMPONENT Development
RUNTIME DESTINATION ${CMAKE_INSTALL_BINDIR}
COMPONENT Development
COMPONENT Application
FILE_SET HEADERS DESTINATION ${CMAKE_INSTALL_INCLUDEDIR}
COMPONENT Development
)
# ...To build our target as a runtime dependency rather than a static library, we set the BUILD_SHARED_LIBS cache variable to "ON":
vcpkg.json
{
"version": 6,
"configurePresets": [
// ...
{
"name": "shared-internal-libs",
"inherits": "release",
"cacheVariables": {
"BUILD_SHARED_LIBS": "ON"
}
}],
// ...
}GUIDs
To create a valid MSI installer, our program needs a Globally Unique Identifier (GUID). This GUID is what Windows uses to track the installed product, manage updates, and handle uninstalls.
Every product must have a GUID but, if we don't provide one, WiX will automatically generate one at build time. However, this GUID will be different on every build. This makes it impossible for Windows to realise that the installers generated from two different builds are actually for the same application.
To address this, we should specify an exact GUID for our program and consistently use it. We can generate a GUID using command-line utilities (uuidgen on Linux/macOS, [guid]::NewGuid() in PowerShell) or an online tool like uuidgenerator.net.
Once you have a GUID, you set it in your root CMakeLists.txt using the CPACK_WIX_UPGRADE_GUID variable. This must be done before the include(CPack) command:
CMakeLists.txt
cmake_minimum_required(VERSION 3.23)
project(Greeter VERSION 1.0)
include(cmake/Coverage.cmake)
include(cmake/Sanitize.cmake)
include(cmake/Tidy.cmake)
add_subdirectory(app)
add_subdirectory(greeter)
enable_testing()
add_subdirectory(tests)
add_subdirectory(benchmarks)
set(CPACK_ARCHIVE_COMPONENT_INSTALL ON)
# Don't use this GUID - generate your own!
set(CPACK_WIX_UPGRADE_GUID "c8288165-c0b1-4c9a-ba61-877175be0b5a")
include(CPack)
cpack_add_component(Development
DISPLAY_NAME "The Greeter Library"
DESCRIPTION "Compiled Library, Header Files, and CMake Configuration Files"
)
cpack_add_component(Application
DISPLAY_NAME "The Greeter Application"
DESCRIPTION "An application that says hello to the user"
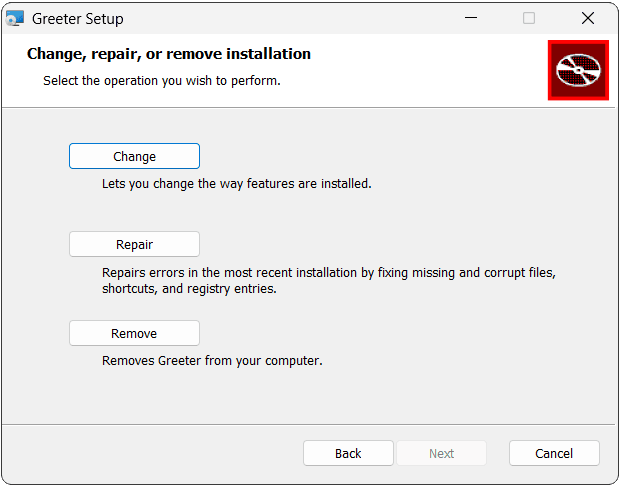
)If we generate two different installers, they will now use this same GUID. If we install our program using one of the installers, and then run the second, Windows will understand that both are for the same underlying program.
Rather than treating the second installer as a separate program, it will now present options for the user to upgrade, repair, or uninstall what they already have:
Multi-Component Installers
Our installer now correctly bundles the executable and its required DLLs. However, installers can contain multiple components, and present users with options on which they want to install, uninstall, or upgrade.
Let's replicate this by imagining we have a simple Documentation.pdf file in our project root that explains how to use our program.
We set the install rules and configure the component in the usual way:
CMakeLists.txt
cmake_minimum_required(VERSION 3.23)
project(Greeter VERSION 1.0)
include(cmake/Coverage.cmake)
include(cmake/Sanitize.cmake)
include(cmake/Tidy.cmake)
add_subdirectory(app)
add_subdirectory(greeter)
enable_testing()
add_subdirectory(tests)
add_subdirectory(benchmarks)
set(CPACK_ARCHIVE_COMPONENT_INSTALL ON)
set(CPACK_WIX_UPGRADE_GUID "c8288165-c0b1-4c9a-ba61-877175be0b5a")
include(CPack)
cpack_add_component(Development
DISPLAY_NAME "The Greeter Library"
DESCRIPTION "Compiled Library, Header Files, and CMake Configuration Files"
)
cpack_add_component(Application
DISPLAY_NAME "The Greeter Application"
DESCRIPTION "An application that says hello to the user"
)
install(FILES
${CMAKE_SOURCE_DIR}/Documentation.pdf
DESTINATION "docs"
COMPONENT Documentation
)
cpack_add_component(Documentation
DISPLAY_NAME "Greeter Documentation"
DESCRIPTION "A PDF file explaining how to use the application"
)Finally, we'll update our package preset to include both components:
CMakePresets.json
{
"version": 6,
// ...
"packagePresets": [
// ...
{
"name": "windows-release-installer",
"displayName": "Windows Installer (MSI)",
"inherits": "default",
"generators": ["WIX"],
"variables": {
"CPACK_COMPONENTS_ALL": "Application"
"CPACK_COMPONENTS_ALL": "Application;Documentation"
}
}
]
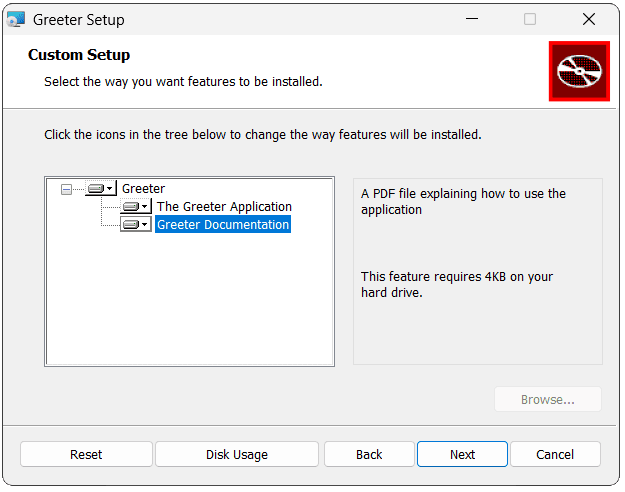
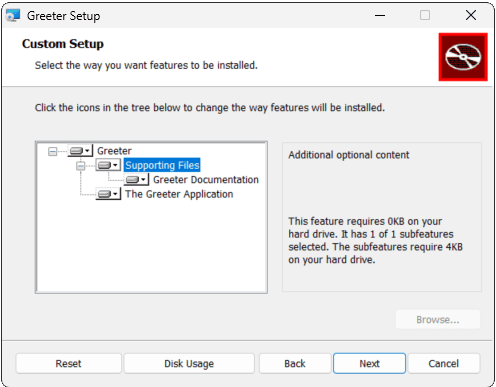
}Now, when a user runs the installer, they will see a feature tree where they can inspect the different parts of the installation:
This technique is particularly useful when used with components that are downloaded on-demand. This means users don't download a massive installer containing components they may not want. Instead, we ship a lightweight installer which downloads components on demand based on what users select within the UI. We won't cover this here, as it requires fairly advanced setup, as well as setting up a web server to host our downloads.
When using WiX, this can be implemented using Burn bundles, and the CPack module we're using provides a friendlier front end based around the cpack_configure_downloads() command documented here.
Component Customization
The cpack_add_component() command offers further options to control how our components are presented, and how they interact with each other.
We can state that one component depends on another component using the DEPENDS keyword:
cpack_add_component(Application
DISPLAY_NAME "The Greeter Application"
DESCRIPTION "An application that says hello to the user"
DEPENDS RuntimeDependencies
)
cpack_add_component(RuntimeDependencies
DISPLAY_NAME "The Runtime Dependencies"
DESCRIPTION "DLLs and other files that are required for the application"
)By default, the installer will assume the user wants to install all of our components. The easiest way to change that is by setting components to DISABLED, meaning they will initially be deselected:
cpack_add_component(OptionalStuff
DISPLAY_NAME "Optional Stuff"
DESCRIPTION "You probably dont want this"
DISABLED
)We can set a component as REQUIRED, meaning it must be installed and cannot be deselected:
cpack_add_component(Application
DISPLAY_NAME "The Greeter Application"
DESCRIPTION "An application that says hello to the user"
REQUIRED
DEPENDS RuntimeDependencies
)Finally, we can set a component as HIDDEN. This effectively removes the component from the visible options, but still includes it in the installation (assuming it's not also DISABLED):
# Everyone needs this and they don't need to know it exists
# So we just mark it as REQUIRED and HIDDEN
cpack_add_component(RuntimeDependencies
DISPLAY_NAME "The Runtime Dependencies"
DESCRIPTION "DLLs and other files that are required for the application"
REQUIRED HIDDEN
)Component Groups
To further improve the user experience, we can group related components together. Let's create a SupportingFiles group for our docs, and other ancillary components we might need in the future.
We do this using the cpack_add_component_group() command. Groups can also be nested inside other groups by setting the PARENT_GROUP within this command.
We assign components to a group using the GROUP argument of their cpack_add_component() command or, alternatively, setting CPACK_COMPONENT_<Name>_GROUP:
CMakeLists.txt
cmake_minimum_required(VERSION 3.23)
project(Greeter VERSION 1.0)
include(cmake/Coverage.cmake)
include(cmake/Sanitize.cmake)
include(cmake/Tidy.cmake)
add_subdirectory(app)
add_subdirectory(greeter)
enable_testing()
add_subdirectory(tests)
add_subdirectory(benchmarks)
set(CPACK_ARCHIVE_COMPONENT_INSTALL ON)
set(CPACK_WIX_UPGRADE_GUID "c8288165-c0b1-4c9a-ba61-877175be0b5a")
include(CPack)
cpack_add_component(Development
DISPLAY_NAME "The Greeter Library"
DESCRIPTION "Compiled Library, Header Files, and CMake Configuration Files"
)
cpack_add_component(Application
DISPLAY_NAME "The Greeter Application"
DESCRIPTION "An application that says hello to the user"
)
install(FILES
${CMAKE_SOURCE_DIR}/Documentation.pdf
DESTINATION "docs"
COMPONENT Documentation
)
cpack_add_component_group(SupportingFiles
DISPLAY_NAME "Supporting Files"
DESCRIPTION "Additional optional content"
PARENT_GROUP "" # Top-level group
EXPANDED # Expanded by default in the installer UI
)
cpack_add_component(Documentation
DISPLAY_NAME "Greeter Documentation"
DESCRIPTION "A PDF file explaining how to use the application"
GROUP SupportingFiles
)
# Alternatively:
set(CPACK_COMPONENT_Documentation_GROUP SupportingFiles)This change results in a more organized feature selection screen in the installer, which is especially helpful for large applications with many optional components.
Customizing the Installer
Most of what we've configured so far, such as our cpack_add_component() and cpack_add_component_group() comments, have been generic settings that are compatible across a wide range of package types. If we were to switch our generator to NSIS, an alternative to WIX, our component configuration would work there, too.
However, CPack includes further, more specific settings for each individual generator. These generators, and how we can use them, are listed on the official docs.
The .zip packages we were using earlier were created using the Archive generator, and the installer we created in this lesson is using the WiX generator.
Behind the scenes, WiX installers are hugely customizable. The WiX documentation lists all the possibilities. CPack's WiX generator offers a front-end to this, allowing us to customize things by setting CMake variables.
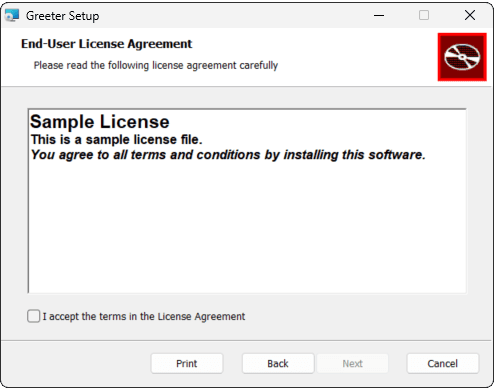
For example, let's modify the license that is shown by default in the installation steps. This licence can be styled and exported in the rich text format (.rtf) supported by most document editors:
license.rtf
{\rtf1\ansi\deff0
{\fonttbl{\f0 Arial;}}
{\colortbl;\red0\green0\blue0;}
\pard
\f0\fs28\b Sample License\par
\fs20 This is a sample license file.\par
\i You agree to all terms and conditions by installing this software.\i0\par
}To have WiX use this file, we set the CPACK_WIX_LICENSE_RTF variable:
CMakeLists.txt
# ...
set(CPACK_ARCHIVE_COMPONENT_INSTALL ON)
set(CPACK_WIX_UPGRADE_GUID "c8288165-c0b1-4c9a-ba61-877175be0b5a")
set(CPACK_WIX_LICENSE_RTF "${CMAKE_SOURCE_DIR}/license.rtf")
include(CPack)
# ...
There are many more variables we can set, controlling things like the images shown in the installer (CPACK_WIX_UI_BANNER and CPACK_WIX_UI_DIALOG) as well as the icon we want to use for our program (CPACK_WIX_PRODUCT_ICON).
The generator's official docs list all the possibilities.
Summary
In this lesson, we've gone beyond simple archives to create user-friendly installer, and we've automated its creation in our CI pipeline.
- The WiX Toolset: CPack's
WIXgenerator is a front-end for the WiX Toolset, which builds.msiinstallers. - Handling Dependencies: We saw how to create a self-contained executable with static linking and, more importantly, how to use
install(RUNTIME_DEPENDENCIES)to automatically bundle all required.dllfiles for a shared library build. - CI Automation: We used a matrix strategy in GitHub Actions to build our installer exclusively on the Windows runner, demonstrating how to handle platform-specific packaging in a multi-platform workflow.
- Components and Groups: We used CPack components to group installed files, allowing us to create different packages from the same project and to provide a structured feature selection UI for the user.
- Customizing Installers: We introduced how to customize an installer through CPack's generators, which act as a front-end to the underlying tool.
Deployment with GitHub Releases
Learn to automate the release process using a GitHub Actions workflow that builds, packages, and publishes artifacts to a GitHub Release