Setting up a C++ Development Environment
Getting our computer set up so we can create and build C++ programs. Then, creating our very first application
In this introductory lesson, we'll create our first program in C++! We will start very simply. We'll just be outputting some text to the screen.
Things will ramp up quickly, but first, our priority is to make sure we have everything we need to start writing and running C++ programs.
If you do not have a development environment set up yet, let's start by going through some options we have.
Selecting a Code Editor
If you do not yet have a code editor, now is the time to get one! There are plenty of free options for every major operating system:
- For Windows, Visual Studio is the common choice. The 2026 Community Edition is free and has everything we'll need. Note that Visual Studio Code is not the same as Visual Studio. They're both code editors, but installing Visual Studio is recommended for C++
- For Mac, CLion or Xcode are recommended.
- For Linux, CLion or Qt Creator are common choices.
Note that CLion is only free for education and non-commercial use. If you want to use it for other purposes, you will need to pay for a license.
The screenshots we show in this course will be from Visual Studio, but it's not that important what software you use. The interface and processes will be very similar, and the code will be entirely identical.
When installing your editor, ensure that you include C++ components during the setup if given the option. This can be done by reviewing the online documentation for your editor.
This course requires nothing special or unusual - the basic ability to create modern C++ programs will fulfill our needs.
In Visual Studio, this can be done by selecting one of the C++ Workloads during installation - for example, Desktop Development with C++ or Game Development with C++
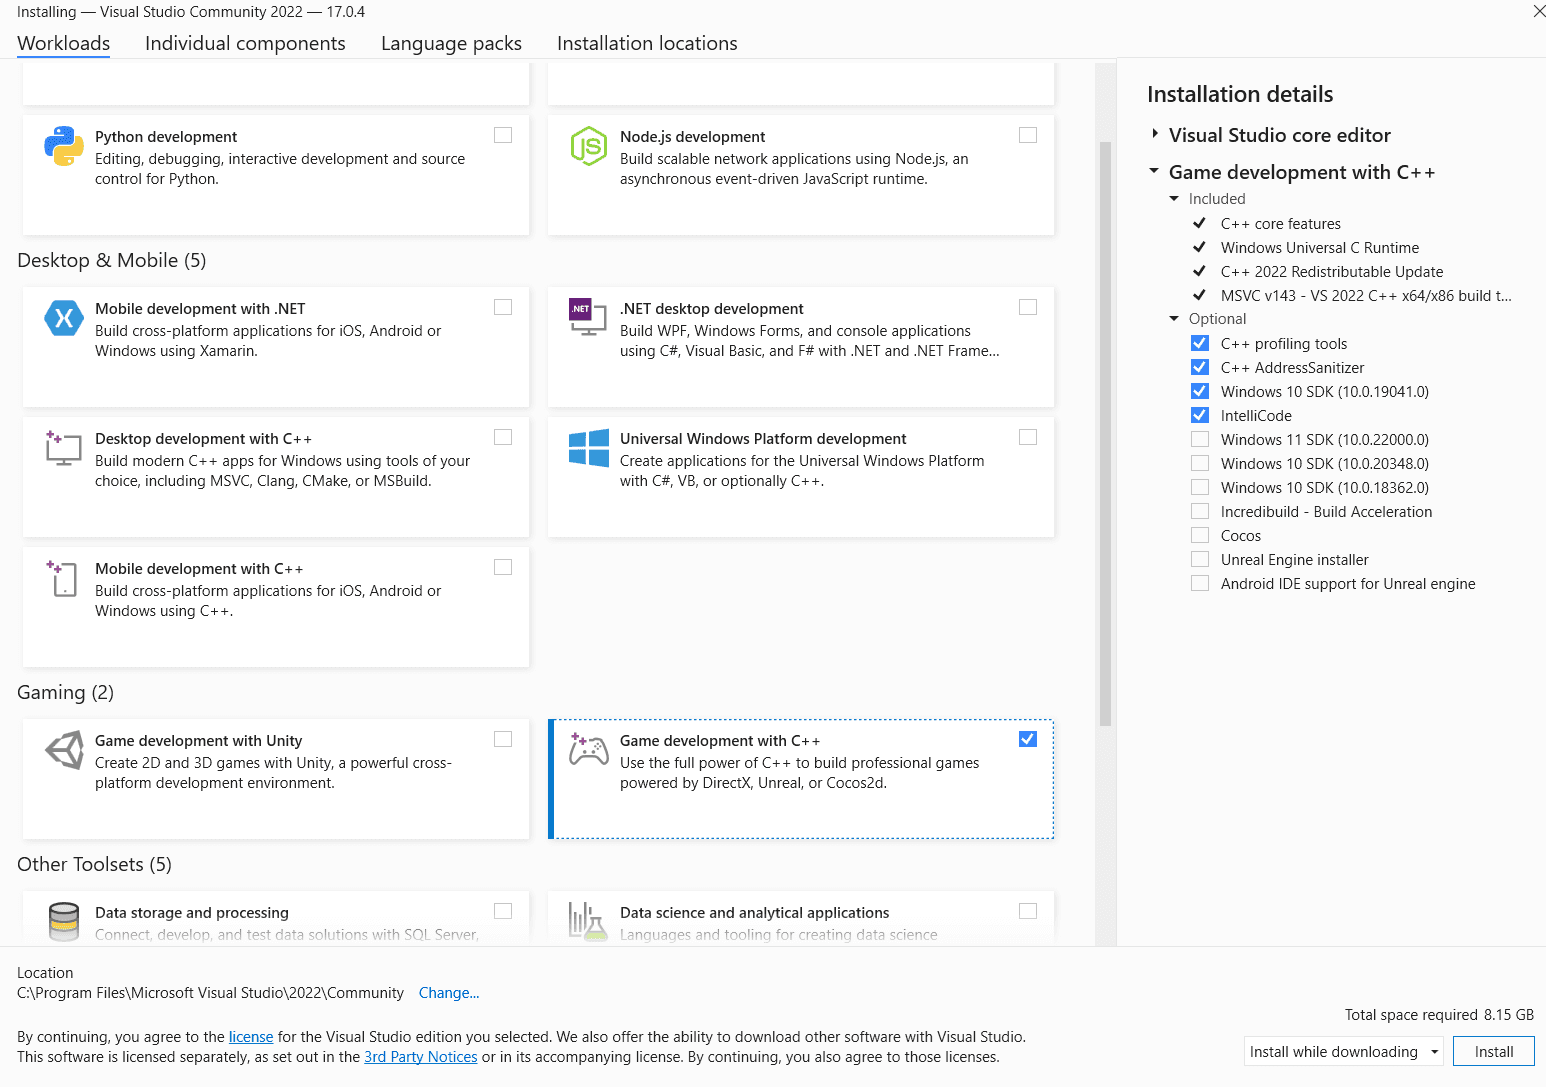
If you already have Visual Studio installed without these components, you can run the installer again and click Modify to change which components are available.
Hello World
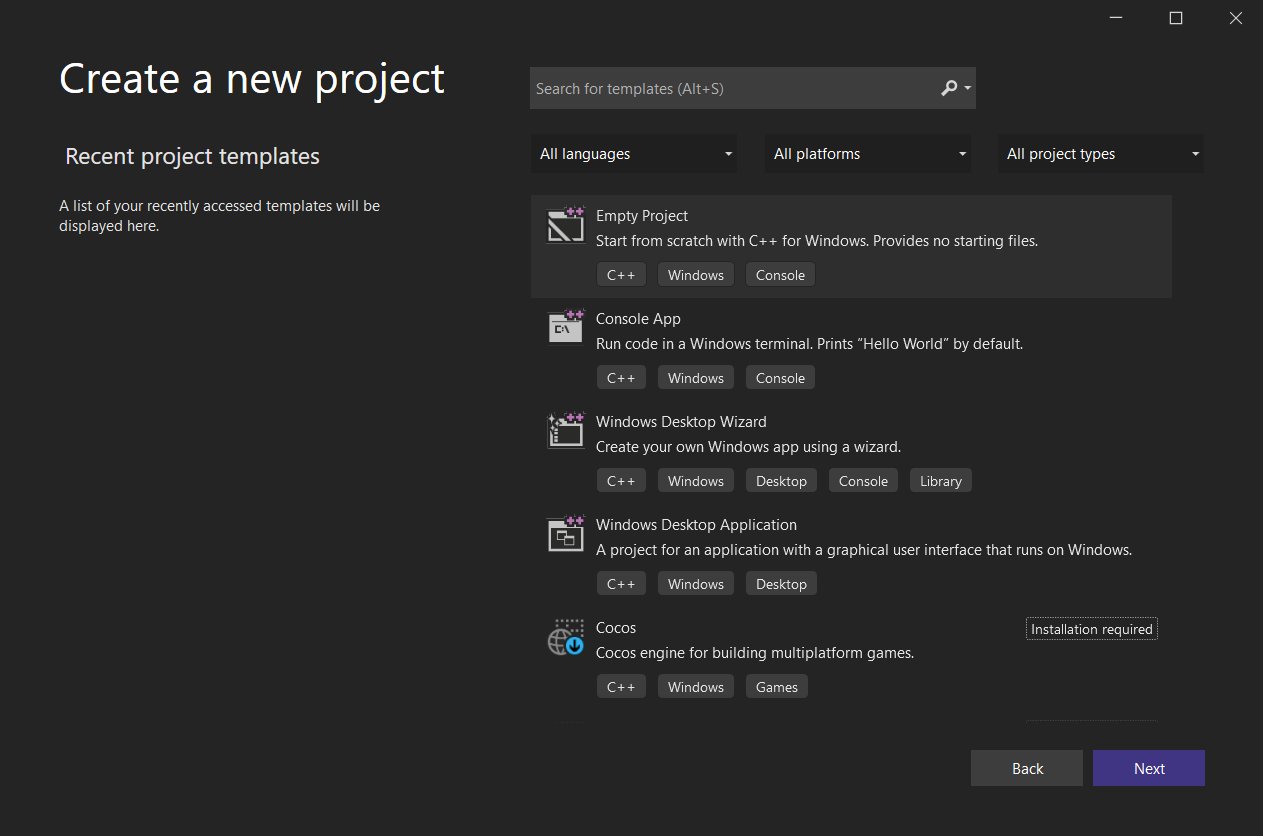
Once we've got your editor of choice set up, create a new, blank C++ project with it.
In Visual Studio, this involves creating an Empty Project from the Create a new project window. This window should be accessible from your start screen, or File > New > Project from the top menu bar.
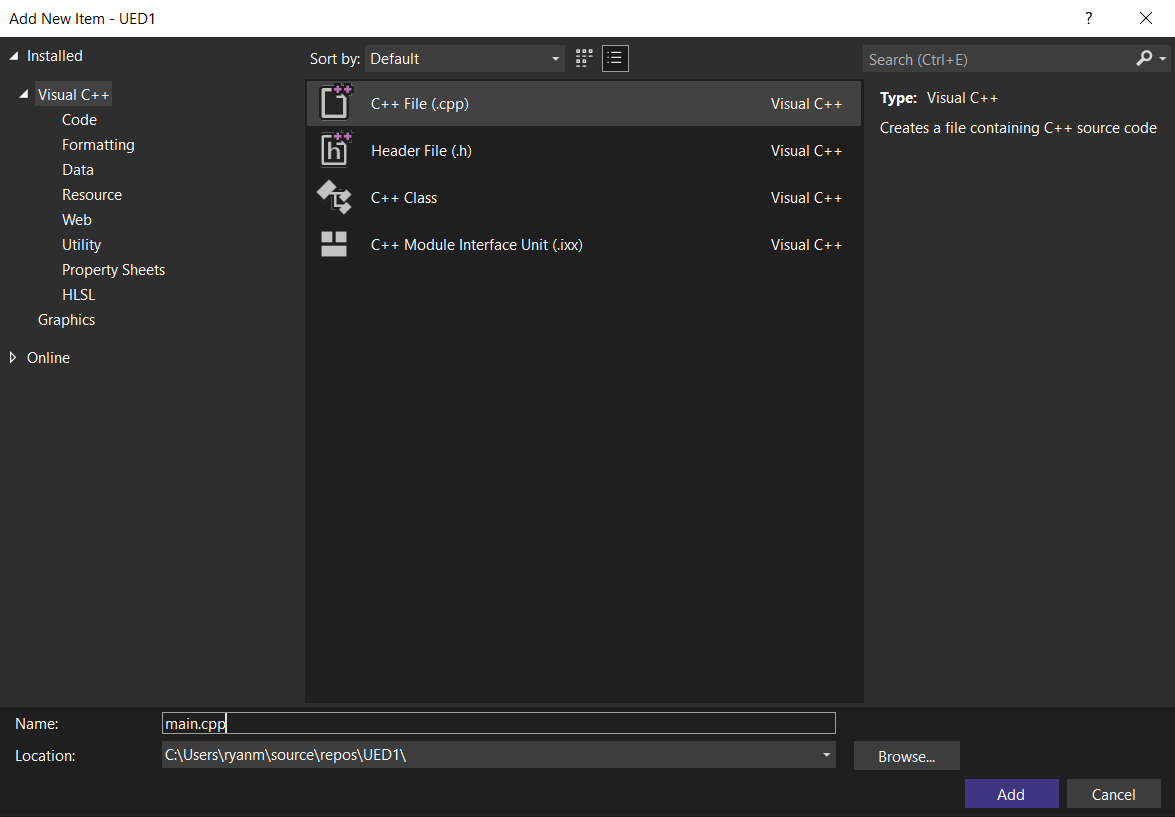
Once we create the project, we can then add our first C++ file to it.
Other editors may have automatically included a starting file when they generated the project, in which case this step can be skipped.
In Visual Studio, we can add a file from the top menu bar under Project > Add New Item.
We can call our file anything we want - I've gone with main.cpp
In Visual Studio, this will create a new, empty file in our project.
If you're using a different editor, and that editor included a starting file for you, they may also have included some code in that file. If so, delete their starting code.
We want to have our starting code look exactly like what is below:
#include <iostream>
using namespace std;
int main() {
cout << "Hello World!";
}To ensure everything works, paste this code into your main.cpp, save your file then build and run the program.
In most IDEs, this can be done by pressing a button somewhere in the user interface. In Visual Studio, for example, we can use the Start Without Debugging button on the top menu.
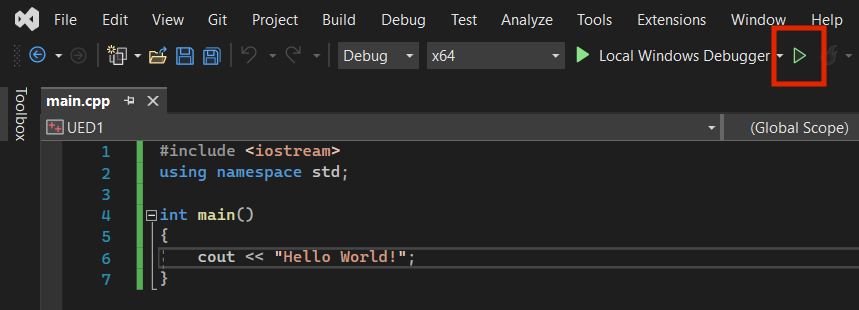
Our program should open a terminal where we see the output of the code - a simple "Hello World!" message.
Hello World!Understanding our Program
By the end of this course, you'll understand what every line of code is doing, but for now, we need to skip over some things.
Until we introduce those more advanced topics, our code files should always follow the basic structure of the previous example.
Initially, we will limit our changes to just the area between the { and }
Currently, that line of code is cout << "Hello World!";.
cout is an abbreviation of "character output". When we write (or "stream") things to the character output, it should appear in a terminal or console window when we run our program.
We stream things to the character output using the << operator, with cout on the left and the thing we want to stream on the right.
If the thing we want to stream is some text, we need to put the text in double quotes, such as "Hello World!" or "Goodbye!".
Finally, we need to end our statement using a semi-colon ;
We can stream as many things to the output as we want simply by repeating the pattern on additional lines:
#include <iostream>
using namespace std;
int main() {
cout << "Hello World!";
cout << "My Name is Ryan";
cout << "Goodbye";
}Hello World!My Name is RyanGoodbyeLine Breaks
Even though our previous code was spanned across multiple lines, we can see that our output wasn't. As we'll see later in this chapter, C++ is fairly flexible about the spacing around our code. There are many ways to lay out the code in any given file, and our layout choice generally won't affect how our program behaves.
However, it would be nice if we could add some spacing that does affect the output of our program. To insert a line break into our output, we stream the special sequence "\n". Note the direction of the slash is important - we need \, not /
Any subsequent output will then be on a new line:
#include <iostream>
using namespace std;
int main() {
cout << "Hello World!";
cout << "\n";
cout << "My Name is Ryan";
cout << "\n";
cout << "Goodbye";
}Hello World!
My Name is Ryan
GoodbyeWe don't need to stream \n as a standalone statement - we can include it as part of the text we're streaming as part of an existing statement. We can even place an \n within the middle of a string of text.
So, we could have written our previous program like this:
#include <iostream>
using namespace std;
int main() {
cout << "Hello World!\n";
cout << "My Name is Ryan\nGoodbye";
}Hello World!
My Name is Ryan
GoodbyeChaining << Operators
We can stream multiple things to the terminal in a single statement. This is done by using the << operator multiple times, sometimes referred to as chaining the operator:
#include <iostream>
using namespace std;
int main() {
cout << "Hello World!" << "\n";
cout << "My Name is Ryan" << "\n";
cout << "Goodbye";
}Hello World!
My Name is Ryan
GoodbyeWe can further shorten this program to a single statement. The following statement spans multiple lines, and we've also added additional spaces to make our << operators line up:
#include <iostream>
using namespace std;
int main(){
cout << "Hello World!\n"
<< "My Name is Ryan\n"
<< "Goodbye";
}Hello World!
My Name is Ryan
GoodbyeEven though our statement now spans multiple lines, it is still a single statement. We can tell when our statement ends by looking at where the semicolon is.
Breaking the statement across multiple lines and adding spaces to make our << operators line up does not change the behaviour of the program. However, laying our code out in a tidy way will make it easier to read for humans, including ourselves or our future colleagues.
Outputting Numbers
We can output many different types of data. We will see more of this soon, but here's an example of outputting some numbers. Note that we don't need to surround numbers with quotes - we only use quotes when representing text:
#include <iostream>
using namespace std;
int main() {
cout << 42 << " is a number\n"
<< "Another number is " << 3.14;
}42 is a number
Another number is 3.14We should now have confirmed that our development environment is set up. We can write code, compile it, run it, and see our output.
Summary
In this introductory lesson, we have laid the groundwork for your journey into the world of coding. Here's a quick recap of what we've covered:
- Setting Up the Development Environment: We should now have our environment set up, and be ready to start programming
- Creating a "Hello World" Program: Our first coding exercise involved writing the classic "Hello World" program. This simple exercise ensured we have everything set up correctly, and served as an introduction to writing and running C++ programs
- Basic C++ Syntax: We explored the basics of C++ syntax, covering how to write simple statements and use
coutfor output - Understanding Line Breaks and Chaining Operators: We learned how to format output using line breaks (
\n) and the concept of chaining<<operators for streamlined code. - Outputting Different Data Types: The lesson concluded with an introduction to outputting various data types in C++, including both text and numbers.
Objects, Variables and Types
An introduction to the building blocks of our software - objects, and the variables that can be associated with them.