Introduction to SDL_Image
SDL_Image.
Ryan McCombe
In this lesson, we’ll start using the SDL_Image extension we installed earlier. We’ll cover 3 main topics:
- Initializing and closing
SDL_Image - Using the
IMG_Load()function to load and render a wide variety of image types, rather than being restricted to the basic bitmap (.bmp) format. - Using surface blending modes to use transparency and other techniques when blitting
- Creating image files from our surfaces using
IMG_SaveJPG()andIMG_SavePNG()
We’ll be building upon the basic application loop and surface-blitting concepts we covered earlier in the course:
main.cpp
#include <SDL.h>
#include "Image.h"
class Window {
public:
Window() {
SDLWindow = SDL_CreateWindow(
"My Program", SDL_WINDOWPOS_UNDEFINED,
SDL_WINDOWPOS_UNDEFINED, 600, 300, 0);
}
void Render() {
SDL_FillRect(
GetSurface(), nullptr, SDL_MapRGB(
GetSurface()->format, 50, 50, 50
)
);
}
void Update() {
SDL_UpdateWindowSurface(SDLWindow);
}
SDL_Surface* GetSurface() {
return SDL_GetWindowSurface(SDLWindow);
}
~Window() { SDL_DestroyWindow(SDLWindow); }
private:
SDL_Window* SDLWindow;
};
int main(int argc, char** argv) {
SDL_Init(SDL_INIT_VIDEO);
SDL_Event Event;
bool shouldQuit{false};
Window GameWindow;
Image ExampleImg{"example.png"};
while (!shouldQuit) {
while (SDL_PollEvent(&Event)) {
if (Event.type == SDL_QUIT) {
shouldQuit = true;
}
}
GameWindow.Render();
ExampleImg.Render(GameWindow.GetSurface());
GameWindow.Update();
}
SDL_Quit();
return 0;
}Image.h
#pragma once
#include <SDL.h>
#include <iostream>
#include <string>
class Image {
public:
Image(std::string File) : ImageSurface{
SDL_LoadBMP(File.c_str())} {
if (!ImageSurface) {
std::cout << "Failed to load image: " <<
File << ":\n" << SDL_GetError();
}
SourceRectangle.w = ImageSurface->w;
SourceRectangle.h = ImageSurface->h;
}
void Render(SDL_Surface* DestinationSurface) {
SDL_BlitSurface(ImageSurface,
nullptr,
DestinationSurface,
&DestinationRectangle);
}
~Image() { SDL_FreeSurface(ImageSurface); }
private:
SDL_Surface* ImageSurface{nullptr};
SDL_Rect DestinationRectangle{0, 0, 0, 0};
};One notable change from the previous lesson is that our main function is now passing a .png image path to our Image constructor:
Image ExampleImg{"example.png"};This image should be located in the same directory that our executable file is created in. The examples and screenshots from this lesson are using a .png file that is available by clicking here.
However, our Image class does not currently support .png images. It’s using SDL_LoadBMP() to load image files and, as the name suggests, this function only supports .bmp images.
// Image.h
class Image {
public:
Image(std::string File)
: ImageSurface{SDL_LoadBMP(File.c_str())} {
if (!ImageSurface) {
std::cout << "Failed to load image: " <<
File << ":\n" << SDL_GetError();
}
// ...
}
// ...
};As such, our program can’t render the image, and we have an error being reported in the terminal:
Failed to load image: example.png:
File is not a Windows BMP fileInitializing and Quitting SDL_Image
The SDL_Image extension allows us to load many more image formats. It includes the code that can understand formats like PNG and JPG, and load their pixels into an SDL_Surface that we can work with as before.
To use SDL_Image, we should first initialize it. This is done using the IMG_Init() function, available after including SDL_Image.h. We pass it initialization flags indicating what formats we need to support:
// main.cpp
#include <SDL.h>
#include <SDL_image.h>
int main(int argc, char** argv) {
SDL_Init(SDL_INIT_VIDEO);
IMG_Init(IMG_INIT_PNG);
// ...
}A list of the available IMG_Init flags is available here. We can initialize multiple libraries at once using the | operator:
IMG_Init(IMG_INIT_PNG | IMG_INIT_JPG);We should also call IMG_Quit() before our application ends, allowing the extension to clean up at the appropriate time. Let’s add both of these to our main() function:
// main.cpp
#include <SDL.h>
#include <SDL_image.h>
#include "Image.h"
class Window {/*...*/};
int main(int argc, char** argv) {
SDL_Init(SDL_INIT_VIDEO);
IMG_Init(IMG_INIT_PNG);
SDL_Event Event;
bool shouldQuit{false};
Window GameWindow;
Image ExampleImg{"example.png"};
while (!shouldQuit) {/*...*/}
// Cleanup
IMG_Quit();
SDL_Quit();
return 0;
}Using IMG_Load()
Once we’ve initialized SDL_Image, we can replace SDL_LoadBMP() in our Image class with IMG_Load(). This function is a drop-in replacement - it has the same API.
It accepts the file we want to load as a c-string, and returns a pointer to the SDL_Surface where the image data was loaded:
// Image.h
#pragma once
#include <SDL.h>
#include <SDL_image.h>
#include <iostream>
#include <string>
class Image {
public:
Image(std::string File) : ImageSurface{
IMG_Load(File.c_str())} {
if (!ImageSurface) {
std::cout << "Failed to load image: " <<
File << ":\n" << SDL_GetError();
}
}
// ...
};Our program should now render our image:

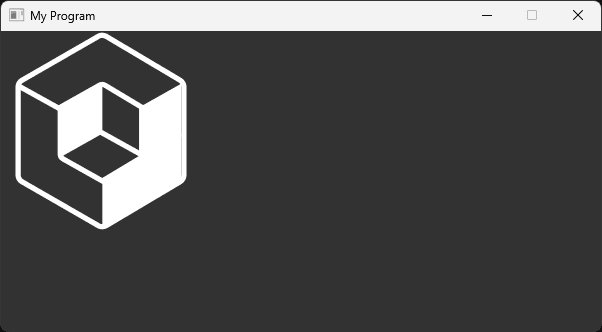
We can treat the resulting surface in the same way we did before, such as blitting it onto other surfaces.
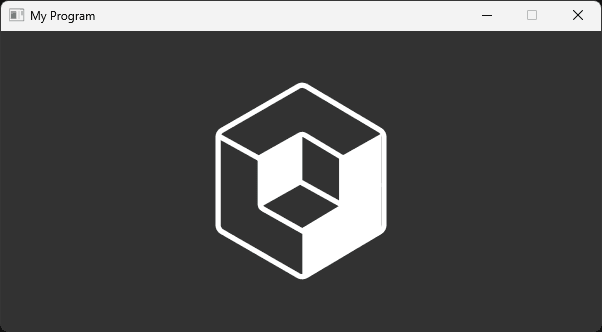
For example, let’s update our Render() function to use BlitScaled() instead, and update our DestinationRectangle to set the size and position of our image:
// Image.h
class Image {
public:
// ...
void Render(SDL_Surface* DestinationSurface) {
SDL_BlitScaled(ImageSurface,
nullptr,
DestinationSurface,
&DestinationRectangle);
}
private:
SDL_Rect DestinationRectangle{200, 50, 200, 200};
};
Transparency and Blend Modes
Our PNG image has transparent sections, and we see our program is respecting that by default. In areas where our PNG was transparent, the blitting operation skipped those pixels, keeping the existing color on the destination surface.
In this example, the Window::Render() method fills the window surface with a solid gray color. The Image::Render() method then blends our image on top of it.
This blending strategy to use when blitting is configured on the source surface, which is the ImageSurface created by IMG_Load() in our example.
The surface created by IMG_Load() has blending enabled by default if the image it loads includes transparency. However, we can also enable it explicitly using the SDL_SetSurfaceBlendMode() function.
We pass a pointer to the surface we’re configuring, and the blend mode we want to use. SDL_BLENDMODE_BLEND is the mode that uses transparency:
// Image.h
class Image {
public:
Image(std::string File) : ImageSurface{
IMG_Load(File.c_str())} {
if (!ImageSurface) {
std::cout << "Failed to load image: " <<
File << ":\n" << SDL_GetError();
}
SDL_SetSurfaceBlendMode(
ImageSurface, SDL_BLENDMODE_BLEND
);
}
// ...
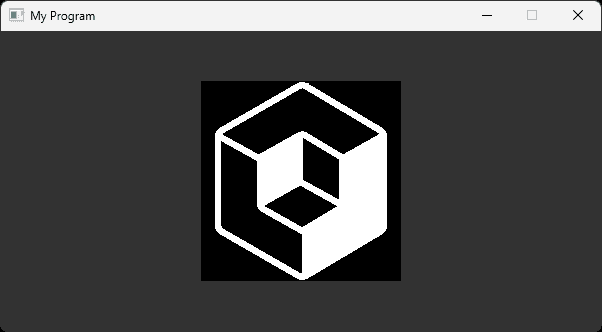
};We can disable blending and return to the basic blitting algorithm using SDL_BLENDMODE_NONE:
// Image.h
class Image {
public:
Image(std::string File) : ImageSurface{
IMG_Load(File.c_str())} {
if (!ImageSurface) {
std::cout << "Failed to load image: " <<
File << ":\n" << SDL_GetError();
}
SDL_SetSurfaceBlendMode(
ImageSurface, SDL_BLENDMODE_NONE
);
}
// ...
};
Transparency and Pixel Formats
For blending to work, our surface must also use a pixel format that includes transparency data. IMG_Load() uses an appropriate pixel format by default.
However, if we change it - using SDL_ConvertSurface() for example - we may lose the transparency data, and therefore lose the ability to blend our surface onto others.
We can check if a pixel format includes transparency (also called alpha) by passing it to the SDL_ISPIXELFORMAT_ALPHA() macro:
// main.cpp
// ...
int main(int argc, char** argv) {
SDL_Init(SDL_INIT_VIDEO);
Window GameWindow;
SDL_Surface* Surface{
IMG_Load("example.png")};
if (SDL_ISPIXELFORMAT_ALPHA(
Surface->format->format)) {
std::cout << "Surface has alpha";
}
Surface = SDL_ConvertSurface(
Surface,
GameWindow.GetSurface()->format, 0
);
if (!SDL_ISPIXELFORMAT_ALPHA(
Surface->format->format)) {
std::cout << "...but not any more";
}
SDL_Quit();
return 0;
}Surface has alpha...but not any moreTaking Screenshots
SDL_Image includes two functions that let us save a surface to an image file on our hard drive. To save a PNG file, we use IMG_SavePNG(), passing a pointer to the surface, and the location we want the file saved to.
The location where the file will be created is relative to the location of our executable:
// Image.h
class Image {
public:
// ...
void SaveToFile(std::string Location) {
IMG_SavePNG(ImageSurface, Location.c_str());
}
// ...
};IMG_SaveJPG() works similarly but has an additional integer parameter. This integer ranges from 0 to 100 and affects the quality of the saved file. Higher values prioritize quality, while lower values prioritize compression, thereby reducing file size.
We can use either of these functions to take screenshots of our program. We simply pass our window surface as the first argument:
// main.cpp
class Window {
public:
// ...
void TakeScreenshot() {
IMG_SaveJPG(
GetSurface(), "Screenshot.jpg", 90
);
}
// ...
}
// ...Summary
In this lesson, we’ve introduced the SDL_Image extension, greatly expanding the range of image formats our application can support.
We also saw how some formats include transparency, allowing us to blend surfaces whilst blitting.
In the next lesson, we’ll combine the topics we’ve covered so far in this lesson into a cohesive Image class. We’ll focus on how to provide the capabilities we learned to external code using a friendly public interface.
We’ll also see how to manage the complexities involved within our class in a way that keeps everything organized and easy to maintain.
Was this lesson useful?

Ryan McCombe
Introduction to SDL_Image
Learn to load, manipulate, and save various image formats using SDL_Image.

Game Dev with SDL2
Learn C++ and SDL development by creating hands on, practical projects inspired by classic retro games
The 2D Rendering API
- 41.GPUs and Rasterization
- 42.SDL Renderers