Creating SDL2 Buttons
Learn to create interactive buttons in SDL2 and manage communication between different UI components.
Our applications can draw shapes, but how do we let users interact with them meaningfully? This lesson focuses on creating clickable buttons, and having those clicks cause some meaningful effect in our program.
We'll start by designing a Button class, reusing some logic from our existing Rectangle class. We'll discuss the concepts of inheritance and composition as ways to structure our code.
Key topics include:
- Handling mouse events like clicks and hovers for buttons.
- Designing class APIs for extensibility using virtual functions.
- Implementing different communication patterns between UI components (parent-child, child-parent, arbitrary, global).
- Using forward declarations and separate source files to manage dependencies.
Starting Point
Here's the code from our previous lessons that we'll use as a starting point. We have classes for managing the window, a simple UI layer, and a Rectangle component:
Let's start by creating a simple Button class to manage our buttons. Similar to our Rectangle class, we'll have a constructor that receives an SDL_Rect to control the size and position, which we'll use later.
We'll also add HandleEvent() and Render() functions so we can connect Button instances to our application architecture:
// Button.h
#pragma once
#include <SDL.h>
class Button {
public:
Button(const SDL_Rect& R) {
// ...
}
void HandleEvent(SDL_Event& E) {
// ...
}
void Render(SDL_Surface* Surface) {
// ...
}
};Let's add a Button instance to our UI class:
// UI.h
#pragma once
#include <SDL.h>
#include "Rectangle.h"
#include "Button.h"
class UI {
public:
void Render(SDL_Surface* Surface) const {
A.Render(Surface);
B.Render(Surface);
C.Render(Surface);
}
void HandleEvent(SDL_Event& E) {
A.HandleEvent(E);
B.HandleEvent(E);
C.HandleEvent(E);
}
private:
Rectangle A{{50, 50, 50, 50}};
Rectangle B{{150, 50, 50, 50}};
Button C{{250, 50, 50, 50}};
};Extending vs Composing
Our Button class is likely to find a lot of the code we added to our Rectangle class helpful. This includes rendering a rectangle to act as the background color of our button, and detecting when the mouse enters or clicks in this area.
To take advantage of the code we've already written in our Rectangle class, there are two main approaches we might consider for our Button. First, we could add a Rectangle member to our Button class. That might look something like this:
// Button.h
#pragma once
#include <SDL.h>
#include "Rectangle.h"
class Button {
public:
Button(const SDL_Rect& Rect)
: Rect{Rect}
{
Rect.SetColor({255, 165, 0, 255}); // Orange
}
void HandleEvent(SDL_Event& E) {
Rect.HandleEvent(E);
// Implement button-specific event logic...
}
void Render(SDL_Surface* Surface) {
Rect.Render(Surface);
// Render the rest of the button...
}
private:
Rectangle Rect;
};Alternatively, we could inherit from Rectangle, thereby making Rectangle a base class of our Button. That could look like this:
// Button.h
#pragma once
#include <SDL.h>
#include "Rectangle.h"
class Button : public Rectangle {
public:
Button(const SDL_Rect& Rect)
: Rectangle{Rect}
{
SetColor({255, 165, 0, 255}); // Orange
}
void HandleEvent(SDL_Event& E) override {
Rectangle::HandleEvent(E);
// Implement button-specific event logic...
}
void Render(SDL_Surface* Surface) override {
Rectangle::Render(Surface);
// Render the rest of the button...
}
};In general, the way to think about this is to wonder whether it is more accurate to say that a Button has a Rectangle (option 1) or that a Button is a Rectangle (option 2).
Sometimes, this will be an obvious distinction - a Car has an Engine, but it is a Vehicle. So it would inherit from Vehicle, but contain an Engine as a member variable.
In the Button and Rectangle case, either approach is reasonable. We'll go with inheritance in this lesson, but only because it offers more learning opportunities.
Improving the Rectangle API
When a class like our Rectangle is intended to be inherited from, we should spend some time thinking about how we can design our class to best support this.
For example, what behaviours are derived classes likely to want to override? It seems likely that derived classes may want to react to things like the user clicking the rectangle, or the mouse entering and exiting its bounds.
Unfortunately, with our current Rectangle design, it's not particularly clear how it expects its derived classes like Button to do this. For example, implementing a reaction to the cursor leaving the bounds of the rectangle might look something like this, which is not exactly intuitive:
// Button.h
#pragma once
#include <SDL.h>
#include <iostream>
#include "Rectangle.h"
class Button : public Rectangle {
public:
Button(const SDL_Rect& Rect)
: Rectangle{Rect}
{
SetColor({255, 165, 0, 255}); // Orange
}
void HandleEvent(SDL_Event& E) {
// Was the pointer hovering over the button
// before the event has handled?
bool wasPointerHovering{isPointerHovering};
// Handle the event by deferring to the
// base implementation
Rectangle::HandleEvent(E);
// Has that event changed the
// isPointerHovering value?
if (!wasPointerHovering && isPointerHovering) {
std::cout << "Hello mouse\n";
}
}
};Note: this change would also require isPointerHovering to be moved from private to protected within Rectangle.
To design a better API, a good strategy is to approach things in the opposite order. That is, write the code you'd ideally like to write, whilst pretending the API supports it. That might look something like this:
// Button.h
// ...
class Button : public Rectangle {
public:
// ...
// This doesn't exist, but I wish it did
void OnMouseEnter() override {
std::cout << "Hello mouse\n";
}
};Then, write the underlying code that makes the API work that way. In this case, that requires us to update the Rectangle base class:
// Rectangle.h
#pragma once
#include <SDL.h>
#include <iostream>
class Rectangle {
public:
// ...
virtual void OnMouseEnter() {}
void HandleEvent(SDL_Event& E) {
if (E.type == SDL_MOUSEMOTION) {
bool wasPointerHovering{isPointerHovering};
isPointerHovering = isWithinRect(
E.motion.x, E.motion.y
);
if (!wasPointerHovering && isPointerHovering) {
OnMouseEnter();
}
} else if (
E.type == SDL_WINDOWEVENT &&
E.window.event == SDL_WINDOWEVENT_LEAVE
) {
isPointerHovering = false;
} else if (E.type == SDL_MOUSEBUTTONDOWN) {
if (isPointerHovering &&
E.button.button == SDL_BUTTON_LEFT
) {
std::cout << "A left-click happened "
"on me!\n";
}
}
}
// ...
};Let's add support for OnMouseExit() and OnLeftClick(), too:
// Rectangle.h
#pragma once
#include <SDL.h>
#include <iostream>
class Rectangle {
public:
// ...
virtual void OnMouseEnter() {}
virtual void OnMouseExit() {}
virtual void OnLeftClick() {}
void HandleEvent(SDL_Event& E) {
if (E.type == SDL_MOUSEMOTION) {
bool wasPointerHovering{isPointerHovering};
isPointerHovering = isWithinRect(
E.motion.x, E.motion.y
);
if (!wasPointerHovering && isPointerHovering) {
OnMouseEnter();
} else if (
wasPointerHovering && !isPointerHovering
) {
OnMouseExit();
}
} else if (
E.type == SDL_WINDOWEVENT &&
E.window.event == SDL_WINDOWEVENT_LEAVE
) {
if (isPointerHovering) OnMouseExit();
isPointerHovering = false;
} else if (E.type == SDL_MOUSEBUTTONDOWN) {
if (isPointerHovering &&
E.button.button == SDL_BUTTON_LEFT
) {
std::cout << "A left-click happened "
"on me!\n";
OnLeftClick();
}
}
}
// ...
};This makes implementing behaviours in derived classes significantly easier and less error-prone:
// Button.h
#pragma once
#include <SDL.h>
#include <iostream>
#include "Rectangle.h"
class Button : public Rectangle {
public:
Button(const SDL_Rect& Rect)
: Rectangle{Rect}
{
SetColor({255, 165, 0, 255});
}
void OnMouseEnter() override {
std::cout << "Hello mouse\n";
}
void OnMouseExit() override {
std::cout << "Goodbye mouse\n";
}
void OnLeftClick() override {
std::cout << "You left-clicked me!\n";
}
};Hello mouse
You left-clicked me!
Goodbye mouseCommunication Between Components
Having our HandleEvent() function change some state on the component that received the event is fairly straightforward - we just update variables or call some function as normal. Below, our Button objects become red when left-clicked:
// Button.h
// ...
class Button : public Rectangle {
public:
void OnLeftClick() override {
SetColor({255, 0, 0, 255});
}
};However, in more complex programs, a component in one area of the program will need to influence the behaviour in some other area.
We'll cover the four most common examples of this:
- Communicating with a child or children - for example, a
UItalking to theRectangles that it manages - Communicating with a parent - for example, a
Buttontalking to theUIthat manages it - Communicating with an arbitrary component - for example, a
Buttontalking to aRectanglethat it has no obvious relationship to - Communicating with everything - for example, a
Buttontelling every other component that something important has happened
Communicating with Children
Having a component communicate with a child tends to be quite easy, as the child is a member variable, or within a container (such as a std::vector) that is a member variable.
As such, we can simply manipulate children through their public members:
// UI.h
// ...
class UI {
public:
// ...
void SetRectangleColors(const SDL_Color& Color) {
A.SetColor(Color);
B.SetColor(Color);
}
// ...
};Communicating with Parents
To communicate with a parent, a component needs a pointer or reference to that parent. Let's update our Button class so that each button knows which UI object is its parent.
A common approach is to simply have the component accept a constructor argument containing that reference, and store it as a member variable. We then have the parent provide a reference to itself as that argument when it creates its child.
So, in this case, our Button class will store a reference to a UI object.
Because our UI.h header file is already including our Button.h header file, we can't have our Button.h also include UI.h. This would result in a circular dependency.
Instead, let's just forward-declare our UI as a class. This gives the compiler enough information to know that UI is the name of a type, so we can use it in our constructor argument list and as the type for a new UIManager variable:
// Button.h
#pragma once
#include <SDL.h>
#include "Rectangle.h"
class UI;
class Button : public Rectangle {
public:
Button(UI& UIManager, const SDL_Rect& Rect)
: UIManager{UIManager},
Rectangle{Rect}
{
SetColor({255, 165, 0, 255});
}
private:
UI& UIManager;
};Back in the UI class, we'll provide this reference to our Button through :
// UI.h
// ...
class UI {
// ...
private:
// ...
Button C{*this, {250, 50, 50, 50}};
};When our button is left-clicked, let's have it call the SetRectangleColors() method on it's parent UI. This requires us to override the OnLeftClick() function we inherited from our Rectangle base class.
However, because we have only forward-declared the UI type in Button.h, it will be an incomplete type. This limits what the Button.h header file can do with our UIManager. For example, we won't be able to call UI functions from our Button header file.
To solve this, we'll need to add a new source file to our project, where we can fully define the required Button::OnLeftClick() behaviour. However, let's first declare this override in the header file:
// Button.h
// ...
class Button : public Rectangle {
public:
// ...
void OnLeftClick() override;
// ...
};Let's add a new Button.cpp source file to our project, which can safely include both the Button and UI header files:
// Button.cpp
#include "Button.h"
#include "UI.h"
void Button::OnLeftClick() {
UIManager.SetRectangleColors(
{0, 255, 0, 255} // Green
);
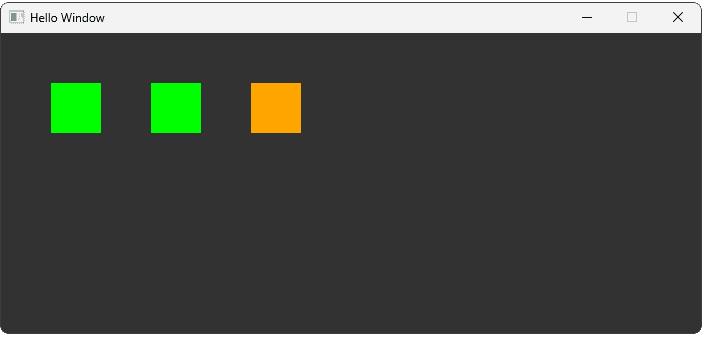
}With those changes, clicking our button should now call the SetRectangleColors() method on its UI parent, and that UI should then call SetColor() on each of it's Rectangle children:
Communicating with Arbitrary Components
Communicating with a random component elsewhere in the hierarchy is conceptually similar to communicating with a parent. We just need some way to acquire a reference or pointer to that object. In this example, our Button receives a Rectangle reference as a constructor argument and, when the Button is clicked, it turns that rectangle green:
// Button.h
// ...
class Button : public Rectangle {
public:
Button(
UI& UIManager,
const SDL_Rect& Rect,
Rectangle& Target
)
: Rectangle{Rect},
UIManager{UIManager},
Target{Target}
{
SetColor({255, 165, 0, 255});
}
void OnLeftClick() override {
Target.SetColor({0, 255, 0, 255});
};
private:
Rectangle& Target;
UI& UIManager;
};It's generally going to be our manager-style classes like UI that establish these links between components:
// UI.h
// ...
class UI {
// ...
private:
Rectangle A{{50, 50, 50, 50}};
Rectangle B{{150, 50, 50, 50}};
Button C{*this , {250, 50, 50, 50}, A};
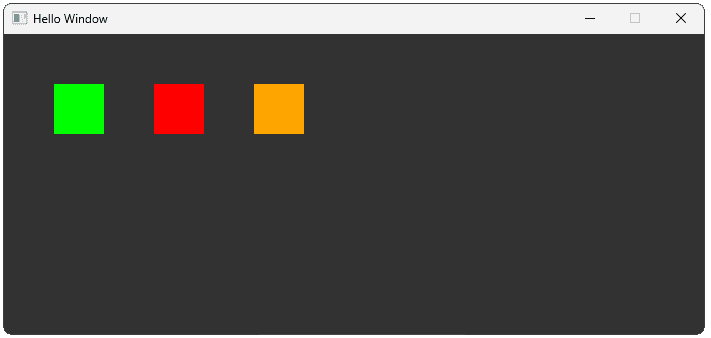
};With these changes, clicking our button now turns the A rectangle green:
Communicating with Everything
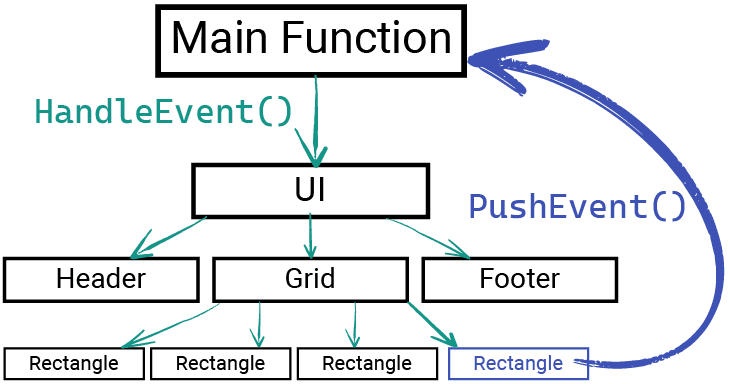
The last and most impactful way that a component can communicate with other components of our program is to push an event onto the main event queue. This is because we're not limited to just reading events from the event queue, we can also write to it.
A component from anywhere in our hierarchy can push an SDL_Event. That data shows up in the event loop in our main() function, like any other event. From there, the message gets sent to every other component, through the HandleEvent() pattern we're starting to establish:
Our next lesson is dedicated to this topic but, as a quick preview, here is how we can make our Button quit the application by pushing an SDL_QUIT event, which our application loop over in main.cpp is already set up to react to:
// Button.cpp
#include "Button.h"
void Button::OnLeftClick() {
SDL_Event E{SDL_QUIT};
SDL_PushEvent(&E);
}Complete Code
Here is the complete code incorporating all the changes we made throughout this lesson, including the new Button class and the modifications to Rectangle and UI.
Summary
In this lesson, we created an interactive Button class by inheriting from our Rectangle class and using virtual functions for event handling. We explored various patterns for communication between different components in our application, from direct parent/child interaction to using the main SDL event queue.
Key Takeaways:
- Buttons can be built by extending existing shape classes.
- Virtual functions -
OnMouseEnter(),OnMouseExit(), andOnLeftClick()- provide a clean API for derived classes to customize behavior. - Inheritance (
Buttonis aRectangle) and Composition (Buttonhas aRectangle) are two ways to reuse code. - Components can communicate via direct references (parent-child, child-parent, arbitrary) or indirectly via the event queue using
SDL_PushEvent(). - Forward declarations and separate
.cppfiles help manage dependencies and incomplete types.
Creating Custom Events
Learn how to create and manage your own game-specific events using SDL's event system.