Building SDL2 from Source (GCC and Make)

Ryan McCombe
In this lesson, we’ll get SDL installed, along with two extensions which we’ll need later in this chapter.
SDLis a cross-platform library that allows us to create windows, access input devices, and create graphics.SDL_imageis an extension that allows us to work with images in all the common formats (jpeg, png, etc)SDL_ttfis an extension that we can use to render text at run-time
This setup guide downloads the source code for the libraries and compiles them on our local machine. We then demonstrate how to add these libraries to projects that use either Xcode or CMake
Note that this guide is more advanced than our earlier options. If we just want to get up and running with SDL on Windows, most will find it easier to use a package manager:

If we’re using Windows or Mac, we do not need to compile the SDL libraries ourselves. Precompiled packages are available for those operating systems, which we can just download:


If we want or need to build the libraries from source, and our environment supports CMake, this guide is recommended:

C++ Toolchains
Compiling SDL following this guide relies on using a suite of command line tools that can build C++ projects. This is sometimes referred to as a toolchain.
- On most Linux-based systems, the tools we need are installed by default
- On macOS, the tools are available if we’ve installed Xcode. Alternatively, we can install them from the official Apple Developer site. A dedicated guide for installing them is available on freecodecamp.org
- We don’t cover Windows in this guide, but those interested in setting up a similar environment should consider the Windows Subsystem for Linux or follow the using MinGW guide on Microsoft’s site.
Download the SDL Source Code
We’ll be building SDL2 from the source code. This may seem daunting, but the SDL2 code comes with some very helpful scripts that make things much easier.
Once we have our compilation toolchain set up, we need to download the SDL source code from GitHub. The latest version of SDL will be available on the releases page on GitHub.
Important Note: this release page may include preview versions of SDL3. This course is using SDL2, so ensure the release you download starts with 2 (for example, 2.30.2)
Once we’ve found the latest version 2 release, we want to download the source code - either as a zip or tar.gz file:

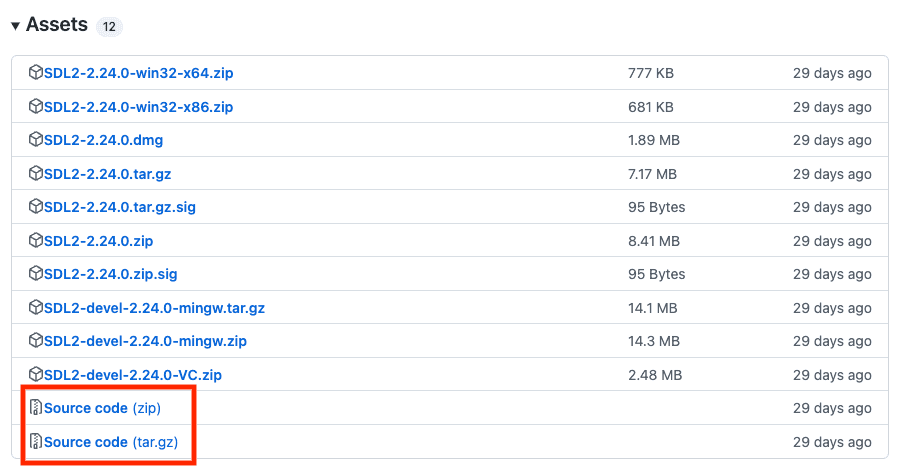
Once downloaded, we can decompress that into any location on our hard drive.
Using Git
Those comfortable with git may want to retrieve the source code by cloning the repository, rather than downloading and extracting a zip file.
Note that the main branch is used for ongoing development of SDL3, which has not been released yet. As such, we should ensure our local working directory is using an SDL2 branch or release tag, such as release-2.30.x:
git clone -b release-2.30.x --depth 1 https://github.com/libsdl-org/SDL.gitBuilding the Source Code
Next, we should navigate to the folder that was decompressed - typically it will be called SDL-main. Within that folder, we should create a new folder, called build.
Then, we should navigate to that build folder within a terminal window:
- In MacOS, we can right-click on the folder and select New Terminal at Folder
- On Windows, we can right-click on the folder and select Open in Terminal
Step 1: configure
Once our terminal is open at the correct location, we can run the command:
../configureTroubleshooting Command Not Found: configure
The main cause of this error is that the terminal window is not in the correct location. We want the build folder to be inside the folder that was decompressed from the GitHub download. Then, we want the terminal to be open inside that folder.
You can check for this using the command pwd - the output is likely to be something like:
pwd
/Users/your-name/Downloads/SDL-main/buildSpecifically, we want the ending of this output to be /build. If that is not the case, ensure you’re creating the correct folder hierarchy and try again
The configure script will scan your system to better understand how SDL2 should be compiled. It should be completed within a few seconds.
Step 2: make
When it is complete, run the command make in the same build location.
makeThis command will take a little longer, as it is compiling SDL2.
Step 3: make install
When the make process completes, we next need to install the software onto our machine. That can be done with the command: sudo make install.
Again, we run this from the same build folder we’ve used for all the previous commands:
sudo make installStep 4: sdl2-config
Finally, when our make install completes, we need to find out where the SDL libraries were installed, so we can use them in our projects.
To do this, we can run the following command, again from the build folder:
sdl2-config --libs --cflagsThis script will report where our SDL libraries were installed, and where the header files are that we will #include in our source files.
The output may look something like below:
-L/usr/local/lib -lSDL2
-I/usr/local/include/SDL2 -D_THREAD_SAFEWe should make a note of this output, as we’ll need it when we want to add SDL to one of our projects.
Summary
In summary, the 4 commands we need to run, in order, from the build folder are:
../configuremakesudo make installsdl2-config --cflags --libs
With this step complete, we have successfully compiled and installed SDL2 in our system, and we’re ready to use it in our projects!
Adding SDL to a Project
Now that SDL is installed on our system, we can add it to our C++ projects. The way we do this depends on what tool we’re using, but the basic idea involves updating our project settings based on the output from the sdl2-config command we ran earlier.
The command outputs two directories:
- The directory where the SDL libraries were installed
- The directory where the SDL header files are, so the compiler can find them when we use the
#includedirective
In my case, the output of sdl2-config --cflags --libs was:
-L/usr/local/lib -lSDL2
-I/usr/local/include/SDL2 -D_THREAD_SAFEThe exact formatting of this output is intended to be used in a command-line environment. But, if we’re using an IDE to configure our project, we can extract the output we need.
For my example output, we can infer that:
- the libraries are available in
/usr/local/lib - the header files are available in
/usr/local/include/SDL2
Your output may have been different, and therefore the paths you need to use may also be different.
Example: Xcode Project
Let’s see an example of using these directories to add SDL to an Xcode project. The process for other IDEs is likely to be quite similar
Step 1: Adding the Library as a Dependency
Within the General tab, under the Frameworks and Libraries section, we can add a library using the + icon.

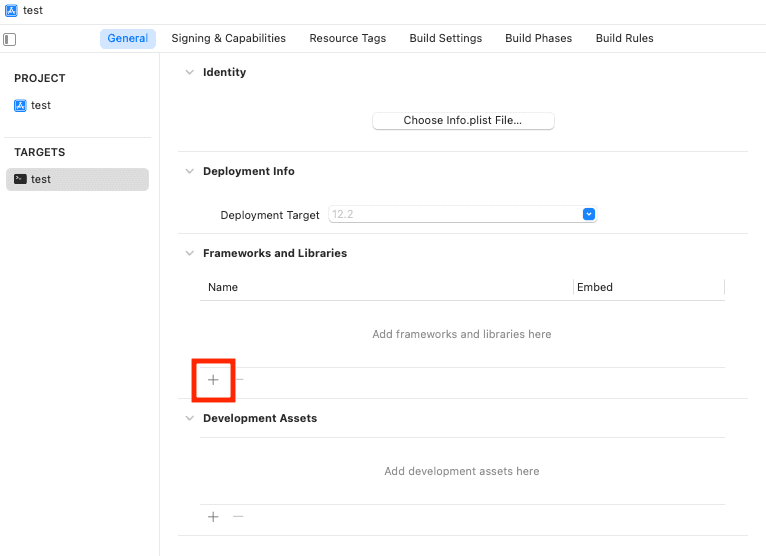
At the bottom of the popup menu, select Add Other, followed by Add Files.
Next, we need to navigate to the location suggested when we ran sdl2-config --libs --cflags earlier.
My output was the following:
-L/usr/local/lib -lSDL2
-I/usr/local/include/SDL2 -D_THREAD_SAFEWe’re interested in the lib folder, so in my case, the location we want is /usr/local/lib. Your location may have been different.
Either way, we need to navigate to the folder listed. The path may be hidden, so you may need to show hidden files (Command + Shift + . on macOS) to see the required path.
Once we’re in the location, we want to select the .dylib file:

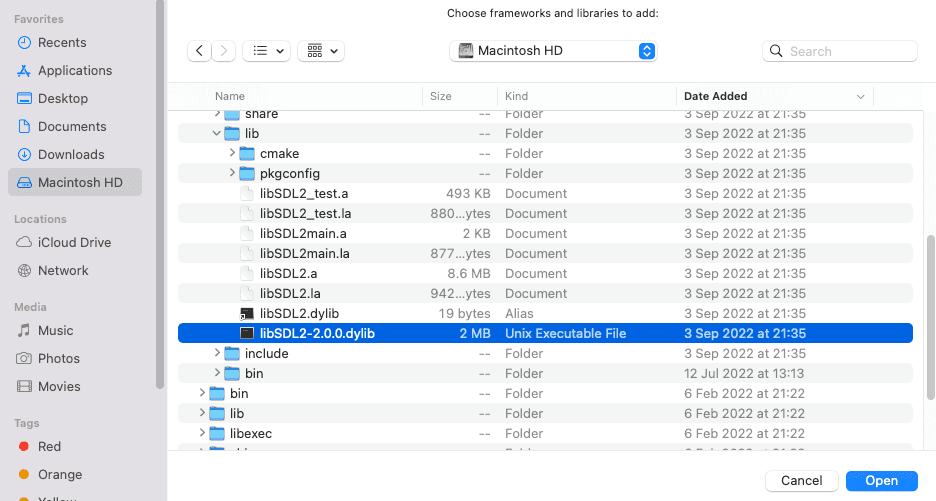
Note that when configuring a project on Windows, the library will have a .dll extension instead.
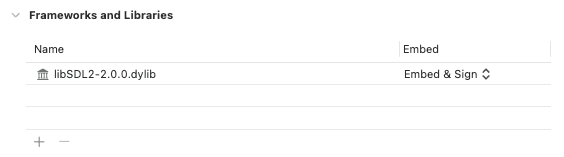
After selecting our library, the Framework and Libraries section of the project settings should be updated:

Step 2: Adding the Library and Header Search Paths
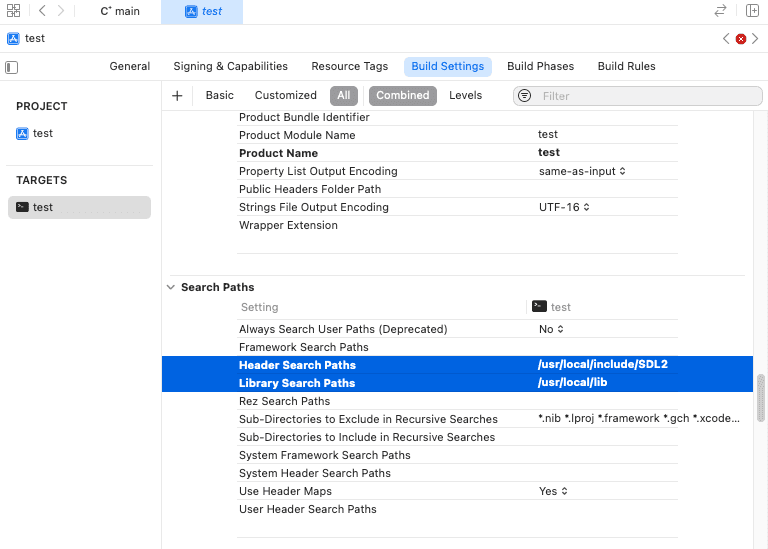
Finally, within the Build Settings tab of our project settings, we need to scroll down to the Search Paths section. There, we need to add the respective SDL locations to the Header Search Paths and Library Search Paths.
Again, these were the paths given by the sdl2-config --libs --cflags command. We need to put the lib path in the Library Search Paths section, and the include path in the Header Search Paths section.
In my case, it looks like this, but your paths may have been different:

With everything set up, we should now be able to #include SDL files in our code, and start using it!
Example: CMake Project
Imagine we have the following cmake project:
cmake_minimum_required(VERSION 3.16)
set(CMAKE_CXX_STANDARD 20)
project(Sandbox VERSION 1.0.0)
add_executable(Sandbox main.cpp)We need to add the SDL library and include directory to this file. Our earlier call to sdl2-config --libs --cflags should have given us two directories we need. For example, my output was:
-L/usr/local/lib -lSDL2
-I/usr/local/include/SDL2 -D_THREAD_SAFEThis means:
- The SDL library is located in
/usr/local/lib - The SDL header files are located in
/usr/local/include/SDL2
Adding the Libraries
To add the library as a project dependency, we need to find it within the library directory provided above. The library will have a .dylib extension in macOS or Linux-based operating systems, and .dll in Windows.
Once we’ve found it, we add it to our CMakeLists.txt. This should come after our project() call, and we should replace Sandbox with the name of our project:
target_link_libraries(
Sandbox PRIVATE /usr/local/lib/libSDL2.dylib
)Adding the Include Directories
Finally, we need to add the include directories to our CMakeLists.txt. Again, this should come after our project() call, and we replace Sandbox with the name of our project:
target_include_directories(
Sandbox PRIVATE /usr/local/include/SDL2
)My Library or Include Directory has Spaces
If one of our paths has spaces in it, we need to wrap it in double quotes:
target_include_directories(
Sandbox PRIVATE "/Dekstop/header files"
)
target_link_libraries(
Sandbox PRIVATE "/my libs/SDL2.dylib"
)I already have a call to target_link_libraries or target_include_directories
That’s not a problem - it’s safe to have multiple calls:
target_include_directories(
Sandbox PRIVATE /some/directory
)
target_include_directories(
Sandbox PRIVATE "/Desktop/header files"
)
target_include_directories(
Sandbox PRIVATE /usr/local/include/SDL2
)You can combine them into a single call if preferred by separating each directory with a space or a line break:
target_include_directories(
Sandbox
PRIVATE
/some/directory
"/Desktop/header files"
/usr/local/include/SDL2
)My complete CMakeLists.txt file looks like this:
cmake_minimum_required(VERSION 3.16)
set(CMAKE_CXX_STANDARD 20)
project(Sandbox VERSION 1.0.0)
add_executable(Sandbox main.cpp)
target_include_directories(
Sandbox PRIVATE
/usr/local/include/SDL2
)
target_link_libraries(
Sandbox PRIVATE
/usr/local/lib/libSDL2.dylib
)Additional Step on Windows: SDL2main.dll
Note that if we’re building our application for Windows, we should additionally add SDL2main as a library. The build scripts should have compiled this and stored it in the same directory as the primary SDL2.dll file:
cmake_minimum_required(VERSION 3.16)
set(CMAKE_CXX_STANDARD 20)
project(Sandbox VERSION 1.0.0)
add_executable(Sandbox main.cpp)
target_include_directories(
Sandbox PRIVATE
/usr/local/include/SDL2
)
target_link_libraries(
Sandbox PRIVATE
/usr/local/lib/SDL2.dll
/usr/local/lib/SDL2main.dll
)SDL needs to perform additional manipulation of our main function to make our program compatible with Windows, and this small additional library provides that functionality.
Creating a Window
The following is a minimalist main.cpp file that will test our setup:
#include <SDL.h>
int main(int argc, char** argv) {
SDL_Init(SDL_INIT_VIDEO);
SDL_Window* Window { SDL_CreateWindow(
"Hello Window", 0, 0, 800, 300, 0
) };
SDL_Event event;
while(true) {
SDL_PollEvent(&event);
}
return 0;
}If everything is working correctly, we’ll see a window pop up when our program runs:

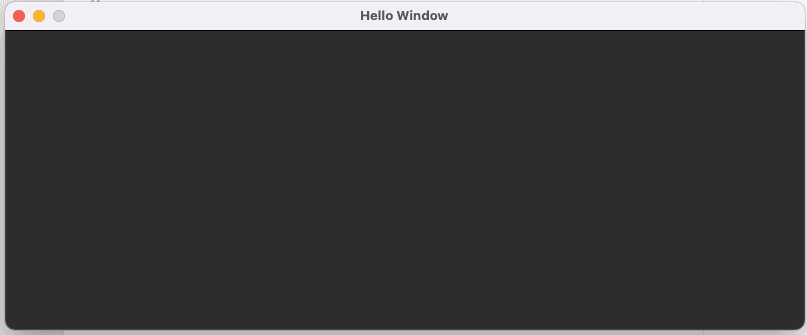
Note that this program does not allow itself to be closed. We’ll add that capability later in the course. For now, we can close it using our IDE if possible, or forcing it to close through our operating system (Ctrl + Alt + Del on Windows or Cmd + Option + Esc on macOS).
Troubleshooting: Unresolved External Symbol SDL_main
This error is generally going to be caused if we define our main function with one of the shorter signatures:
int main() {
// ...
return 0;
}int main(void) {
// ...
return 0;
}Normally, the abbreviated main function would work, but SDL sometimes needs to change the entry point of our program to ensure it is compatible with the platform we’re running it on. The Windows operating system is one such environment where this is necessary,
Therefore, to ensure our code is compatible with SDL, we need to use the full signature for our main function:
int main(int argc, char** argv) {
// ...
return 0;
}Troubleshooting: SDL_main must return a value
This error often indicates that the main function in our code is not explicitly returning a value:
int main(int argc, char** argv) {
// ...
}Normally, this would work - the C++ specification states that if our entry function doesn’t return a value, it’s treated as if it returned 0.
However, in some environments, SDL needs to rename our main function behind the scenes to ensure our program is compatible with the platform it’s running on. As such, our main function needs to adhere to the rules as if it were a regular function, and return an appropriate value:
int main(int argc, char** argv) {
// ...
return 0;
}Building SDL_image and SDL_ttf
SDL2 has a collection of official extensions, that can add further capabilities to our project. In this course, we’ll use SDL_image for handling images, and SDL_ttf for rendering text.
Step 1: Download the Source Code
To add them to our project, we first retrieve the source code for the latest 2.x releases. These are available from GitHub:
- The SDL_image releases are available here: https://github.com/libsdl-org/SDL_image/releases
- The SDL_ttf releases are available here: https://github.com/libsdl-org/SDL_ttf/releases
Step 2: Download External Dependencies
Building the SDL extensions from source involves an additional step that didn’t apply to the base SDL library. The extensions have external dependencies, that we also have to download.
After we unzip the SDL_image and SDL_ttf releases, we’ll see they contain an /external directory. This is where their dependencies need to be inserted. There are some scripts in that directory that can automate this for us.
Linux / macOS users can open a terminal in the external folder, and run the download.sh script:
download.shWindows users can run the Get-GitModules.ps1 script in PowerShell instead:
Get-GitModules.ps1PowerShell Execution Policies
Depending on your environment, attempting to run a PowerShell script may result in an error similar to the following:
Get-GitModules.ps1 cannot be loaded because running scripts is disabled on this system. For more information, see about_Execution_Policies at
https:/go.microsoft.com/fwlink/?LinkID=135170.This is a security feature, as running a PowerShell script from an untrusted source can compromise your security.
To allow PowerShell to run scripts, you will first need to run PowerShell as an administrator. This can be done by finding PowerShell in the start menu, right clicking and selecting Run as Administrator
We can then remove the restriction using the following command:
Set-ExecutionPolicy -ExecutionPolicy UnrestrictedAfter running the Get-GitModules.ps1: script in the external directory, we can then reenable the restrictions as an administrator if preferred:
Set-ExecutionPolicy -ExecutionPolicy DefaultIf removing the restrictions is not an option, we can alternatively open a regular PowerShell window in the external directory, and copy and paste the following command. This will have the same effect as running the Get-GitModules.ps1 script:
foreach ($Line in Get-Content ..\.gitmodules) {
[String] $PRegex = "path\s*=\s*(?<path>.*)"
[String] $URLRegex = "url\s*=\s*(?<url>.*)"
[String] $BRegex = "branch\s*=\s*(?<Branch>.*)"
if ($Line -match $PRegex) {
$Match = Select-String -InputObject $Line `
-Pattern $PRegex
$Path = $Match.Matches[0].Groups[1].Value
}
elseif ($Line -match $URLRegex) {
$Match = Select-String -InputObject $Line `
-Pattern $URLRegex
$URL = $Match.Matches[0].Groups[1].Value
}
elseif ($Line -match $BRegex) {
$Match = Select-String -InputObject $Line `
-Pattern $BRegex
$B = $Match.Matches[0].Groups[1].Value
Write-Host `
"git clone $URL $Path -b $B --recursive" `
-ForegroundColor Blue
git clone $URL ../$Path -b $B --recursive
}
}Using Git
The external dependencies are registered as git submodules, so if we cloned the repository, downloading the dependencies to the correct directory is slightly easier. We can simply use this command in the root of each of our repositories:
git submodule update --init --recursiveStep 3: Build the Library
Once the /external folder is populated with our dependencies, the remaining steps are the same as we covered when building the main SDL library:
- Create a
buildfolder within the downloaded source code, then navigate to that build folder within a terminal - Run
../configure - Run
make - Run
sudo make install - Run
sdl2-config --cflags --libsand make a note of the output
Step 4: Add the Library as a Dependency
Once we’ve built the library, we need to add it as a dependency to our project. How we do that depends on the tools we’re using, but it broadly involves following the same steps we performed when setting up the base SDL2 library.
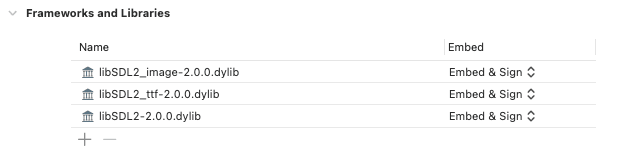
In an IDE such as Xcode, this involves repeating the steps we covered earlier to add a new entry under the Frameworks and Libraries section
After adding SDL2, SDL_image, and SDL_ttf to my Xcode project, the libraries and framework section looks like this:

In a CMake project, this involves adding new entries to our target_link_libraries() call:
target_link_libraries(Sandbox PRIVATE
/usr/local/lib/libSDL2.dylib
/usr/local/lib/SDL2_image.dylib
/usr/local/lib/SDL2_ttf.dylib
)Step 5: Update the Search Paths
Finally, we need to update our search paths so our project can find the header files we #include to access the library functions.
Note that the header files may be installed in the same location as the base SDL2 header files, so we may not need to make any further changes in this step.
In my case, make install placed the SDL_image and SDL_ttf libraries and headers into the same folders as the base SDL2 library and headers, so no additional search paths were required:
In a CMake project, the target_include_directories call of our CMakeLists.txt could also remain the same:
target_include_directories(
Sandbox PRIVATE
/usr/local/include/SDL2
)If our new header files were located elsewhere, we’d simply need to expand the search list in our IDE, or add additional include directories in our CMakeLists.txt:
target_include_directories(
Sandbox PRIVATE
/usr/local/include/SDL2
/usr/local/include/SDL2-image
/user/local/include/SDL2-ttf
)Step 6: Compiling and Running The Program
After completing these 5 steps for the SDL2, SDL_image, and SDL_ttf, we can test that everything is working correctly by compiling and running the following program:
#include <SDL.h>
#include <SDL_image.h>
#include <SDL_ttf.h>
int main() {
SDL_Init(SDL_INIT_VIDEO);
IMG_Init(IMG_INIT_PNG);
TTF_Init();
SDL_Window* Window { SDL_CreateWindow(
"Hello Window", 0, 0, 800, 300, 0
) };
SDL_Event event;
while(true) {
SDL_PollEvent(&event);
}
}If the previous program fails to compile, it’s generally going to be one of two problems - either the compiler can’t find the files we’re trying to #include, or the linker can’t find the symbols we’re attempting to use, such as SDL_Init().
We can generally infer which problem we’re dealing with based on the error messages. The inability to find an include file usually generates a descriptive error message, whilst linker errors will typically use terminology like "undefined symbol".
Troubleshooting Compiler Error: Cannot Find Header File
To address this, we need to read the error message and understand which #include directive is causing the problem.
If it is #include SDL.h, for example, we need to examine the search paths in our IDE settings, or the argument to target_include_directories() in CMake, and ensure that SDL.h file is in one of those locations.
If it isn’t, we need to update our search paths (or target_include_directories() call) to include the path where SDL.h is located.
Troubleshooting Linker Error: Undefined Symbol
If our program is getting past the compilation stage, that means each of our individual source code files is working as intended. However, if we get a linker error, that typically means that one of the source code files is trying to use a symbol (for example, a variable or function) that cannot be found.
If the problematic symbol is from SDL, such as SDL_Init(), that means the linker can’t find the SDL library. Similarly, if it’s IMG_Init, it means the linker can’t find the SDL_image library.
Once we’ve identified which library is missing, we need to consult our project settings (or target_link_libraries() in CMakeLists.txt) to ensure that the library is added. If it is there, we need to ensure the path is correct.
If we’re trying to link to /usr/local/lib/libSDL2.dylib for example, and that file does not exist, we need to move it there, or update the path to correctly point to the file.
Troubleshooting Runtime Error: Cannot Find Library
If the previous program compiles successfully, but crashes as soon as we run it, that is likely caused by an inability to find the .dylib file, or the .dll file on Windows.
The make install command attempts to place the library in a location where the operating system can find it at run time, but it might not always get it right.
The safest way to ensure the platform can find the library when our program is running is to place the library in the same location as the executable file we’re building.
If we’re running the program through an IDE and we’re not sure where the executable file is, we can often find it by looking closely at the compiler output. In the following example, the second line reveals the compiler is placing our executable SDL2.exe in the C:\SDL2\x64\Debug\ directory.
Build started: Project: SDL2, Config: Debug x64
SDL2.vcxproj -> C:\SDL2\x64\Debug\SDL2.exe
Build: 1 succeeded
Build took 01.580 secondsIf we were to place our .dylib or .dll file in that same location, the operating system would be sure to find it, and run our program successfully.
Summary
The key steps in building SDL2 from source involve downloading the code from GitHub, running the configuration and build scripts, and linking the compiled libraries to your project. With SDL2 and its extensions set up, you'll be ready to start developing! Key takeaways:
- SDL2 can be built from source on Linux and macOS using the provided configuration and build scripts
- SDL_image and SDL_ttf extensions add support for images and fonts
- Linking the compiled SDL2 libraries to your project requires specifying the library and include paths
- Troubleshooting common compilation, linking, and runtime errors is essential for a smooth development experience
Was this lesson useful?

Ryan McCombe
Building SDL2 from Source (GCC and Make)
This guide walks you through the process of compiling SDL2, SDL_image, and SDL_ttf libraries from source

Game Dev with SDL2
Learn C++ and SDL development by creating hands on, practical projects inspired by classic retro games