Preprocessor Definitions
Explore the essential concepts of C++ preprocessing, from understanding directives to implementing macros
When we build our code, it is not immediately compiled. Instead, it is first sent to the preprocessor.
The preprocessor is a behind-the-scenes tool. It modifies our code based on special instructions we insert into our source files, known as preprocessor directives.
The preprocessor does not modify our original code. It generates temporary, intermediate copies of our files, and modifies those. Therefore, we normally don't see the modifications the preprocessor does - it happens behind the scenes.
Once the preprocessor has finished generating these temporary copies, with all the changes based on the directives we supply, they are sent off for compilation.
In this lesson, we'll explore how to use these directives to make our projects more flexible and efficient.
Preprocessor Directives
We can give instructions to the preprocessor by including specific instructions in our source code files. These instructions are called directives and, when the preprocessor encounters one, it reacts accordingly.
These preprocessor directives are very powerful - they are a programming language in their own right. They have variables, conditional statements, function-like syntax, and more.
These preprocessor directives give us a range of new abilities, which we'll cover in this chapter. They include:
- Generating different versions of our software from the same source code.
- Defining reusable blocks of code, which we can then quickly add to our files
- Including code others have written, sometimes called library code, to let us build more advanced features quickly
- Splitting our project across multiple files, to keep everything organized.
Test your Knowledge
The Preprocessor
What is the preprocessor?
Conditional Inclusion
A common use of the preprocessor is to determine what code is included in the software we build.
For example, we often want our software to behave differently when run by a developer, compared to a real-world user. To do this, we create different versions, or releases, of our software.
The development version might show a lot more information to help us debug issues. In the releases we use for demos, or ultimately send to customers, all of that additional code is stripped out.
We can do that by wrapping the code we want to conditionally include between #ifdef and #endif directives:
#include <iostream>
using namespace std;
int main(){
cout << "Hello There";
#ifdef DEVELOPMENT_BUILD
cout << "\nThis is a developer build";
#endif
}In this example, DEVELOPMENT_BUILD is a preprocessor definition that we can choose to set or not. We show how to set this in the next section.
If we set DEVELOPMENT_BUILD, our output will be this:
Hello There
This is a developer buildIf we don't, our program will output:
Hello ThereThe opposite of #ifdef is #ifndef. This will include code if a flag is not defined:
#include <iostream>
using namespace std;
int main(){
cout << "Hello There";
#ifndef DEVELOPMENT_BUILD
cout << "\nThis is a public build";
#endif
}We can also use #elif (which means "else if") and #else:
#include <iostream>
using namespace std;
int main(){
cout << "Hello There";
#ifdef DEVELOPER_BUILD
cout << "\nThis is a developer build";
#elif DEMO_BUILD
cout << "\nThis is a demo build";
#else
cout << "\nThis is a public build";
#endif
}Setting Preprocessor Definitions
How we set a preprocessor definition, such as our DEVELOPMENT_BUILD example, depends on our IDE.
In Visual Studio, we can set it by selecting Project from the top menu bar, and visiting Project -> Properties -> C/C++ -> Preprocessor -> Preprocessor Definitions
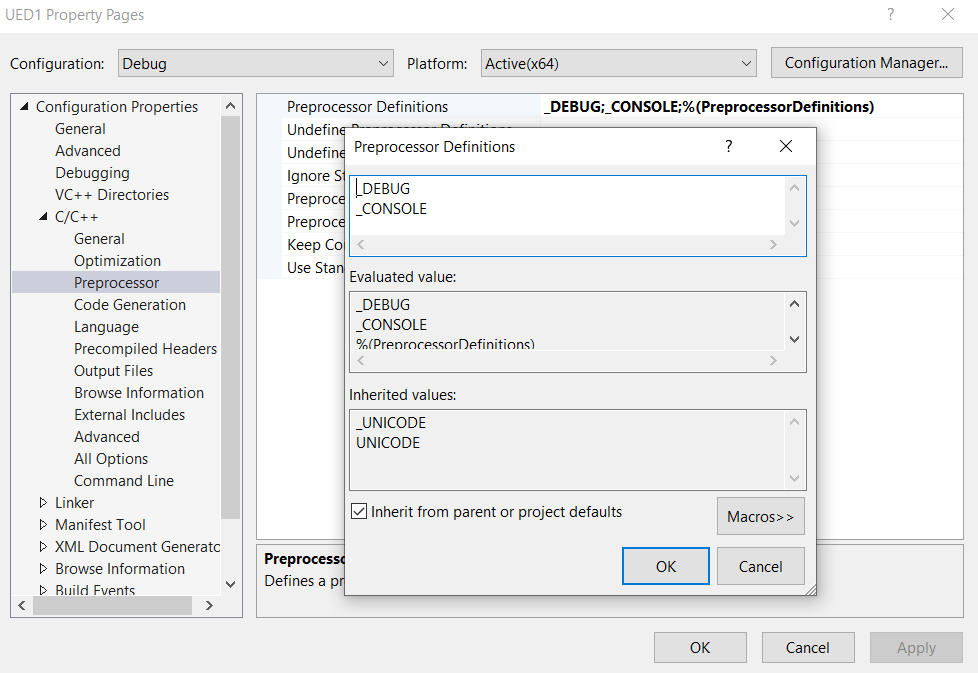
Preprocessor definitions are part of Visual Studio's release configuration system. Within Visual Studio, we can define multiple configurations, and two are usually provided by default - Debug and Release.
We can create more configurations as needed. Each configuration can have its own set of preprocessor definitions (and other settings), and we can then switch between configurations quickly through the user interface.
Other IDEs commonly have similar options. In projects that use CMake, we can set preprocessor definitions using the add_compile_definitions() or target_compile_definitions() functions:
add_compile_definitions(
DEVELOPER_BUILD
ANOTHER_DEFINITON
YET_ANOTHER
)add_executable(MyProgram "main.cpp")
target_compile_definitions(
MyProgram PUBLIC
DEVELOPER_BUILD
ANOTHER_DEFINITON
YET_ANOTHER
)Test your Knowledge
Conditional Inclusion
What is the purpose of the #ifdef, #ifndef, #elif, #else, and #endif preprocessor directives?
The #define Directive
As we saw in the previous section, if we want to provide a preprocessor definition across our whole project, we typically do it through our build tools.
But we don't have to - we can just define things within our source files. For example, we can define a flag like this:
#define DEVELOPMENT_BUILDIn files where this directive exists, the effect is equivalent to having set it through our tooling:
#define DEVELOPMENT_BUILD
#include <iostream>
using namespace std;
int main(){
cout << "Hello There";
#ifdef DEVELOPMENT_BUILD
cout << "\nThis is a developer build";
#endif
}Hello There
This is a developer buildSome things to note about #define are:
- The things we define with this directive are typically called "macros" - eg,
DEVELOPMENT_BUILDis a macro - To distinguish macros from other C++ code, we typically use all uppercase names with
_as a separator - We do not end macros with a semi-colon - they are not C++ statements
- Macros are typically defined at or near the top of files. A macro is available from the line it was defined until the end of the file.
Test your Knowledge
Macro Definitions
How can we define a macro called IS_DEMO that we could use with an #ifdef directive?
Text Replacement Macros
The utility of macros goes beyond simple boolean defined or not-defined logic.
Text substitution macros allow us to #define blocks of code, and then easily insert those blocks of code elsewhere in our project as needed.
The following sections can make people a little nervous, but don't worry. It's fairly uncommon that we need to create text replacement macros. As a beginner, we're much more likely to be using these macros than defining them.
So if the following examples are a bit uncomfortable, just treat them as demonstrations of the types of things that are possible with macros.
Below, we create a DEFINE_INT macro. This will replace any instances of DEFINE_INT in our file with the code to create an integer variable called MyInt with a value of 4.
#define DEFINE_INT int MyInt{4};
#include <iostream>
using namespace std;
struct MyType {
DEFINE_INT
};
int main(){
DEFINE_INT
cout << "MyInt: " << MyInt << '\n';
MyType MyObject;
cout << "MyObject.MyInt: " << MyObject.MyInt;
}MyInt: 4
MyObject.MyInt: 4Below, we define a macro for defining functions called Greet(). We then use this macro to add a member function to our MyType struct, as well as a free function defined above our main function.
Preprocessor definitions can span multiple lines by using the \ character as a line break:
#define DEFINE_GREET \
void Greet(){ \
cout << "Hello There\n"; \
};
#include <iostream>
using namespace std;
struct MyType {
DEFINE_GREET
};
DEFINE_GREET
int main(){
Greet();
MyType MyObject;
MyObject.Greet();
}Hello There
Hello ThereFunction-Like Macros
Macros can also accept arguments to use within their replacement text. This can make them behave somewhat like functions.
The following version of the macro accepts two arguments to be used in the replacement:
#define DEFINE_GREET(Greeting, Name) \
void Greet() { \
cout << Greeting << ", I am " << Name \
<< "\nNice to meet you!\n\n"; \
};
#include <iostream>
using namespace std;
struct Goblin {
DEFINE_GREET("Howdy", "a Goblin object")
};
DEFINE_GREET("Hi there", "a free function")
int main(){
Greet();
Goblin SomeGoblin;
SomeGoblin.Greet();
}Hi there, I am a free function
Nice to meet you!
Howdy, I am a Goblin object
Nice to meet you!Again, don't worry if this all looks a little weird. We're unlikely to need to write code like this as a beginner. It's more important at this stage to understand what macros are and how to use them.
A common way to identify when you're using a macro is that they tend to have an UPPERCASE_NAME, whilst developers tend to name their regular C++ constructs using either PascalCase or snake_case:
PROBABLY_A_MACRO("Hello World")
ProbablyAFunction("Hello World");
probably_a_function("Hello World");For example, Unreal Engine provides a lot of utilities in the form of macros. Logging to the terminal in that ecosystem is done using two function-like macros, UE_LOG and TEXT, alongside regular C++ symbols such as LogTemp and Error:
UE_LOG(LogTemp, Error, TEXT("Hello!"))Summary
In this lesson, we've explored the essentials of the preprocessor. We covered:
- Preprocessor Role: Explored the preprocessor's function in preparing code for compilation.
- Conditional Inclusion: Covered the use of
#ifdef,#ifndef, and related directives for compiling code conditionally. - Macro Definitions: Discussed defining and using macros to simplify repetitive tasks and code management.
- Text Replacement and Function-Like Macros: Introduced advanced macro uses, used for text replacement within our code.
The #include Directive
Discover how the #include directive helps us include library features and split our project across multiple files.