Bitwise Operators and Bit Flags
Unravel the fundamentals of bitwise operators and bit flags in this practical lesson
Behind the scenes, every variable and object we create when programming is stored in binary. That is a series of binary digits (bits), where each bit can have one of only two possible values. The possible values are on or off - typically represented by 1 or 0
Generally, we don't need to work on this level. Our compilers and interpreters just abstract this away so we're acting on higher-level objects, like numbers and strings.
But, there are some use cases where working at the level of individual bits unlocks some new possibilities for us. We'll introduce those in this lesson.
Fixed Width Integers
Whenever we're selecting a data type that we'll be working with at the level of individual bits, it is common to choose a fixed-width unsigned integer. In this lesson, we'll use uint8_t, which is available by including <cstdint>.
Fixed-width integers behave in the same way as int. The key difference is that the language specification prescribes exactly how "wide" (that is, how many bits) are used in a fixed-width type.
The width of a basic int can be different on different platforms - it might be 16 bits, 32 bits, or 64 bits, so we generally don't use it in scenarios where we need fine-grained control at the level of individual bits.
uint8_t uses 8 bits on all platforms. Numerically, this means it supports values in the range 0-255.
Below, we show the underlying binary representation of these numbers using , which allows us to output the binary form of an integer using the :b format specifier.
In the following example, we extend this to :08b, which represents three things:
b: We want our output to be in binary8: We want our output to be 8 characters wide0: If outputting the value requires fewer than 8 characters, prepend as many'0'characters as needed to reach the target width
It looks like this:
#include <cstdint>
#include <format>
#include <iostream>
int main() {
uint8_t i{0};
while (true) {
std::cout
<< std::format("\n{0:<3} = {0:08b}", i++);
// Stop when i wraps around to 0
if (i == 0) break;
}
}This program outputs the numbers from 0-255 as well as their bits, which we've truncated below:
0 = 00000000
1 = 00000001
2 = 00000010
3 = 00000011
4 = 00000100
[...]
252 = 11111100
253 = 11111101
254 = 11111110
255 = 11111111Bitwise Operators
The operators that work on individual bits are called bitwise operators. We'll introduce the three most useful bitwise operators in this lesson, which closely relate to boolean logic.
We previously saw how the || and && operators can be used to combine booleans in different ways.
These are called the "logical OR" and "logical AND" operators. They have their bitwise counterparts, which combine sequences of bits:
- the bitwise OR operator - C++ and many other programming languages represent this by a single
| - the bitwise XOR (exclusive or) operator - typically represented by a caret:
^ - the bitwise AND - typically represented by a single
&
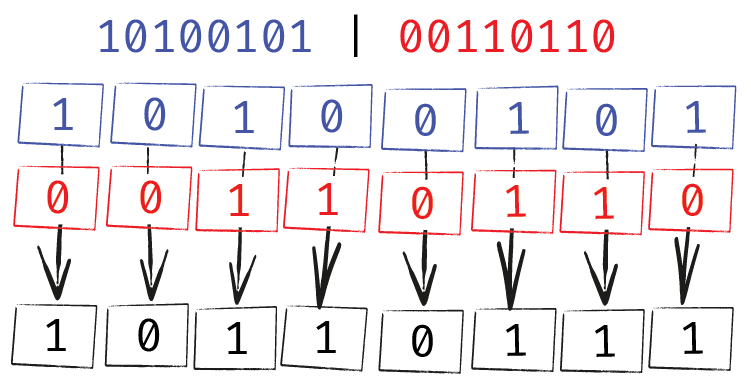
The Bitwise OR Operator: |
The bitwise OR operator looks at the binary representation of its two operands and returns a new object of the same type. Every bit in this new object is set to 1 if either of the operands had a 1 in that same position.
It's easier to demonstrate with a diagram:
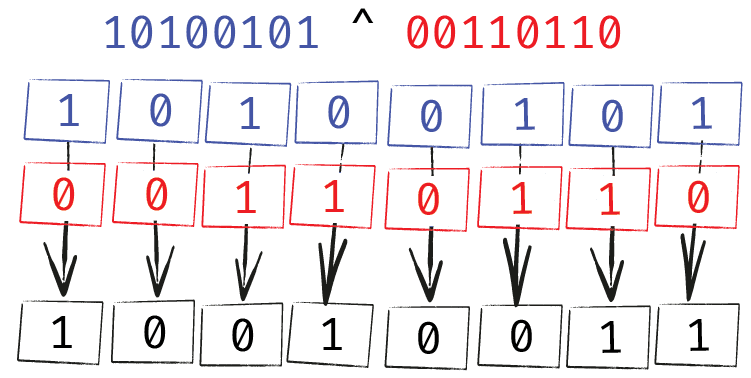
The Bitwise XOR (exclusive or) Operator: ^
XOR works very similarly to OR. The only difference is that, when both operands had a 1 in the same position, the result of XOR will have a 0 in that corresponding position.
Another way to think of XOR is that it will have 1 in each position where the operands have different values.
Here's an example:
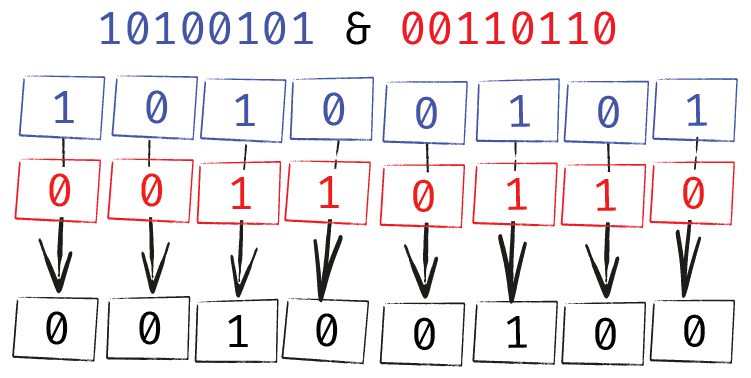
The Bitwise AND Operator: &
Similarly, the bitwise AND operator looks at the binary representation of its two operands and returns a new object of the same type. Every bit in this new object is set to 1 if both of the operands have a 1 in that same position.
Here's an example:
Use Case: Bit Flags
In the next course, we're going to be using the SDL library, which makes heavy use of bitwise operations in its API. For example, it allows us to create a window and gives us a range of options on how that window should behave.
These are all flags that we can enable or disable, covering things like:
- Is the window resizable?
- Is the window full-screen?
- Is the window movable?
- Is it always on top of other windows?
Without bitwise operators, there would be two main ways we would create this API. We could just set our function up to receive a collection of booleans:
CreateWindow(false, true, true, false, true);But this is not a particularly good design, as we can't easily read the behavior. What flags are we setting to be true here? Our IDE might help us out if we hover over the arguments, but that's extra effort, and code isn't always read in an IDE.
Alternatively, we could gather all of our booleans into a user-defined type, and then pass an object of that type to our function:
struct WindowSettings {
bool Fullscreen{false};
bool Resizable{false};
bool Movable{false};
bool AlwaysOnTop{false};
bool Closable{false};
};
void CreateWindow(const WindowSettings& Flags) {
// ...
}
int main(){
WindowSettings Settings;
Settings.Resizable = true;
Settings.Movable = true;
Settings.Closable = true;
CreateWindow(Settings);
}This makes it clearer what flags we're setting to true, but is quite verbose, and may have a performance overhead.
The best approach for this is often to use bit flags, and bitwise operators can help us implement them.
Using Bitwise Operators for Bit Flags
With bitwise operators, we can create an API that looks like this:
CreateWindow(RESIZABLE | MOVABLE | CLOSABLE);There are many ways to make this work. The standard library comes with a std::bitset class to solve this problem. Many others use an elaborate solution that involves enums.
Here, we'll do a basic, raw implementation using integers, so we can fully understand what is going on at a deep level.
The first step is to choose a numeric type for our flags. We want our type to have enough bits to cover every possible flag. A uint8_t has 8 bits, which can accommodate 8 flags.
We don't need to use every bit - if we just need 5 flags, we can still use an 8-bit type - we simply ignore 3 of the bits.
Next, we need to choose a distinct value for each of our flags. Given we're using an integer, each value will be a number.
Each number we choose needs to have a single bit set to 1, with all the others being 0. The pattern that achieves this starts at 1, and each subsequent number is double the previous.
That is, 1, 2, 4, 8, 16, 32, and so on. The following program demonstrates this:
#include <cstdint>
#include <format>
#include <iostream>
int main() {
for (uint8_t i:{1, 2, 4, 8, 16, 32, 64, 128}){
std::cout
<< std::format("{0:<3} = {0:08b}", i)
<< '\n';
}
}1 = 00000001
2 = 00000010
4 = 00000100
8 = 00001000
16 = 00010000
32 = 00100000
64 = 01000000
128 = 10000000Next, we give each number in our sequence a descriptive name, which will be the flag it represents.
Typically we'd also include the number 0, which has every bit set to 0. We use this to represent the absence of any flags - that is, the equivalent of everything being false:
#include <cstdint>
const uint8_t NONE{0}; // 00000000
const uint8_t RESIZABLE{1}; // 00000001
const uint8_t MOVABLE{2}; // 00000010
const uint8_t CLOSABLE{4}; // 00000100
const uint8_t FULLSCREEN{8}; // 00001000
const uint8_t ALWAYS_ON_TOP{16}; // 00010000This doubling pattern can continue if we need more flags. If we need more than 8 flags, we'd need to switch to a type that has more than 8 bits. For example, uint16_t, uint32_t, and uint64_t are also available.
We can now combine our flags in any way we want using the bitwise OR operator |. We show some examples below, where every flag we include in our bitwise expression sets the corresponding bit in our uint8_t to 1:
#include <cstdint>
#include <format>
#include <iostream>
const uint8_t NONE{0};
void CreateWindow(uint8_t flags = NONE) {
std::cout <<
std::format("\nFlags: {0:08b}", flags);
}
int main() {
// Set one bit to 1
CreateWindow(CLOSABLE);
// Set two bits to 1
CreateWindow(FULLSCREEN | ALWAYS_ON_TOP);
// Set three bits to 1
CreateWindow(MOVABLE | CLOSABLE | RESIZABLE);
}Flags: 00000100
Flags: 00011000
Flags: 00000111Checking if a Bit Flag Was Set
In the function that receives our bit flags, we can determine which flags were set using the bitwise & operator. For example, to check if the CLOSABLE flag was set, we can do this:
#include <cstdint>
#include <format>
#include <iostream>
const uint8_t NONE{0};
void CreateWindow(uint8_t flags = NONE) {
std::cout <<
std::format("\nFlags: {0:08b}", flags);
if (flags & CLOSABLE) {
std::cout << "\nCLOSABLE was set\n";
} else {
std::cout << "\nCLOSABLE was NOT set\n";
}
}
int main() {
CreateWindow(CLOSABLE);
CreateWindow(FULLSCREEN | ALWAYS_ON_TOP);
CreateWindow(MOVABLE | CLOSABLE | RESIZABLE);
}Flags: 00000100
CLOSABLE was set
Flags: 00011000
CLOSABLE was NOT set
Flags: 00000111
CLOSABLE was setIt's likely to be unclear why this works, but it's important to understand what flags & CLOSABLE is doing.
The CLOSABLE variable sets a single bit to 1. Specifically, CLOSABLE is 00000100 - that is, the 3rd bit from the right is set to 1
Therefore, given how the bitwise & works, there are only two possible outcomes when one of the operands is 00000100:
- If the other operand -
flagsin this case - also has a1in that position, the&operator will return00000100. This is equivalent to the numeric value4.4, and any other non-zero number, istruewhen treated as a boolean - If the other operand -
flagsin this case - has a0in that position, the&operator will return00000000. This is equivalent to the numeric value0.0isfalsewhen treated as a boolean
The net effect of all of this is that the flags & CLOSABLE expression will be truthy only if flags has its third bit from the right set to 1.
An expression like MOVABLE | CLOSABLE | RESIZABLE generates a value with that bit set to 1, whilst the value returned from an expression like FULLSCREEN | ALWAYS_ON_TOP will have the bit set to 0
Full Example
Below, we've hooked up all of our flags. This lets us provide a CreateWindow() function that is quite elegant to use and, within that function, we can react as needed to whatever flags the caller has selected:
#include <cstdint>
#include <iostream>
const uint8_t NONE{0};
void CreateWindow(
std::string Title, uint8_t flags = NONE
) {
std::cout << Title << " has these flags:";
if (flags == NONE) {
std::cout << " NONE";
}
if (flags & RESIZABLE) {
std::cout << " RESIZABLE";
}
if (flags & MOVABLE) {
std::cout << " MOVABLE";
}
if (flags & CLOSABLE) {
std::cout << " CLOSABLE";
}
if (flags & FULLSCREEN) {
std::cout << " FULLSCREEN";
}
if (flags & ALWAYS_ON_TOP) {
std::cout << " ALWAYS_ON_TOP";
}
std::cout << '\n';
}
int main() {
CreateWindow("Window A");
CreateWindow("Window B", FULLSCREEN);
CreateWindow("Window C", RESIZABLE | MOVABLE);
}Window A has these flags: NONE
Window B has these flags: FULLSCREEN
Window C has these flags: RESIZABLE MOVABLESummary
In this lesson, we explored bitwise operators, bit flags, and how to implement them in our own API designs
Key Takeaways
- Understanding Bitwise Operators: Learned about the bitwise OR, AND, and XOR operators, and how they manipulate individual bits in binary representations of integers.
- Fixed Width Integers: Gained insights into using fixed-width integers like
uint8_tfor predictable, platform-independent bit manipulations. - Bit Flags in Practice: Explored the practical application of bitwise operators for managing bit flags, a common technique in configuring settings or options compactly.