Switch Statements
Learn an alternative way to write conditionals, which is often used when we want to take different paths based on a specific value
In this lesson, we focus on switch statements. These are another way to write conditional logic. acting as an alternative to the if, else, and else if statements we covered in the
This section will guide you through:
- Understanding Switch Statements: Grasp how switch statements offer an alternative to traditional if-else chains, especially when dealing with specific variable values.
- Implementing Cases and Breaks: Learn to use
caseandbreakkeywords to control the flow of your program. - Exploring Fallthrough Logic: Discover how fallthrough works in switch statements and how it can be both useful and tricky.
- Utilizing the Default Case: Find out how the
defaultcase acts as a catch-all for any unhandled cases.
By the end of this lesson, you'll be equipped to use switch statements effectively in your programs.
An Example Switch Statement
Switch statements are best introduced by an example so below, we have a program that logs out different strings based on the value of an integer Day variable:
#include <iostream>
using namespace std;
int Day{3};
int main(){
switch (Day) {
case 1: // Is Day == 1?
cout << "Monday";
break;
case 2: // Is Day == 2?
cout << "Tuesday";
break;
case 3: // Is Day == 3?
cout << "Wednesday";
break;
}
}In this example, we're switching on the value of Day. Its value is 3, so we trigger the case 3: scenario, logging out Wednesday:
WednesdayFallthrough
Sometimes, we want behaviour to trigger if our variable has one of multiple values, somewhat similar to what we can implement using the boolean || operator.
In the following switch statement, we log out "Weekend" if the value of Day is either 6 or 7:
#include <iostream>
using namespace std;
int Day{6};
int main(){
switch (Day) {
case 1:
cout << "Monday";
break;
case 2:
cout << "Tuesday";
break;
case 6:
case 7:
cout << "Weekend";
}
}In this program, the value of Day was 6, so we got the expected output:
WeekendThis is an example of fallthrough, a quirky characteristic of switch statements. In this case, the fallthrough was desired, but it's often a source of bugs.
Preventing Fallthrough with break
Fallthrough is the default behavior of switch statements, but we can prevent it through the inclusion of the break keyword, as we had in our initial example. Let's take a look at what happens if we don't include break statements:
#include <iostream>
using namespace std;
int Day{1};
int main(){
switch (Day) {
case 1:
cout << "Monday";
break;
case 2:
cout << "Tuesday";
break;
case 3:
cout << "Wednesday";
break;
}
}MondayTuesdayWednesdayOnce a case statement is triggered, every subsequent case statement is also triggered, until we either reach the end of the switch statement or encounter a break instruction.
In this scenario, because the first case was true (Day == 1) and we have no break statements, the code in every case was executed.
Fallthrough behavior is rarely useful, but it remains the default implementation of switch statements in C++, and most other programming languages.
So, we should be mindful of it and generally remember that, in most scenarios, we'll need to add breaks to our switch statements.
The [[fallthrough]] Attribute
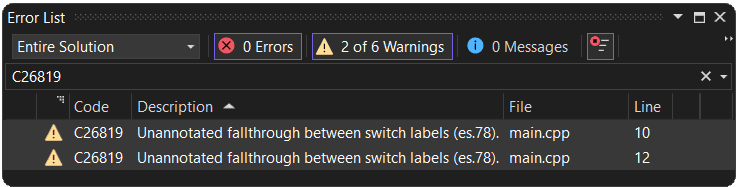
Because the fallthrough behavior is rarely useful and a frequent source of bugs, most modern compilers will issue a warning when they encounter it.
Compilers use warnings to notify us when they detect something in our code that is technically valid, but unusual and potentially problematic.
IDEs will typically present compiler warnings somewhere on their UI after our program compiles. In Visual Studio, we can see warnings by expanding the View menu from the top menu bar, and selecting Error List
In scenarios where we want to use fallthrough, we can add a [[fallthrough]] statement:
#include <iostream>
using namespace std;
int Day{1};
int main(){
switch (Day) {
case 1:
cout << "Monday";
[[fallthrough]];
case 2:
cout << "Tuesday";
[[fallthrough]];
case 3:
cout << "Wednesday";
}
}This does not change the behaviour of our program, but it informs the compiler that we haven't forgotten to add a break statement here. It clarifies to the compiler (and anyone reading our code) that we're using fallthrough behaviour intentionally, so it doesn't need to warn us about a potential bug.
Syntax that is wrapped in [[ and ]], such as [[fallthrough]], are called attributes. We cover attributes in a dedicated lesson later in the course.
Adding a default Case
Switch statements can have a default case, which is activated in all scenarios unless a previously activated case triggered a break:
#include <iostream>
using namespace std;
int Day{3};
int main(){
switch (Day) {
case 1:
cout << "Monday";
break;
case 2:
cout << "Tuesday";
break;
default:
cout << "Something else";
}
}Something elseTest your Knowledge
Using switch Statements
What will the following program output?
#include <iostream>
using namespace std;
int Day{1};
int main(){
switch (Day) {
case 1:
cout << "Monday";
case 2:
cout << "Tuesday";
break;
default:
cout << "Something else";
}
}Summary
Here's a quick recap of what we've covered:
- Switch Statement Basics: You've learned how switch statements provide a streamlined way to handle multiple conditions based on the value of a variable.
- The
caseandbreakKeywords: We explored how to usecaseandbreakto control the flow within switch statements. - Understanding Fallthrough: You now understand how fallthrough works and its potential as both a useful feature and a source of bugs.
- The
defaultCase: We discussed thedefaultcase as a catch-all mechanism.
Function return Statements
Allow our functions to communicate with their caller by returning values when they complete